HAT Brick


Features
- Raspberry Pi HAT with standard HAT form factor
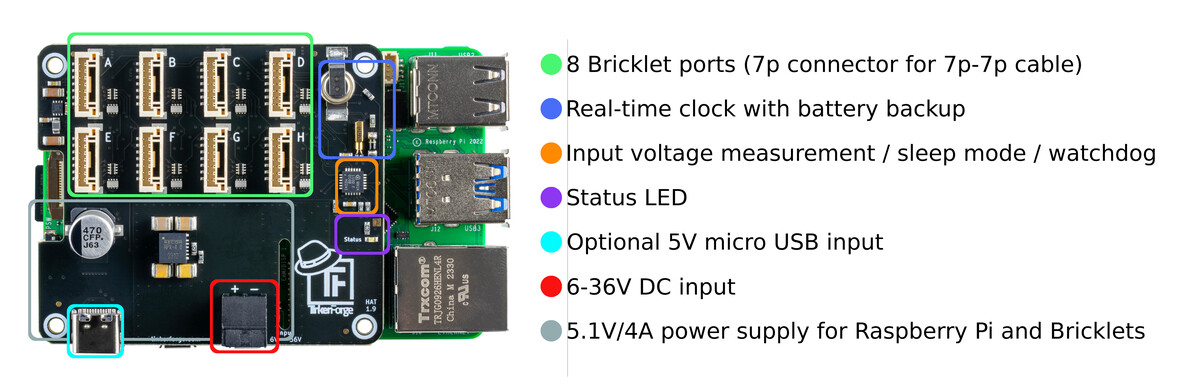
- Eight ports for Bricklets
- Onboard 5.2V power supply (6V-36V input, up to 4A)
- Measures USB and DC supply voltages
- Adds battery backed real-time clock to Raspberry Pi
- Adds low power sleep mode and Raspberry Pi watchdog
Description
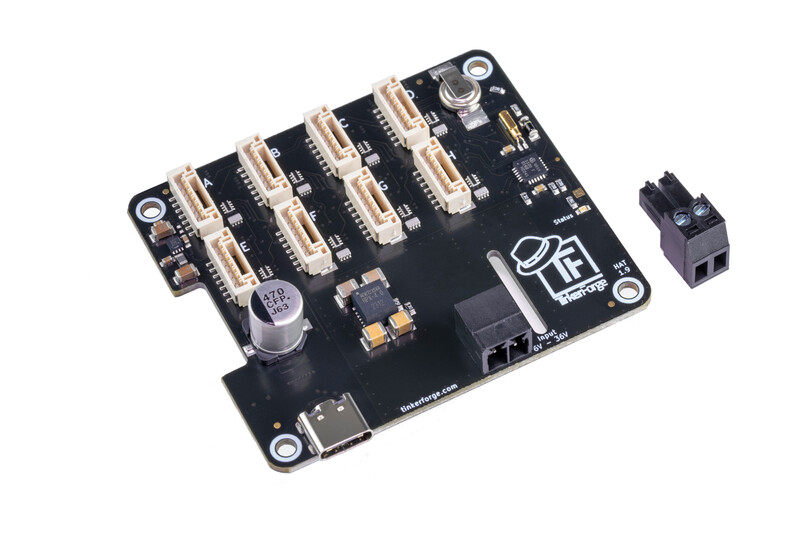
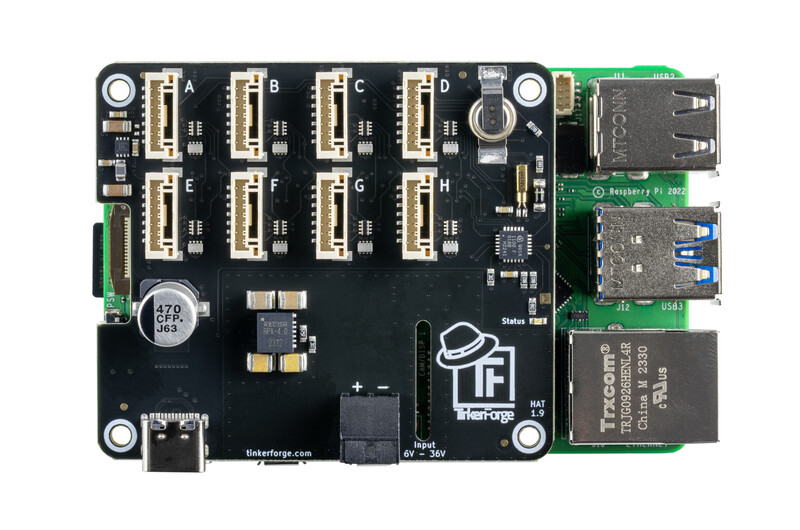
The HAT Brick is a Raspberry Pi HAT with the standard Raspberry Pi HAT form factor. The Brick follows the HAT specification and will automatically and without any changes work with Raspbian.
With the HAT Brick you can connect up to eight Bricklets to your Raspberry Pi.
Note
The HAT Brick provides Bricklet ports with 7 poles each. You can connect Bricklets with a 7 pole to 7 pole cable to it. Only Bricklets with 7 pole Bricklet ports are supported.
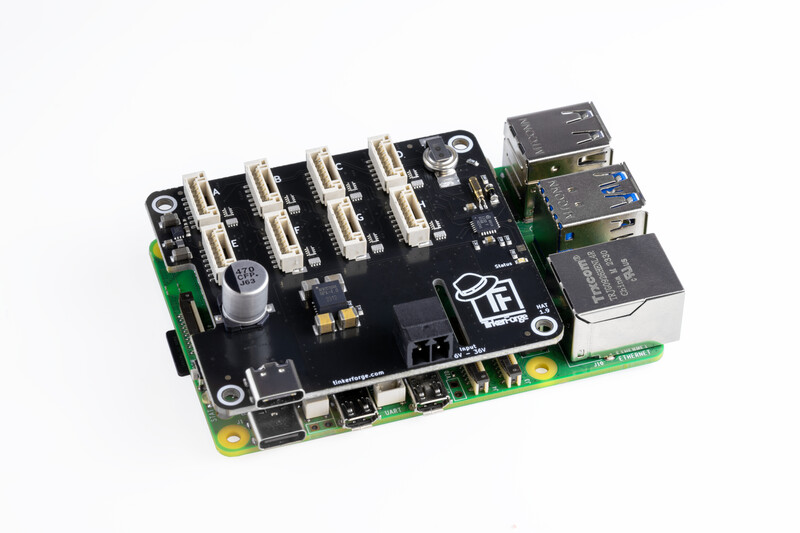
You can power the Raspberry Pi through the HAT Brick by an external 6V-36V DC power supply. The onboard power supply will be able to provide stable 5V, even under heavy load. You can power the Raspberry Pi, connected Bricklets and USB devices connected to the Raspberry Pi's USB connectors as the HAT Brick delivers a slightly increased voltage of 5.2V to compensate additional load.
You can still power the HAT/Raspberry Pi through USB-C. In that case you have to ensure that the HAT Brick will be provided with stable 5V, for example by using the official Raspberry Pi universal power supply. The USB/DC supply voltages are measured and accessible through the API.
The HAT Brick has a real-time clock with super-cap backup that is directly connected to the Raspberry Pi. It can turn the Raspberry Pi off for a specified time. Therefore you can use the Raspberry Pi in battery powered applications, for example to send sensor information every hour to a cloud.
A watchdog can also be implemented with the HAT, so that the Raspberry Pi will be restarted if it crashes or your program gets stuck.
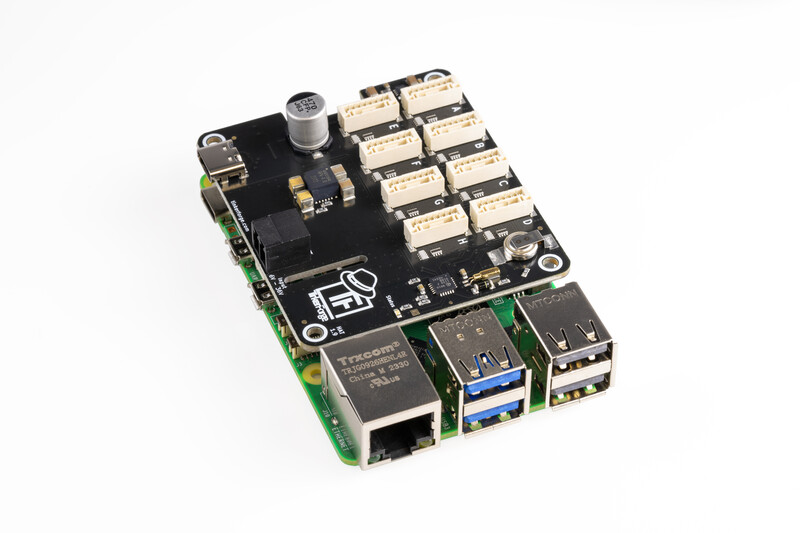
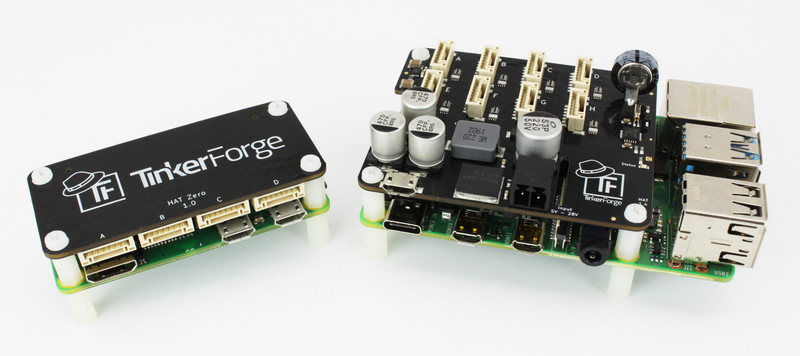
The HAT Brick is electrically compatible to the Raspberry Pi 2B, 3B, 3B+, 4B, 5, Zero and Zero W. The mounting holes are compatible to the Raspberry Pi 2/3/4/5. We also offer a smaller HAT Zero Brick that has mounting holes which are compatible to the Raspberry Pi Zero.
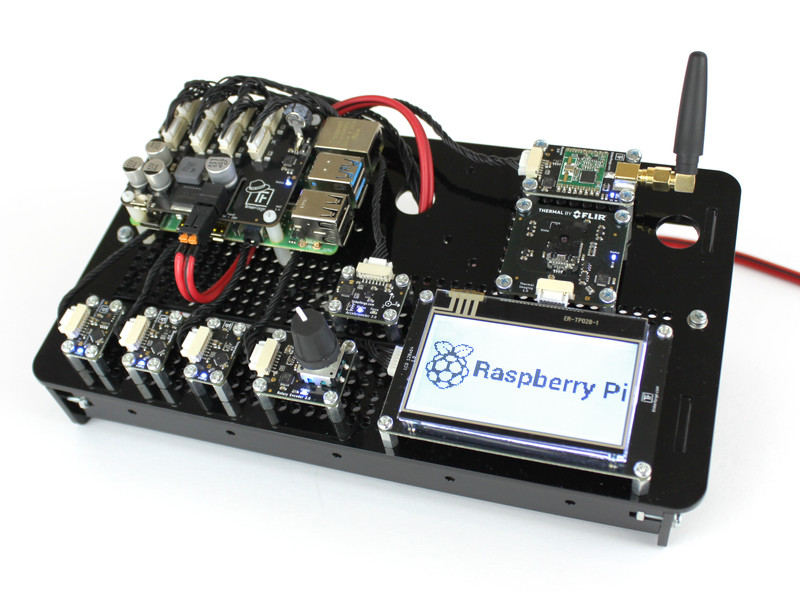
Example project: Use the HAT Brick + Raspberry PI 4 with Thermal Imaging Bricklet and LCD 128x64 Bricklet to show the thermal image as 1-bit representation on the LCD. You can find the source code here.
Technical Specifications
| Property | Value |
|---|---|
| Current Consumption | 100mW (20mA at 5V) |
| Bricklet Ports | 8 |
| DC Input Voltage | 6V-36V |
| DC Output | 5.2V, max. 4A |
| Sleep Current (≤1.4)* | 70mW (14mA at 5V) + 1.5mW if sleep indicator LED enabled |
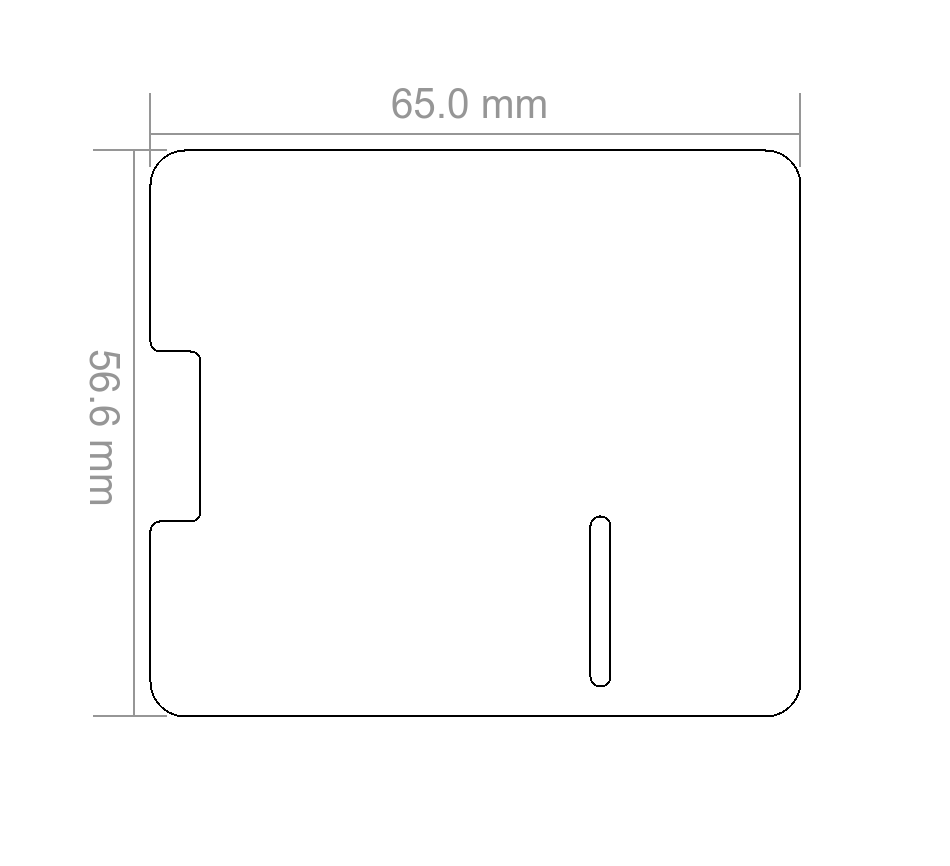
| Dimensions (W x D x H) | 65 x 56 x 25mm (2.56 x 2.20 x 0.98") |
| Weight | 30g |
*: This value is for HAT Brick with hardware version smaller or equal to 1.4.
Resources
Getting Started
To get started with the HAT Brick, you first have to install Brick Daemon on the Raspberry Pi. Brick Daemon acts as a proxy between the Bricklet ports on the HAT Brick and the API bindings. It also handles the real-time clock.
After Brick Daemon is installed you can put the HAT Brick on top of the Raspberry Pi and restart it.
Now use Brick Viewer to connect to the HAT Brick and connected Bricklets. You can install Brick Viewer directly on the Raspberry Pi or on an external PC that has access to it over Ethernet or WIFI. If you use an external PC you have to connect to the hostname or IP of the Raspberry Pi, otherwise to localhost.
In Brick Viewer a new tab named "HAT Brick" as well as one tab for each of the connected Bricklets will appear:
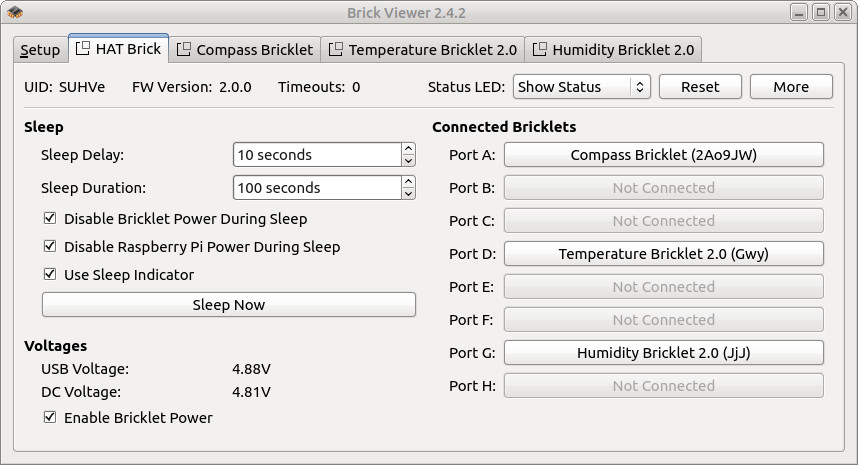
In the HAT Brick tab of Brick Viewer you can test the sleep mode and see the measured voltages as well as the connected Bricklets.
If you are not sure if the HAT Brick was detected correctly you can take a look
in the folder /proc/device-tree/hat/ on the Raspberry Pi:
cd /proc/device-tree/hat/
echo Name: "$(tr -d '\0'<name)", Product: "$(tr -d '\0'<product)",  Product ID: "$(tr -d '\0'<product_id)", Vendor: "$(tr -d '\0'<vendor)"
This should print something like the following:
Name: hat, Product: HAT Brick, Product ID: 0x084e, Vendor: Tinkerforge GmbH
If the folder does not exist or the data does not match the installation was not successful. Is the HAT Brick connected correctly? Did you restart the Raspberry Pi after plugging in the HAT Brick?
Configuration for Improved Throughput
A HAT Brick should be able to transfer about 1000 full-size (64 byte payload) SPITFP (SPI Tinkerforge Protocol) messages per second, similar to a Master Brick. The messages are transferred through an SPI bus that connects the Bricklets on the HAT with the Raspberry Pi.
With Raspbian 2019-06-20 or newer the SPI speed depends on the current CPU clock frequency. The CPU frequency on Raspbian is controlled by the Linux governor. By default the governor is configured as ondemand, which means that the frequency is scaled depending on the load.
This means that by default the throughput increases if the load of CPU is higher. You can turn the frequency scaling off by putting the governor into performance mode.
You can do this with the cpufreq-set tool:
sudo apt-get install cpufrequtils
sudo cpufreq-set -g performance
To do this permanently you can use the cpufrequtils defaults file:
sudo su
apt-get install cpufrequtils
echo 'GOVERNOR="performance"' > /etc/default/cpufrequtils
reboot
This will automatically put the governor into performance mode during bootup.
Low Power Sleep Mode
The HAT Brick can turn the Raspberry Pi off and on again with a configurable off-duration.
You can configure if the power supply of the Bricklets is to be turned off at the same time. Addtionally the blue status LED can be either turned off, or configured as a sleep indicator with a 1 second blink interval.
While the Raspberry Pi is turned off, the real-time clock on the HAT Brick will still be running and set the correct time when the Raspberry Pi boots again.
For more details take a look at the SetSleepMode function in the
API.
Watchdog
The HAT Brick can be used as a watchdog for the Raspberry Pi. It can restart the Raspberry Pi if it crashes or gets stuck.
To implement the watchdog you can also use the sleep delay and
sleep duration parameters of the SetSleepMode function, as shown in the following python example:
while True:
        hat.set_sleep_mode(10, 2, True, False, False)
        time.sleep(1)
This will tell the HAT Brick to restart the Raspberry Pi in 10 seconds in a 1 second loop. The 10 second delay will be reset every loop iteration. If the Raspberry Pi crashes, the loop will stop running and the HAT Brick will restart the Raspberry Pi after 10 seconds have passed.
This loop can be a standalone program or you can put the SetSleepMode
call in the main loop of your application that runs on the
Raspberry Pi. In this case the Raspberry Pi is automatically restarted
if the application crashes or gets stuck.
Real-Time Clock
The HAT Brick comes with a I2C real-time clock that is directly connected to
the Raspberry Pi. It will be automatically detected by the Raspberry Pi. You can check
if it was detected with dmesg. It should have an entry that looks like:
[ 3.850299] rtc-pcf8523 1-0068: rtc core: registered rtc-pcf8523 as rtc0
If you don't have NTP available, you have to initially set the real-time clock. To do this you can set the correct date/time on the Raspberry Pi by hand and then call
hwclock --systohc
on the Raspberry Pi. This will transfer the current time set on the Raspberry Pi to the real-time clock. You only have to do this once.
If you have NTP available, the real-time clock will be updated automatically.
If you have Brick Daemon installed, it will make sure that the real-time clock date and time are automatically transferred back to the system on the next reboot.
Without the Brick Daemon you can also do this yourself by calling
hwclock --hctosys
Compatibility to other Boards and Images
If you use Raspbian, the HAT Brick will automatically be detected and usable. The pins that are used for the communication with the Bricklets are configured automatically.
This is done through a configuration that is read by Raspian from an EEPROM on the HAT.
If you use a non-standard linux image that does not have the raspi-config framework or
a different board that has a compatible pin header but a different processor this will
not work automatically.
In this case the Brick Daemon can do the necessary configuration to the SPI and GPIO
pins. You have to add the configuration to the /etc/brickd.conf file.
For a standard Raspberry Pi you can add the following:
bricklet.group0.spidev = /dev/spidev0.0

bricklet.group0.cs0.driver = gpio
bricklet.group0.cs0.name = gpio23
bricklet.group0.cs0.num = 23

bricklet.group0.cs1.driver = gpio
bricklet.group0.cs1.name = gpio22
bricklet.group0.cs1.num = 22

bricklet.group0.cs2.driver = gpio
bricklet.group0.cs2.name = gpio25
bricklet.group0.cs2.num = 25

bricklet.group0.cs3.driver = gpio
bricklet.group0.cs3.name = gpio26
bricklet.group0.cs3.num = 26

bricklet.group0.cs4.driver = gpio
bricklet.group0.cs4.name = gpio27
bricklet.group0.cs4.num = 27

bricklet.group0.cs5.driver = gpio
bricklet.group0.cs5.name = gpio24
bricklet.group0.cs5.num = 24

bricklet.group0.cs6.driver = gpio
bricklet.group0.cs6.name = gpio7
bricklet.group0.cs6.num = 7

bricklet.group0.cs7.driver = gpio
bricklet.group0.cs7.name = gpio6
bricklet.group0.cs7.num = 6

bricklet.group0.cs8.driver = gpio
bricklet.group0.cs8.name = gpio5
bricklet.group0.cs8.num = 5
First you have to define the spi device that is used (/dev/spidev0.0 for the
Raspberry Pi). Then you have to define the GPIO driver, name and number for each
chip select pin. There are eight chip selects for the eight Bricklet ports and one
additional chip select for the HAT Brick itself.
If you use a completely different board you will have to take a look at it's schematics to adjust the configuration. If you need help with this the best place to ask is probably in the forums at tinkerunity.org.
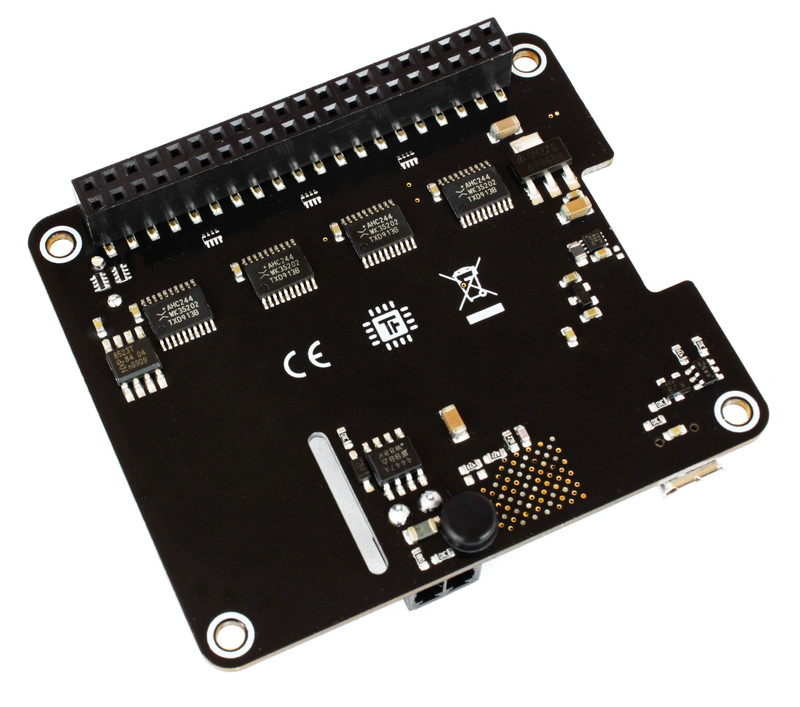
Errata Hardware Version 1.5
Embarrassingly we introduced two hardware bugs in hardware version 1.5.
These bugs were only found after the production run and at the time we were already out of stock. So we decided to go ahead anyway and fix the bugs post-production.

As you can see in the photo above there are two mod wires at the bottom of the Brick.
Without these fixes
- The USB will not work with a USB-C to USB-C cable. It works with USB-C to USB-A cable.
- The battery backup of the real-time clock can sporadically fail if the power is unplugged.
If you have a HAT Brick 1.5 and you need one of these features and the mod wires are missing please contact us, we will replace your HAT Brick.
As of September 24th 2020 all shipped HAT Bricks will come with these fixes!
Programming Interface
See Programming Interface for a detailed description.
| Language | API | Examples | Installation |
|---|---|---|---|
| C/C++ | API | Examples | Installation |
| C/C++ for Microcontrollers | API | Examples | Installation |
| C# | API | Examples | Installation |
| Delphi/Lazarus | API | Examples | Installation |
| Go | API | Examples | Installation |
| Java | API | Examples | Installation |
| JavaScript | API | Examples | Installation |
| LabVIEW | API | Installation | |
| Mathematica | API | Examples | Installation |
| MATLAB/Octave | API | Examples | Installation |
| MQTT | API | Examples | Installation |
| openHAB | API | Examples | Installation |
| Perl | API | Examples | Installation |
| PHP | API | Examples | Installation |
| Python | API | Examples | Installation |
| Ruby | API | Examples | Installation |
| Rust | API | Examples | Installation |
| Shell | API | Examples | Installation |
| Visual Basic .NET | API | Examples | Installation |
| TCP/IP | API | ||
| Modbus | API |