Brick Viewer (brickv)
The Brick Viewer provides a graphical interface for testing Bricks and Bricklets. Each device has its own view that shows the main features and allows to control them.
Additionally brickv can be used to calibrate the analog-to-digital converter (ADC) of the Bricks to improve measurement quality and to flash Brick firmwares and Bricklet plugins.
Usage
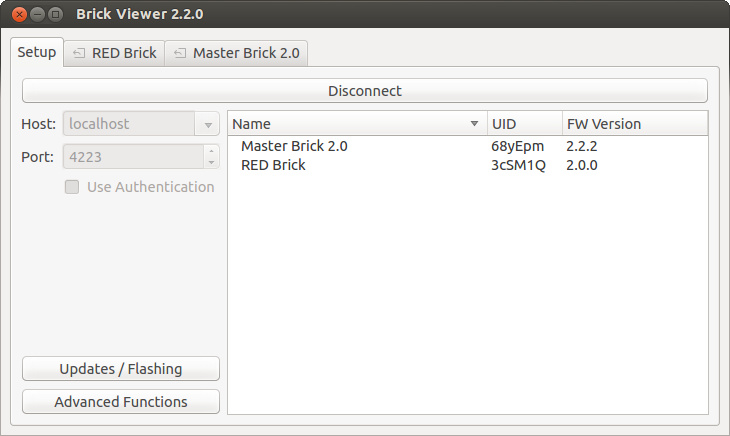
To use the Brick Viewer you have to first connect it to a
Brick Daemon or a WIFI Extension, for
example. The Brick Daemon can be running on the same PC or on a PC in the same
network. Enter the IP address (localhost if you started the Brick Daemon on
the same PC) of the PC running the Brick Daemon, or enter the IP address of a
WIFI Extension. Click "Connect". Now you can go through the tabs at the top
and test your Bricks and Bricklets.
The "Updates / Flashing" button opens a dialogue which shows available updates and let you flash firmwares and plugins onto Bricks and Bricklets. If you click on "Advanced Functions" you can calibrate the analog-to-digital converts (ADC) of Bricks (see below).
Determine Software Versions / Search for Updates
If you have started the Brick Viewer and connected it to a Brick Daemon or a Master Extension you can determine the current software versions and search for updates for all the connected hardware.
To do this you have to press the "Updates / Flashing" button. A dialogue should open which shows you the current software versions. An orange entry tells you that a new version for this entry exist. A red entry tells you that the software for this entry has to be updated to work properly.
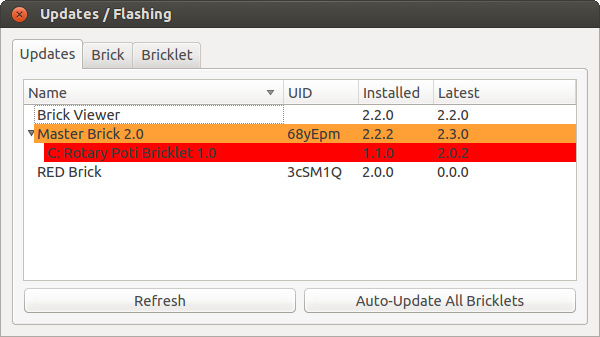
If you want, you can update all Bricklets with the click on "Auto-Update All Bricklets". Bricks can't be updated automatically, you have to update them one by one (see Brick Firmware Flashing).
Brick Firmware Flashing
The recommended tool for flashing of Brick firmwares is Brick Viewer.
For Linux systems without a graphical desktop there is the brick-flash
tool.
Using Brick Viewer
Flashing of Brick firmwares can be done with Brick Viewer since version 1.1.0. The latest firmwares will be downloaded automatically and can be found here too.
Preparation
Flashing a Brick requires that it is connected via USB to the PC that runs the Brick Viewer. Depending on the type of Brick the following hints may apply:
- Before you flash a new firmware on a IMU Brick (1.0) you might want to backup its calibration data, because it is lost during the flashing process. This is only important if you did your own calibration, because the factory calibration can be restored automatically during the flashing process since Brick Viewer version 1.1.13.
- Hardware version 2.0 of the Master Brick has a change in its PCB layout that interferes with bootloader mode if a Master Extension such as RS485, WIFI or Ethernet is present in the stack. In this case the Master Extension needs to be disconnected from the stack to make the bootloader mode work correctly. This problem is fixed in hardware version 2.1.
To flash a new firmware the Brick has to be in bootloader mode. For ESP32 Brick and ESP32 Ethernet Brick just connect them via USB to the PC.
For all other 4x4cm sized Bricks follow these steps:
- Connect the Brick via USB to the PC.
- Press and hold the Erase button.
- Press and release the Reset button.
- Release the Erase button.
Now all LEDs on the 4x4cm Brick should be off, the Brick should be in bootloader mode and a new serial port device should be detected on your PC.
Serial Port
Start the Brick Viewer and click "Updates / Flashing":
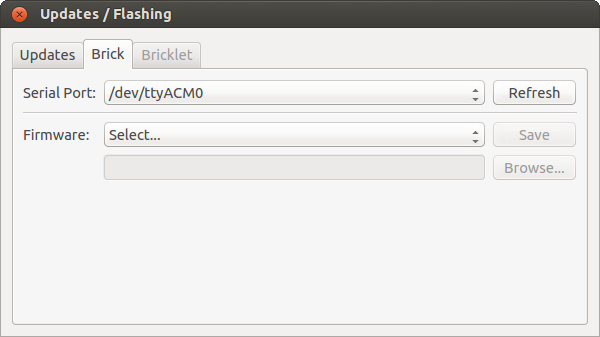
A Brick in bootloader mode should show up as serial port. The "Serial Port" drop-down box shows all detected serial ports. If no port is listed try clicking "Refresh". If still no serial port shows up ensure that your Brick is in bootloader mode and that it is correctly recognized by your operating system:
- On Windows XP and Vista you might need to install Atmel driver
atm6124_cdc.inffrom the drivers subfolder in the Brick Viewer installation folder to make Windows detect a Brick in bootloader mode correctly. Windows 7, 8, 8.1 and 10 autodetect a Brick as "GPS Camera Detect" or "Bossa Program Port" serial device. This works as well, just select "GPS Camera Detect" or "Bossa Program Port" as serial port in Brick Viewer. - If you have an old Linux kernel version you might need to install this SAM-BA Linux USB kernel driver.
- On macOS a Brick might auto detected as DVB-T device and start EyeTV or a similar program automatically is started. Just close EyeTV and proceed with the flash procedure.
Select the correct serial port, typically named as follows:
- Windows: "AT91 USB to Serial Converter" or "GPS Camera Detect" or "Bossa Program Port"
- Linux:
/dev/ttyACM0or/dev/ttyUSB0 - macOS:
/dev/tty.usbmodemfd131
Flashing
Select the firmware for your Brick and click "Save". Now the latest firmware will be downloaded and written to the Brick, then read back again and verified to be correctly written. A message box will pop up to inform you about the result.
If the flash process failed, check if you have selected the correct serial port.
If Brick Viewer on Linux reports "No permission to open serial port" then it
cannot access the selected serial port. Normally, this is caused by the user
not being a member of the dialout. The problem can be fixed by adding the
user to the dialout group or by running brickv as root (sudo brickv).
Instead of letting the Brick Viewer download the latest firmware you can also select "Custom..." from the drop-down box and specify a local file via the "Browse..." button.
Using brick-flash on Linux
Brick Viewer requires a graphical desktop. If you need to flash Bricks
connected to a Linux system without a graphical desktop you can use the
brick-flash tool. It is available as Debian package
that you can download and install:
wget --backups=1 https://download.tinkerforge.com/tools/brick_flash/linux/brick-flash_linux_latest.deb
sudo dpkg -i brick-flash_linux_latest.deb
In contrast to Brick Viewer brick-flash does not download the firmware
for the Brick automatically. The latest firmwares can be found
here. Download the one that should be
flashed, for example the latest Master Brick firmware:
wget --backups=1 https://download.tinkerforge.com/firmwares/bricks/master/brick_master_firmware_latest.bin
Ensure that the Brick is in bootloader mode (see the Brick Viewer section above
about how to do that) and find the serial port name of the Brick. Typically
this is /dev/ttyACM0 or /dev/ttyUSB0.
Now run brick-flash and provide the serial port and firmware file name:
brick-flash -p /dev/ttyACM0 -f brick_master_firmware_latest.bin
Afterwards the Brick should restart automatically and use the new firmware.
Bricklet Plugin Flashing
Flashing of Bricklet plugins into the EEPROM of the Bricklet is possible in two different ways. One possibility is to use the "Auto-Update All Bricklets" feature (see Determine Software Versions).
If you want to flash one distinct Bricklet you can use the flashing window. The latest plugins will be downloaded automatically and can be found here too.
Flashing a Bricklet requires that it is connected to a Brick which is listed in your Brick Viewer. A click on the "Flashing" button opens the required dialog:
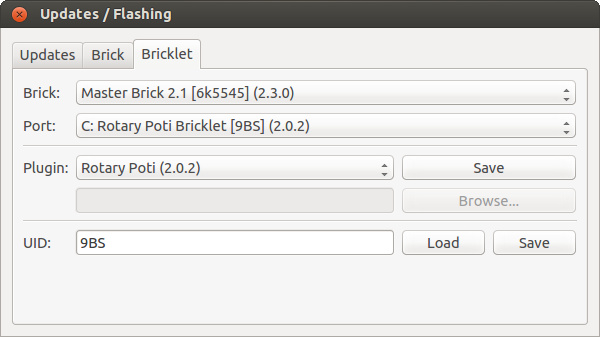
Now select the Brick and port to which the Bricklet is connected. Select the type of your Bricklet from the drop-down box. If you press "Save" now, the latest plugin will be downloaded and written to the EEPROM, then read back again from the EEPROM and verified to be correctly written. A message box will pop up to inform you about the result. If the flash process failed, check if you selected the correct port and if the Bricklet is connected properly.
Instead of letting the Brick Viewer download the latest plugin you can also select "Custom..." from the drop-down box and specify a local file via the "Browse..." button.
You can also read the UID currently written on the Bricklet and set a new one. Note that the UID has to be in Base58 encoding, valid characters are 0-9, a-z and A-Z without 0 (zero), I (big i), O (big o) and l (small L). The only other restriction is that all Bricklet UIDs you use at the same time need to be unique, you can use recognizable names or patterns.
Master Extension Firmware Flashing
Note
Coming soon!
Brick ADC Calibration
Note
This is might only be necessary for legacy Bricks with 10p Bricklet connectors. It is not nececessary nor possible for Bricks with 7p Bricklet connectors.
If you have problems with inaccurate measurements (e.g. Linear Poti Bricklet does not reach the maximum or the voltage measurements in a stack is slightly off) it is possible that the calibration of the ADC is to blame.
To measure analog values, the microcontrollers on the Bricks have analog-to-digital converter (ADC). It is never guaranteed that an ADC on a microcontroller is perfectly calibrated. To overcome this problem, we make it possible to calibrate the ADC in your Bricks.
For the calibration you need one of the potentiometer Bricklets (Rotary Poti or Linear Poti). Connect it to a Brick and click on "Advanced Functions" in the Setup tab of Brick Viewer:

Choose the port your Poti Bricklet is connected to (A-D). Turn your Poti Bricklet completely to the left and press "Calibrate", then turn your Poti Bricklet completely to right and press "Calibrate" again. If your ADC was not calibrated well the gain and offset values should be different then the default values (4095 and 0).
You can test if the calibration works in principle by pressing "Calibrate" when the Poti Bricklet is in the middle position, then one of the values has to change (after that you have to recalibrate, of course).
Brick Logger
Since version 2.3.0 a logger is part of Brick Viewer. Brick Logger can also be used standalone. The documentation can be found here.