- Getting Started
- Hardware
- Software
- Kits
- Starter Kit: Weather Station
- Starter Kit: Hardware Hacking
- Starter Kit: Server Room Monitoring
- Starter Kit: Server Room Monitoring 2.0
- Starter Kit: Blinkenlights
- Starter Kit: Internet of Things
- Starter Kit: Camera Slider
- Tabletop Weather Station
- Embedded Boards
- Specifications
Smart Home Integration using openHAB and RED Brick
For this project we are assuming, that you have build a RED Brick Weather Station, that your RED Brick is using at least Image version 1.6 and that you have at least Brick Viewer 2.2.3 installed.
The openHAB configuration used in this project is based on an example created by an openHAB developer. The original example is available on GitHub.
Goals
We are setting the following goals for this project:
- Temperature, ambient light, humidity and air pressure should be shown on the LCD 20x4 Bricklet,
- the measured values should be updated automatically when they change and
- button 0 on the LCD 20x4 Bricklet should toggle the backlight of the display.
Additionally, if the RED Brick has network connectivity:
- Temperature, ambient light, humidity and air pressure should be shown on openHAB sitemap in the RED Brick web interface.
In the following we will show step-by-step how openHAB has to be configured to achieve this.
Step 1: Enable openHAB service
The openHAB service is disabled by default on the RED Brick because it takes quite some time to start and slows down the boot process. Before we can configure openHAB we have to enable it first. The RED Brick services documentation explains how to do this..
Step 2: Define Bricklet items
Bricks and Bricklets are represented in openHAB as
items. Such
items are defined in .items config files stored on the RED Brick.
Brick Viewer allows to edit these files. See the
RED Brick openHAB documentation
for details.
- Open the openHAB settings tab in Brick Viewer and click the New button.
- Enter
weather-station.itemsas name and click the Create button. - Copy and paste the
.itemstemplate from below into the empty text field. - Replace the UID placeholders (e.g.
<HUMIDITY_UID>) with the corresponding UIDs of your Bricklets. - Click the Apply Changes button to save the file.
This is the .items template
(download)
used in step 3:
Number TF_Humidity               "Humidity [%.1f %%]"    { tinkerforge="uid=<HUMIDITY_UID>" }
Number TF_Barometer              "Pressure [%.0f hPa]"   { tinkerforge="uid=<BAROMETER_UID>" }
Number TF_Barometer_Temperature  "Temperature [%.1f °C]" { tinkerforge="uid=<BAROMETER_UID>, subid=temperature" }
Number TF_AmbientLight           "Luminance [%.0f lx]"   { tinkerforge="uid=<AMBIENT_LIGHT_UID>" }
String TF_LCD                    "LCD"                   { tinkerforge="uid=<LCD_20X4_UID>"}
Switch TF_LCD_Backlight          "LCD Backlight"         { tinkerforge="uid=<LCD_20X4_UID>, subid=backlight"}
Switch TF_Button0                "Button0"               { tinkerforge="uid=<LCD_20X4_UID>, subid=button0"}
Step 3: Define rules
Rules allow to connect events to actions in an when-then fashion. We use this rules to update the currently measured values on the LCD 20x4 Bricklet when they change.
Create a new config file (as described in step 1) named
weather-station.rules and copy and paste following rules
(download)
into it:
import org.openhab.core.library.types.*

var Integer initialSleepTime = 10

rule "Weather Station LCD Init From Backlight"
when
    Item TF_LCD_Backlight changed or System started
then
    createTimer(now.plusSeconds(initialSleepTime)) [|
        sendCommand(TF_LCD, "TFNUM<00>Temperature:")
        sendCommand(TF_LCD, "TFNUM<019>C")
        sendCommand(TF_LCD, "TFNUM<10>Humidity   :")
        sendCommand(TF_LCD, "TFNUM<119>%")
        sendCommand(TF_LCD, "TFNUM<20>Pressure   :")
        sendCommand(TF_LCD, "TFNUM<217>hPa")
        sendCommand(TF_LCD, "TFNUM<30>Luminance  :")
        sendCommand(TF_LCD, "TFNUM<318>lx")
        sendCommand(TF_LCD, String::format("TFNUM<013>%4s", TF_Barometer_Temperature.state.format("%.1f")))
        sendCommand(TF_LCD, String::format("TFNUM<113>%4s", TF_Humidity.state.format("%.1f")))
        sendCommand(TF_LCD, String::format("TFNUM<213>%4s", TF_Barometer.state.format("%.0f")))
        sendCommand(TF_LCD, String::format("TFNUM<313>%4s", TF_AmbientLight.state.format("%.0f")))
    ]

end

rule "Goodbye"
when
    System shuts down
then
    sendCommand(TF_LCD_Backlight, OFF)
end

rule "Weather Station LCD Backlight"
when
    Item TF_Button0 changed
then
    if (TF_LCD_Backlight.state == ON)
        sendCommand(TF_LCD_Backlight, OFF)
    else
        sendCommand(TF_LCD_Backlight, ON)
end

rule "Weather Station LCD Update Temperature"
when
    Item TF_Barometer_Temperature received update
then
    sendCommand(TF_LCD, String::format("TFNUM<013>%4s", TF_Barometer_Temperature.state.format("%.1f")))
end

rule "Weather Station LCD Update Humidity"
when
    Item TF_Humidity received update
then
    sendCommand(TF_LCD, String::format("TFNUM<113>%4s", TF_Humidity.state.format("%.1f")))
end

rule "Weather Station LCD Update Air Pressure"
when
    Item TF_Barometer received update
then
    sendCommand(TF_LCD, String::format("TFNUM<213>%4s", TF_Barometer.state.format("%.0f")))
end

rule "Weather Station LCD Update Ambient Light"
when
    Item TF_AmbientLight received update
then
    sendCommand(TF_LCD, String::format("TFNUM<313>%4s", TF_AmbientLight.state.format("%.0f")))
end
- The "Weather Station LCD Init From Backlight" rule writes the static part of the text to the display and turns the LCD backlight on.
- The "Weather Station LCD Update *" rules update the displayed values when they change.
- The "Weather Station LCD Backlight" rule toggles the LCD backlight when button 0 is pressed.
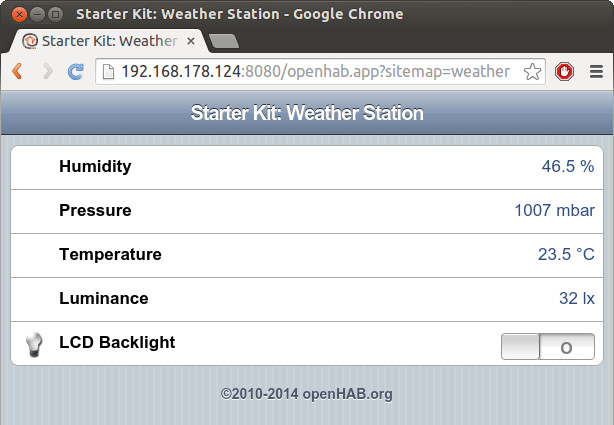
Step 4: Define the sitemap
A sitemap defines the elements of the openHAB user interface. We use it to display the measured values in the RED Brick web interface.
Create a new config file (as described in step 1) named
weather-station.sitemap and copy and paste following sitemap definition
(download)
into it:
sitemap tf_weather_station label="Starter Kit: Weather Station"
{
    Frame
    {
        Text item=TF_Humidity
        Text item=TF_Barometer
        Text item=TF_Barometer_Temperature
        Text item=TF_AmbientLight
        Switch item=TF_LCD_Backlight
    }
}
Now this sitemap's web interface is available at:
http://<RED_BRICK_IP_ADDRESS>:8080/openhab.app?sitemap=weather-station
You can also go to the main RED Brick web interface where all available sitemaps are listed:
http://<RED_BRICK_IP_ADDRESS>