- Getting Started
- Hardware
- Bricks
- Debug Brick
- ESP32 Brick
- ESP32 Ethernet Brick
- HAT Brick
- HAT Zero Brick
- IMU Brick 2.0
- Master Brick
- RED Brick
- Features
- Description
- Technical Specifications
- Resources
- First Steps / Test your RED Brick
- Brick Viewer
- RED Brick Web Interface
- RED Brick Software Image
- Example Programs
- Hardware Description
- FAQ
- Known Issues
- History
- Programming Interface
- Silent Stepper Brick
- Bricklets
- Master Extensions
- Power Supplies
- Discontinued Products
- Timeline
- Bricks
- Software
- Kits
- Embedded Boards
- Specifications
RED Brick

Warning
Unfortunately the RED Brick is discontinued. Because of severe chip shortages of serveral of the ICs that are used on the RED Brick it is not possible for us to produce it anymore.
As a replacement we recommend a Raspberry Pi (Zero) together with a HAT (Zero) Brick.
Features
- Controls other Bricks and Bricklets
- Executes your program directly on the Brick
- Supports nearly all programming languages
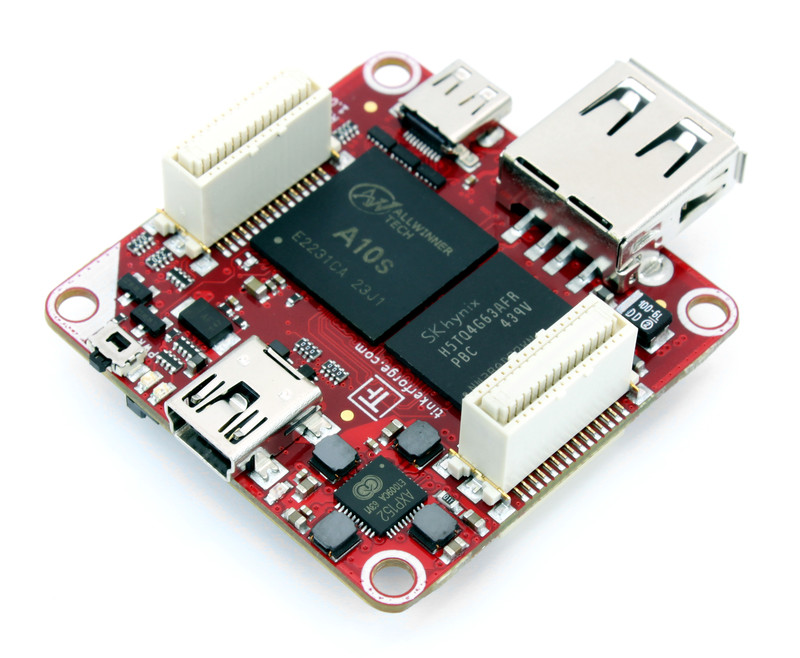
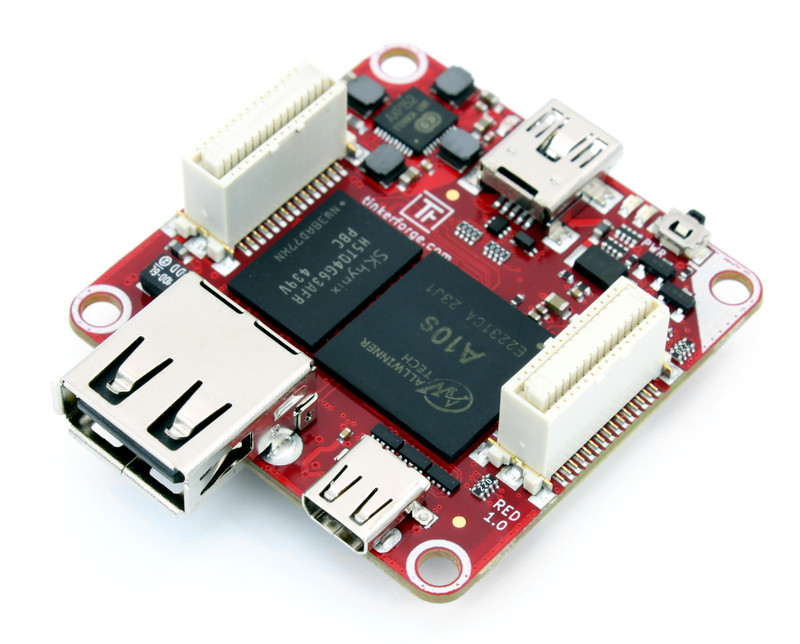
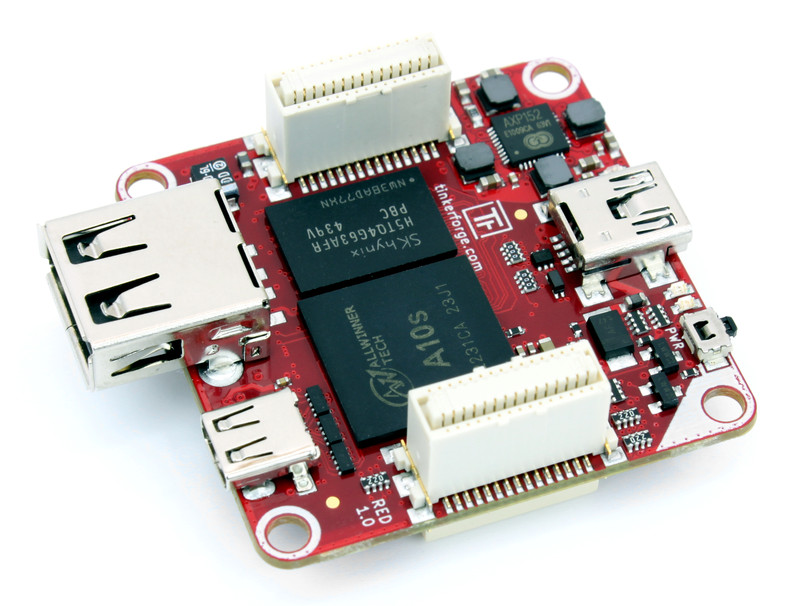
Description
The Rapid Embedded Development Brick (RED Brick) can control other Bricks and Bricklets. The programming languages C/C++, C#, Delphi/Lazarus, Java, JavaScript, Octave, Perl, PHP, Python, Ruby, Shell and Visual Basic .NET can be executed on the Brick.
A program that controls Bricks and Bricklets can be written and tested on a normal PC or Mac. Afterwards the program can be transferred to the RED Brick by the press of a button and can then be executed without any changes. Multiple programs can be executed simultaneously. The execution of programs can be scheduled (execution on boot up, every hour, etc.) and monitored.
This approach enables a very easy and very fast solution to realize projects. To our knowledge there is no other solution available that is even remotely comparable.
For each supported programming language the Tinkerforge API and commonly used software libraries are pre-installed on the system. Other necessary libraries can be installed manually.
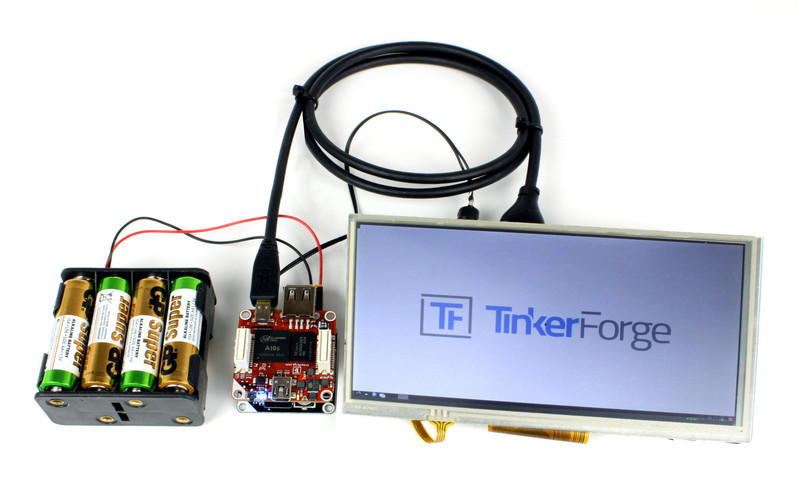
The Brick is equipped with a Micro-HDMI connector, which can be used by programs to show a graphical user interface. A USB 2.0 Host connector can be used to connect USB Wi-Fi adapters, mouses, keyboards, touchscreens and similar.
Note
There are no Bricklet ports available on the RED Brick. To be able to use Bricklets, you will need at least one other Brick, for example the Master Brick. You can stack the RED Brick and Master Brick as usual.
With an Ethernet Master Extension the RED Brick can be extended by an Ethernet interface. The RS485 Master Extension can be used to connect other remote stacks of Bricks and Bricklets.
Advanced users can use the RED Brick with full access to the underlying Debian system.
An introduction video is available on Youtube:
Technical Specifications
| Property | Value |
|---|---|
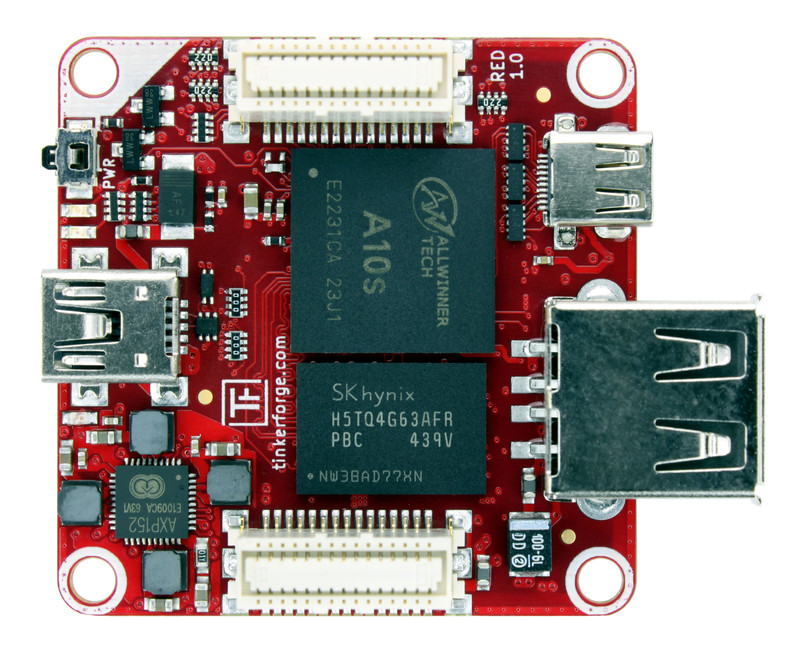
| Processor | Allwinner A10s, Cortex A8 1GHz, 3D Mali400 GPU, NEON |
| Memory | 512MB DDR3 SDRAM, Micro-SD-Card as Flash |
| Connectors | USB 2.0 Host, Micro-HDMI (type D), Mini-USB, Stack connectors |
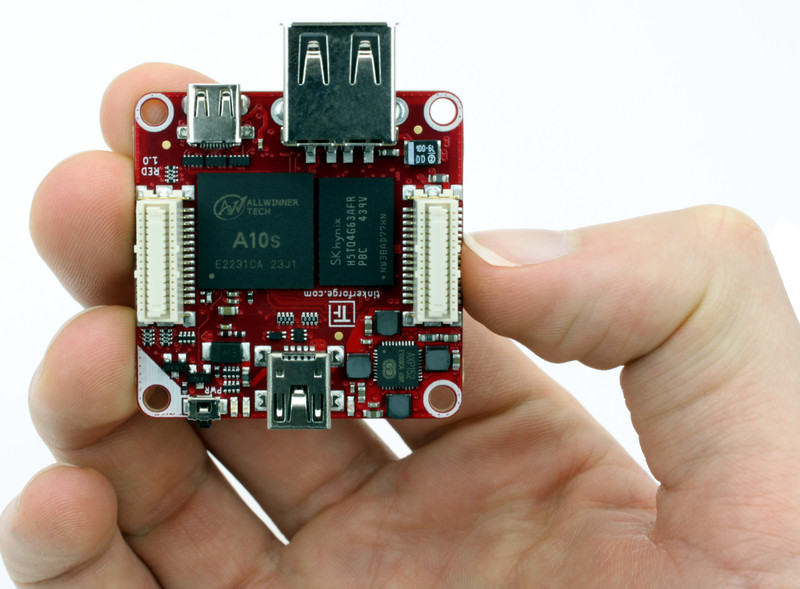
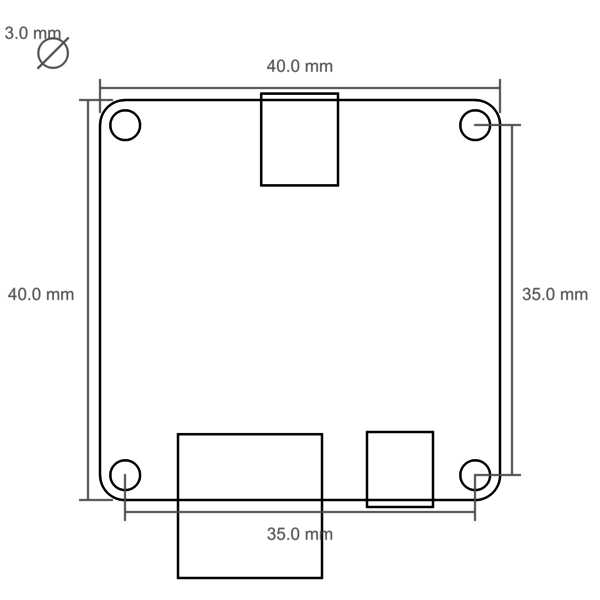
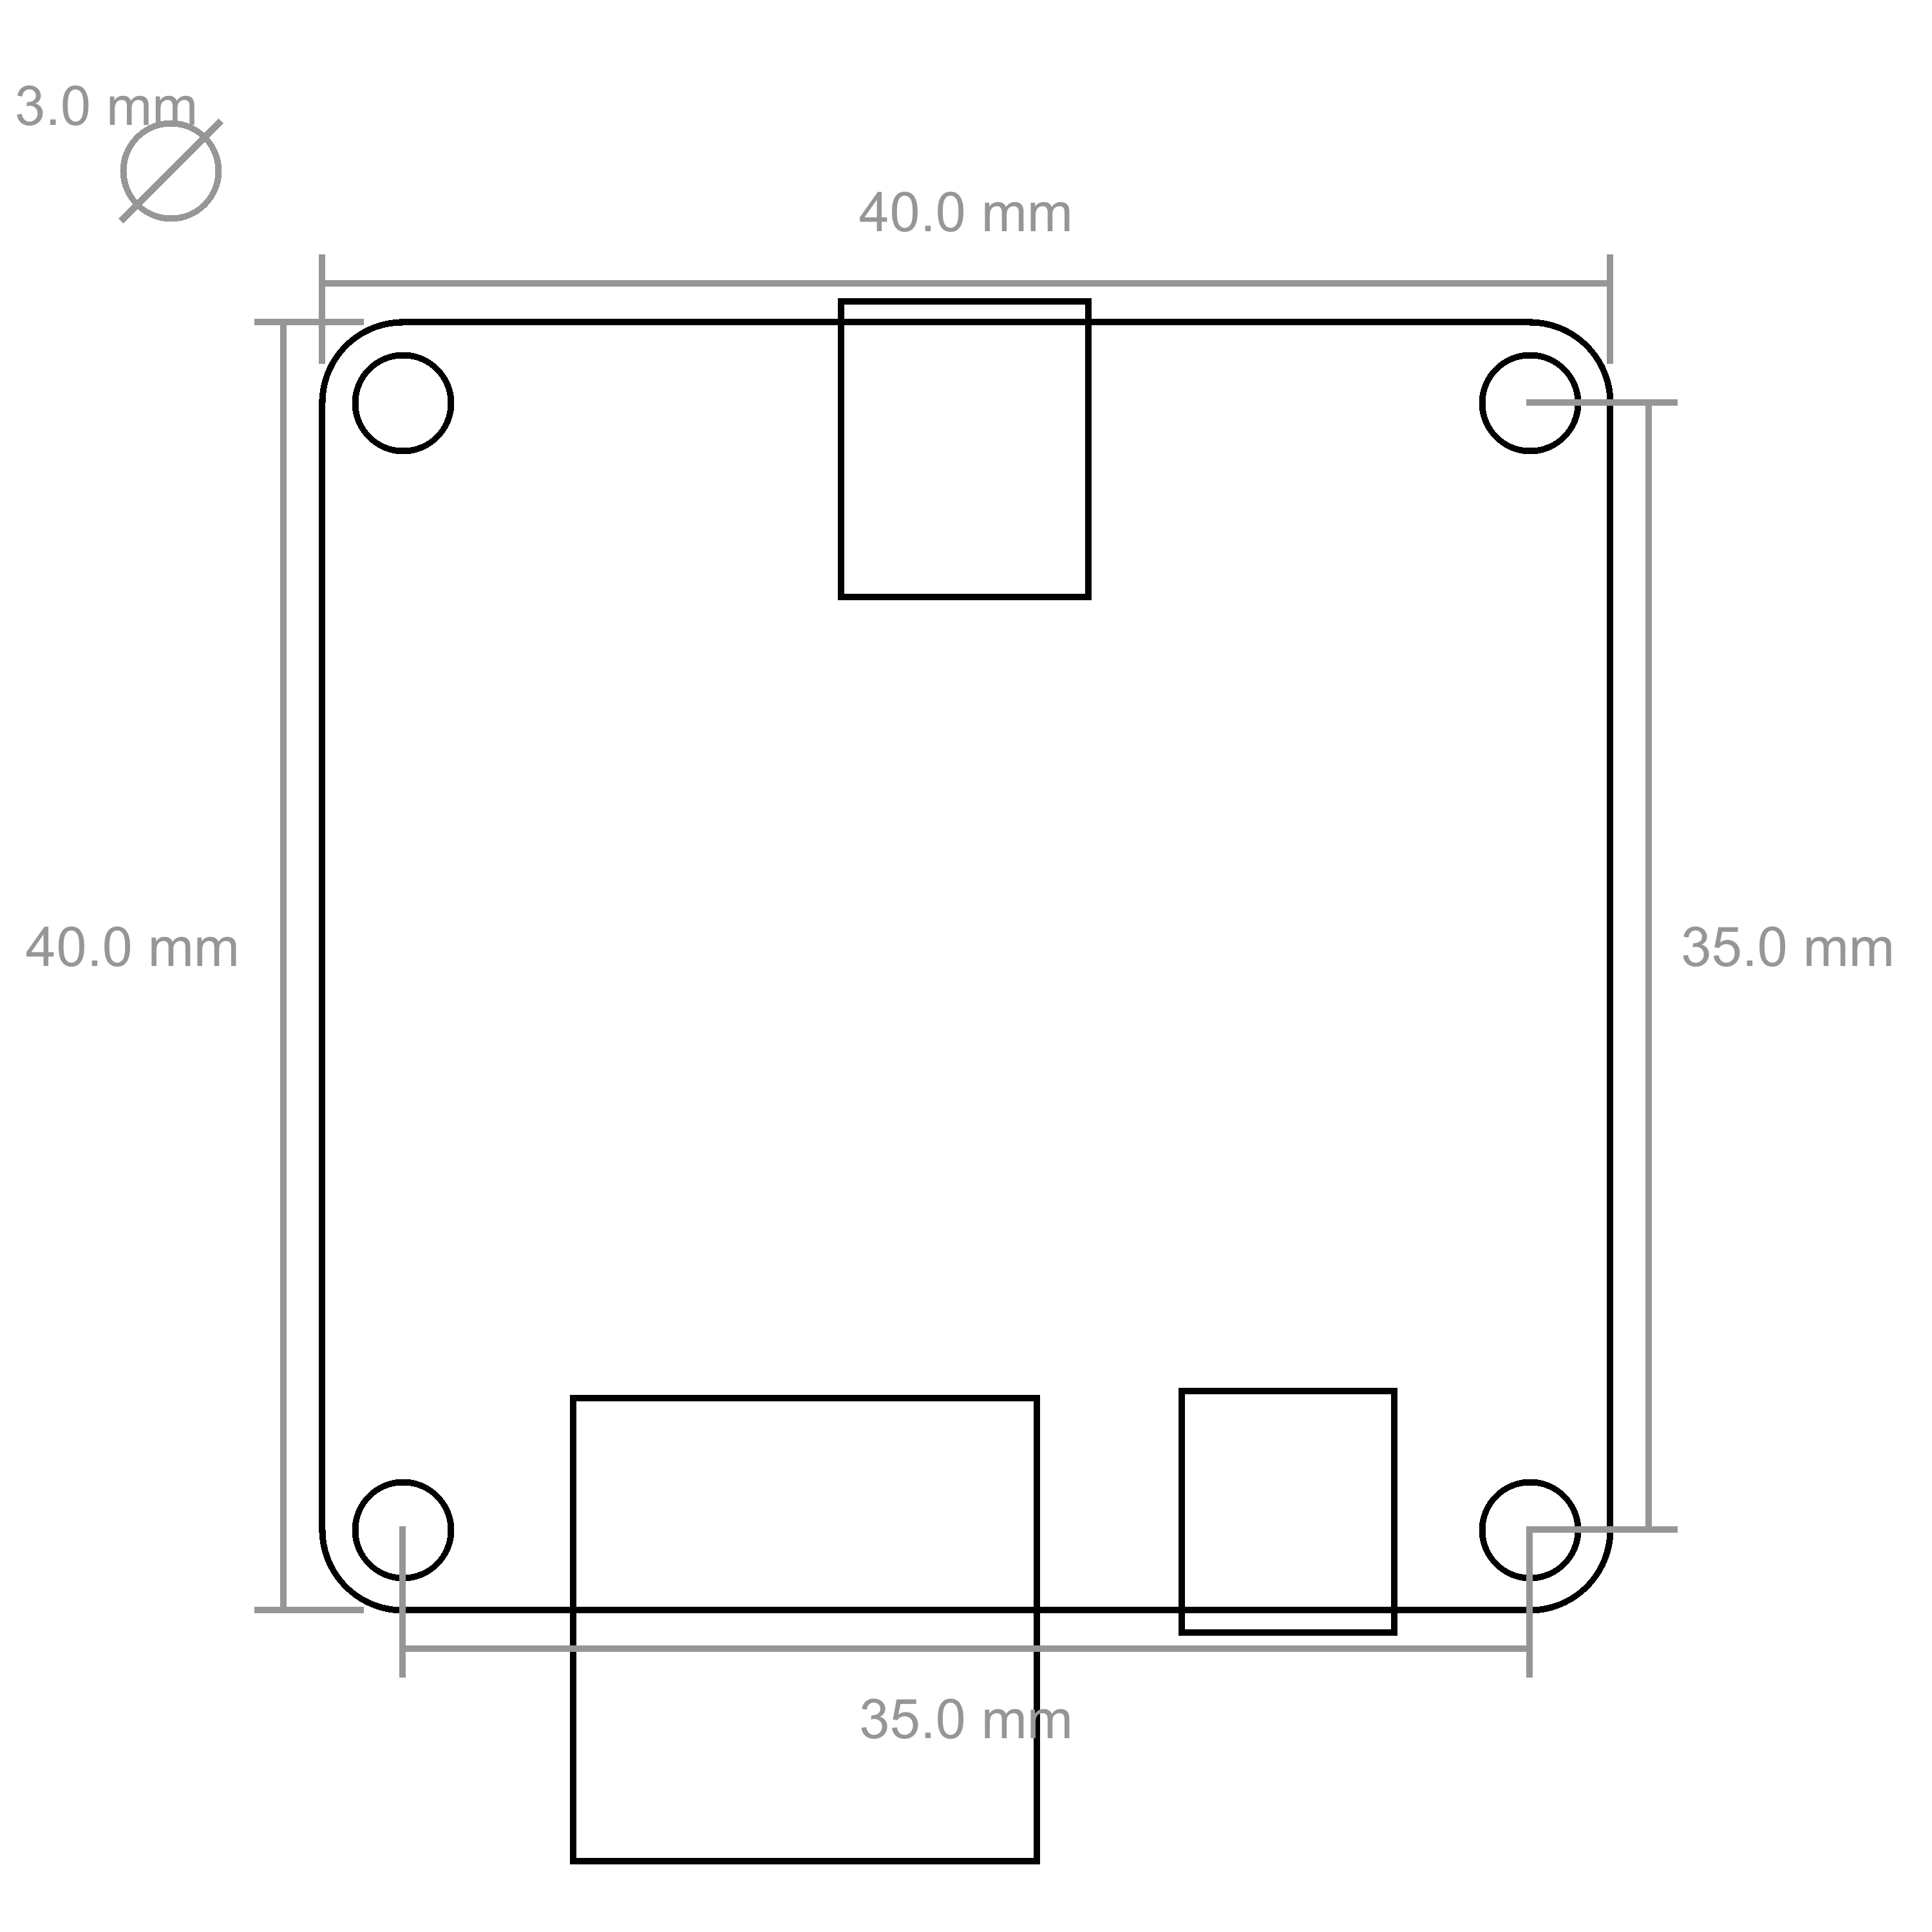
| Dimensions (W x D x H) | 40 x 40 x 16mm (1.57 x 1.57 x 0.63") |
| Weight | 14g |
| Power Consumption | 0.75W (5V/150mA, idle), 1.1W (5V/220mA, 100% load) |
Resources
First Steps / Test your RED Brick
With the following instructions you can test your RED Brick. A full step-by-step tutorial regarding the RED Brick can be found here: RED Brick Tutorial.
First install the Brick Daemon and the Brick Viewer software on your PC or Mac. Insert the prepared Micro-SD card into the Micro-SD-Card slot of the RED Brick. The location of the slot and an overview of the different hardware interfaces of the RED Brick is given in the hardware description. You can order a SD card with pre-installed image in our shop. Otherwise you can prepare an SD card yourself, see the copy image to SD card section.
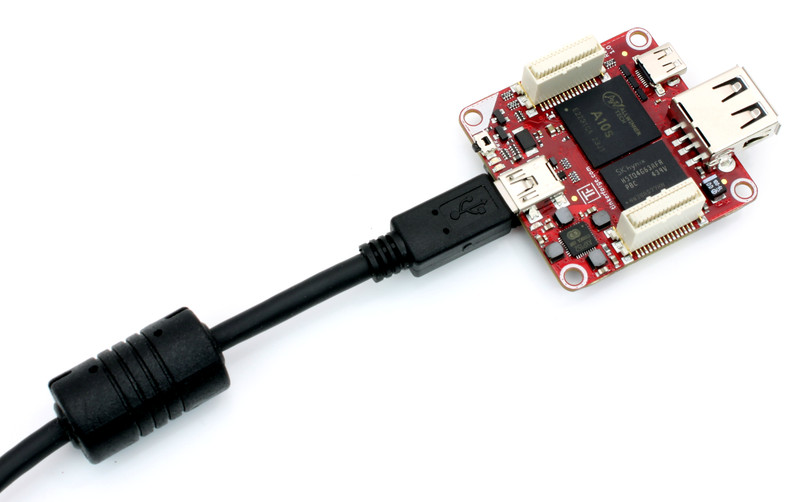
After that your RED Brick is ready to go and can be connected to your PC or Mac with a Mini-USB cable.
If you start the Brick Viewer software and press "Connect". A tab should show up labeled with "RED Brick". Click on it.
On the left side of the tab you see different additional tabs. The "Overview" tab shows information about the CPU load, memory usage and other status information. This view means that your RED Brick works as expected and you can start to upload your programs. See the Brick Viewer section on how to configure the Brick and how to upload your programs.
You can also test the graphical user interface (HDMI). To do so, connect a monitor to the HDMI port and a USB hub with keyboard and mouse to the USB port of the RED Brick. If you power the Brick you can see the LXDE desktop environment booting. After the boot process you should be able to use it as a normal desktop PC.
You can log in to the underlying Linux with user tf and password tf.
The tf user is a sudoer.
Note
For security reasons you may want to change the password. The procedure is documented here.
Brick Viewer
This section describes the configuration of the RED Brick with the Brick Viewer software. The RED Brick can also be configured by the RED Brick API (only for power users).
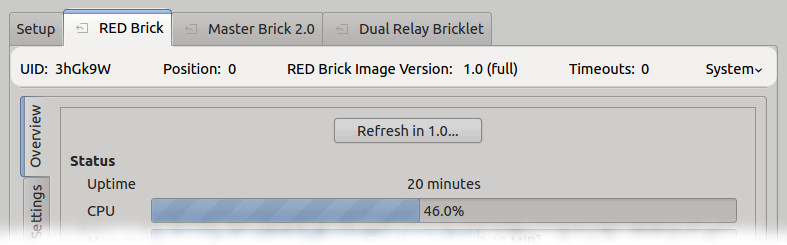
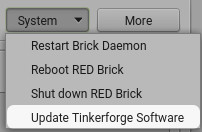
The RED Brick representation in Brick Viewer consists of different tabs, each described in detail below. At the top the UID of the RED Brick, the position in the stack, the name of the used image, number of timeouts and the word System is shown. If you click on it, you can restart the Brick Daemon on the RED Brick and reboot or shut down the RED Brick itself.
Update Tinkerforge Software
Starting from Brick Viewer version 2.3.9 it is possible to update Tinkerforge
software (Brick Viewer and Tinkerforge bindings) present in the RED Brick. The
update process can be initiated from the System menu.
If there are updates available they will be reported.
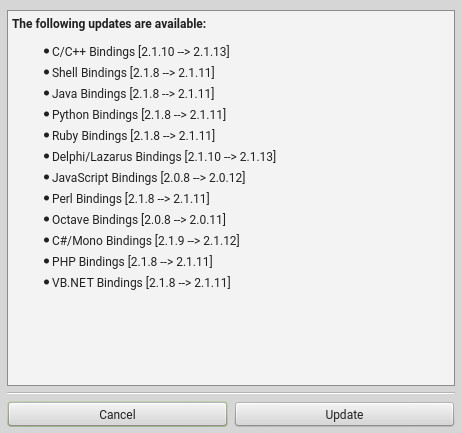
Upon user confirmation the update process will start.
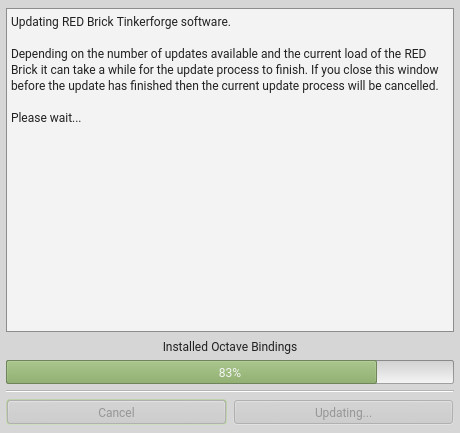
The only requirement for this update feature is a working Internet connection on the system on which the Brick Viewer is running. The RED Brick doesn't require an active Internet connection for the update feature to work.
Overview Tab (Status Information)
This tab is selected by default. It shows the uptime of your RED Brick and the usage of CPU, memory (RAM) and storage. You can see the top processes based on CPU or memory usage and the up- and download speed of the configured network interfaces.
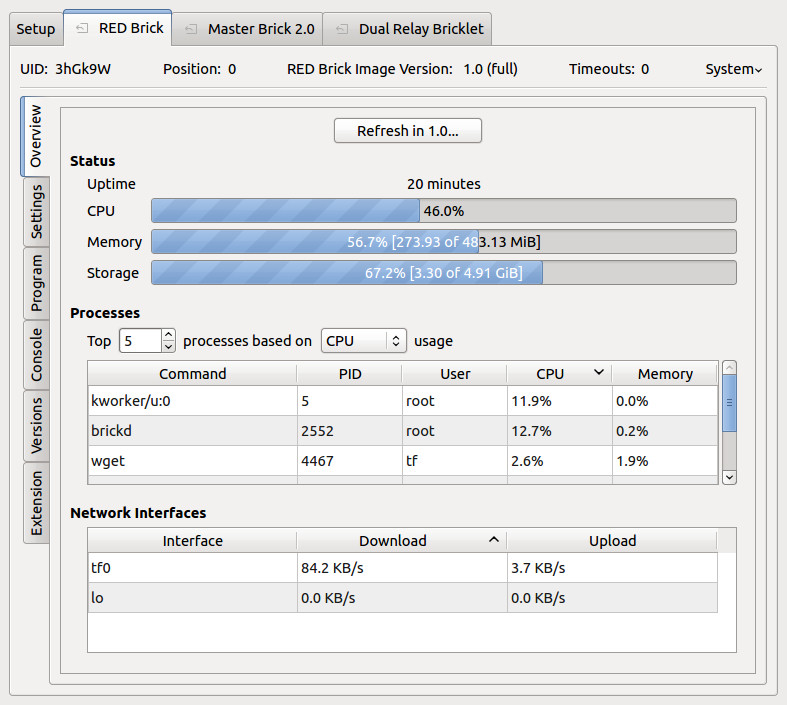
The list can contain the following network interfaces (X is a number, typically 0):
lo: This is the loopback interface. It is a local interface, used for example for the communication between your program and the local Brick Daemon.wlanX: This is a Wi-Fi interface. It is created if you attach a Wi-Fi USB adapter to the USB host connector.ethX: This is a Ethernet interface. It is created if you attach a Ethernet USB adapter to the USB host connector.tfX: This is the Ethernet interface created if you add an Ethernet Extension on top of the RED Brick.
The data in the overview tab is automatically refreshed every 3 seconds.
Settings Tab
The Settings tab is subdivided into several sections.
Network
In the Network section of this tab you can configure settings related to networking.
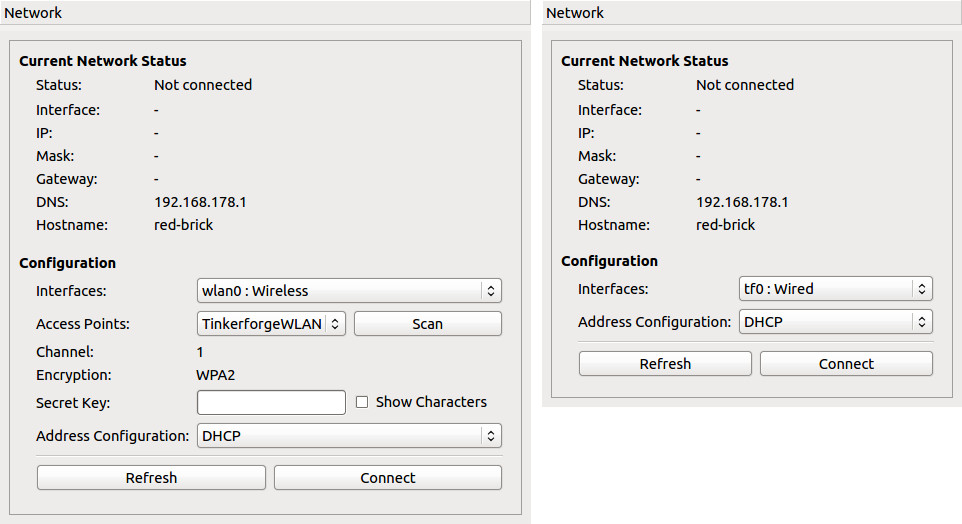
The Current Network Status subsection shows you the status of the configured and currently used network interface. The status is updated automatically every 3 seconds.
Initially the RED Brick is not configured for any interface and will not
automatically connect, even if an interface is available.
You have to configure an interface in the Configuration subsection. First
choose the interface you want to configure. An Ethernet USB adapter will show
up as ethX, the Ethernet Extension as tfX and a Wi-Fi USB adapter
as wlanX (X is a number). Dependent on the selected interface you will get
other configuration options:
Configure an Ethernet Interface:
After selecting an Ethernet interface, choose between DHCP or static IP configuration and click the Connect button.
Configure a Wi-Fi Interface:
After selecting a Wi-Fi interface press the Scan button to scan for access points. It will take some time to get the scan results.
Select the desired access point and enter the secret and select between DHCP or static IP address. After that click Connect. Supported Wi-Fi USB adapters can be found in our shop.
Now the RED Brick will automatically connect with the configured interface after a reboot.
Wireless Access Point
In the Wireless Access Point section (requires Image >= 1.4 and Brick Viewer >= 2.2.2) of this tab, you can turn the RED Brick into a wireless access point. This section is only available if the Access Point service is activated and you have connected the Wi-Fi USB Adapter to the RED Brick USB port.
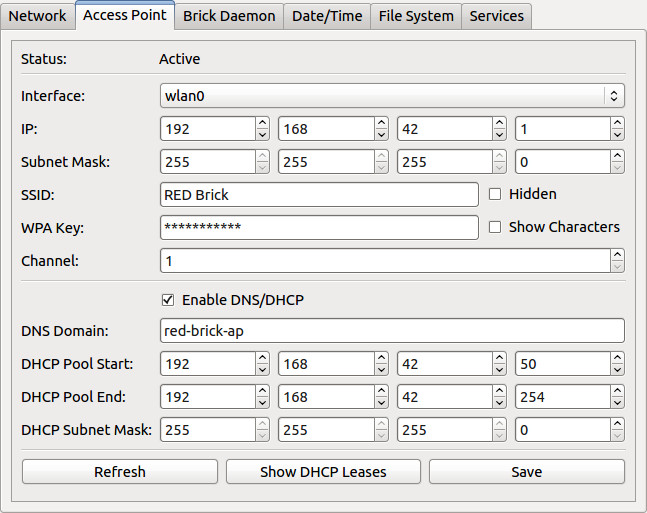
If you use Access Point mode, the RED Brick will provide a DHCP and DNS server. It will give devices that connect to it an IP address and provide a domain. You can configure the IP address, SSID, WPA passphrase, DHCP pool, DNS domain and other options that you might expect from an access point.
It is also possible to show the current DHCP leases, which can help you to identify devices that are connected to the RED Brick access point.
If you use the Access Point mode, there is no external network infrastructure necessary. Your smart phone, tablet or laptop can directly connect to the RED Brick.
Mobile Internet
In the Mobile Internet section (requires Image >= 1.7 and Brick Viewer >= 2.2.6) of this tab, you can configure the RED Brick to connect to the Internet using a GSM modem. This section is only available if the Mobile Internet service is activated and you have connected the 3G USB adapter to the RED Brick USB port.
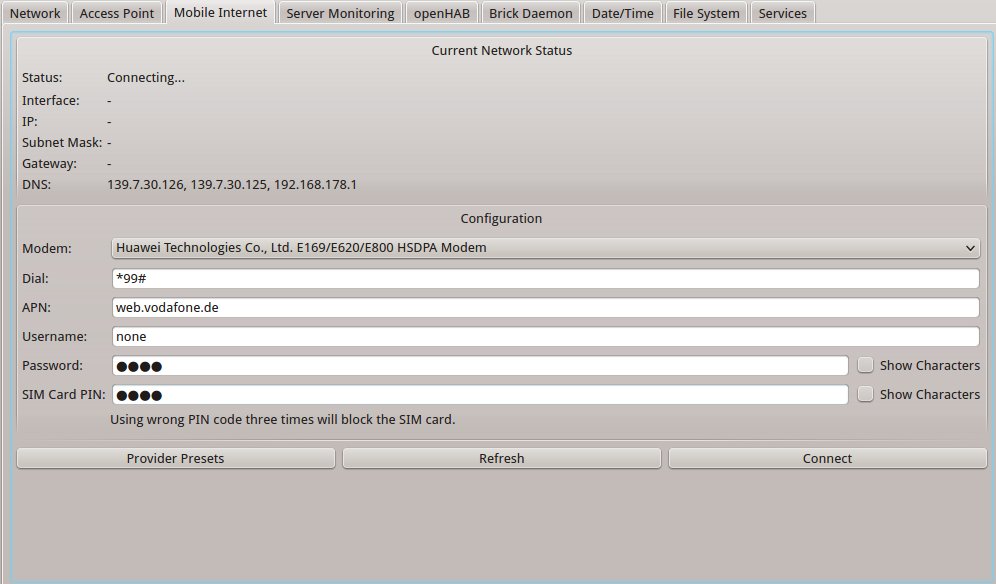
Well known mobile network operator configuration parameters can be loaded as presets using the "Provider Presets" button.
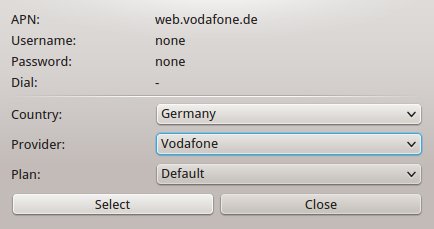
After you click the "Connect" the connection will be established. This might take several minutes. It is necessary to enter a SIM Card PIN even if it is not necessary. If you have disabled the PIN on your SIM card, enter an arbitrary PIN.
If Wireless Access Point and Mobile Internet are enabled at the same time then the RED Brick operates as a Wi-Fi router and shares its Internet connection with the connected Wi-Fi clients.
Server Monitoring
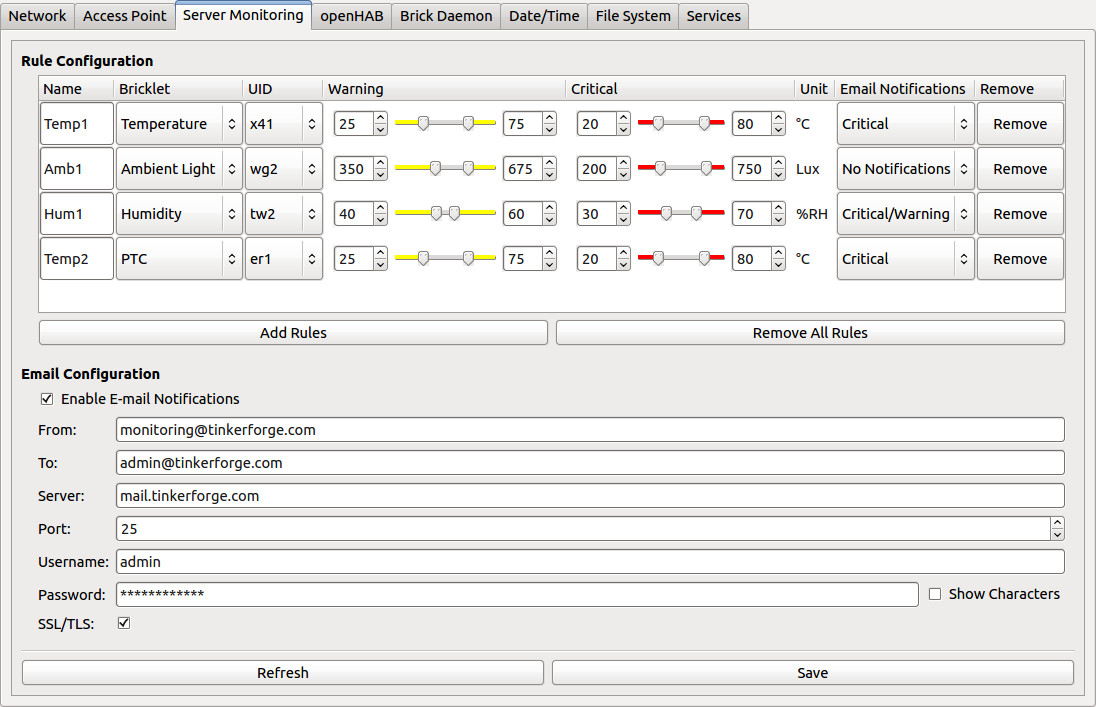
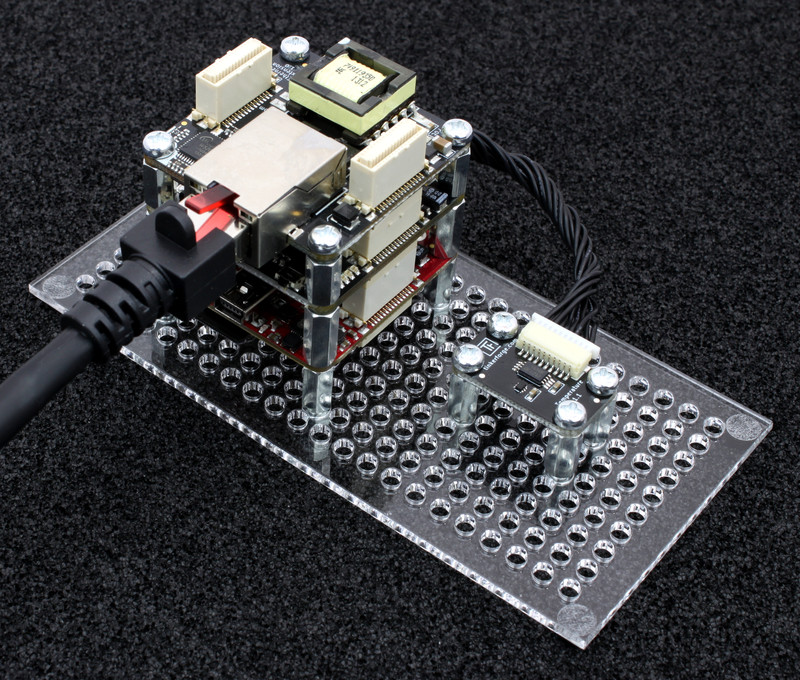
The server monitoring functionality (requires Image >= 1.6 and Brick Viewer >= 2.2.3) is designed to be used with the Starter Kit: Server Room Monitoring. For further details see the documentation of the kit.
openHAB
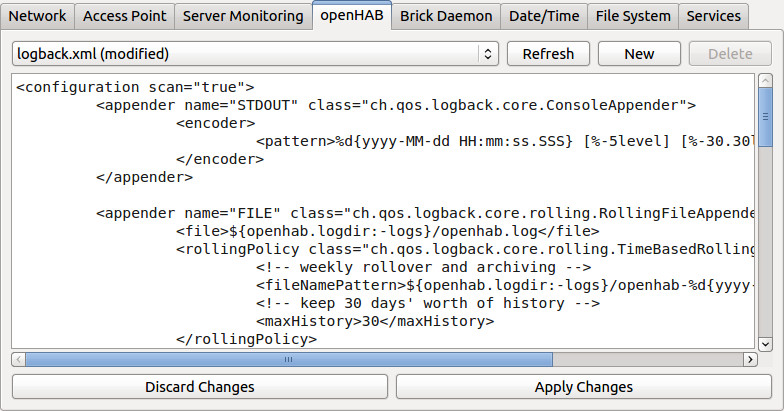
In the openHAB section (requires Image >= 1.6 and Brick Viewer >= 2.2.3) of this tab you can configure the openHAB service running on the RED Brick. Since Image >= 1.10 and Brick Viewer >= 2.3.11 openHAB2 is used.
This section is only available if the openHAB service is activated.
Using the New and Delete buttons you can create new .items, .rules
and .sitemap config files and delete existing config files. Brick Viewer
will automatically store the new config files in the correct openHAB config
directory depending on the file extension.
After you changed the content of a config file you can click the Apply Changes
button to save the changes or click the Discard Changes button to discard
the changes. Config files with unsaved changes are marked as (modified).
An openHAB configuration example can be found in the documentation of the Starter Kit: Weather Station.
Brick Daemon
In the Brick Daemon section of this tab you can configure settings related to the local Brick Daemon.

The configuration includes listen address, corresponding port, port for WebSockets, authentication secret and several other low level configurations including the LED trigger for the red and green LED.
WebSockets are used by the browser version of the JavaScript bindings to control Bricks and Bricklets.
Date/Time
In the Date/Time section you can synchronize the clock of the RED Brick to the clock of your PC. There is no battery on the RED Brick, so the time won't be incremented if the RED Brick is not powered.
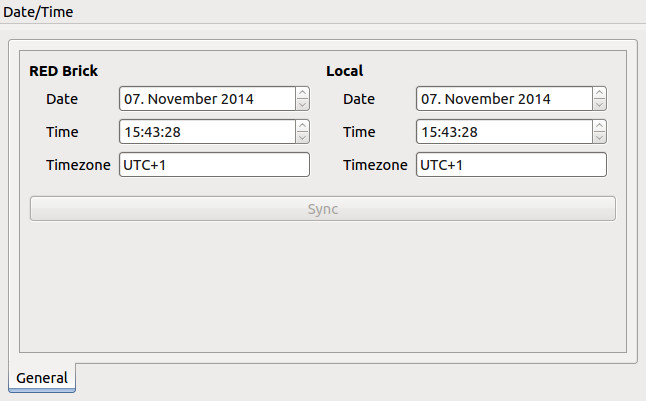
If you have a connection to the Internet (trough the Ethernet Extension or a Wi-Fi USB adapter), the date and time are automatically set by NTP. You only have to configure the timezone, which is saved even if the RED Brick is powered down.
If you need the correct time after bootup but you can't guarantee
or can't obtain Internet access, you can also use the
GPS Bricklet 2.0 or the Real-Time Clock Bricklet 2.0. You can find a small
programs on GitHub
that could be uploaded to the RED Brick to sync the Linux system time with
the GPS time (gps_time program) or the Real-Time Clock's time
(rtc_time program).
File System
In the File System section (requires Brick Viewer >= 2.2.1) you can expand the file system on the Micro-SD card.
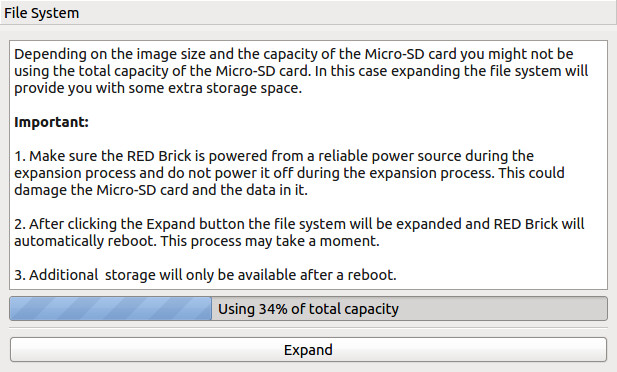
Depending on the image size and the capacity of the Micro-SD card you might not be using the total capacity of the Micro-SD card. In this case expanding the file system will provide you with some extra storage space. If the file system uses less than 95% of the Micro-SD card's size then it can be expanded. To do this follow the instructions in Brick Viewer.
Services
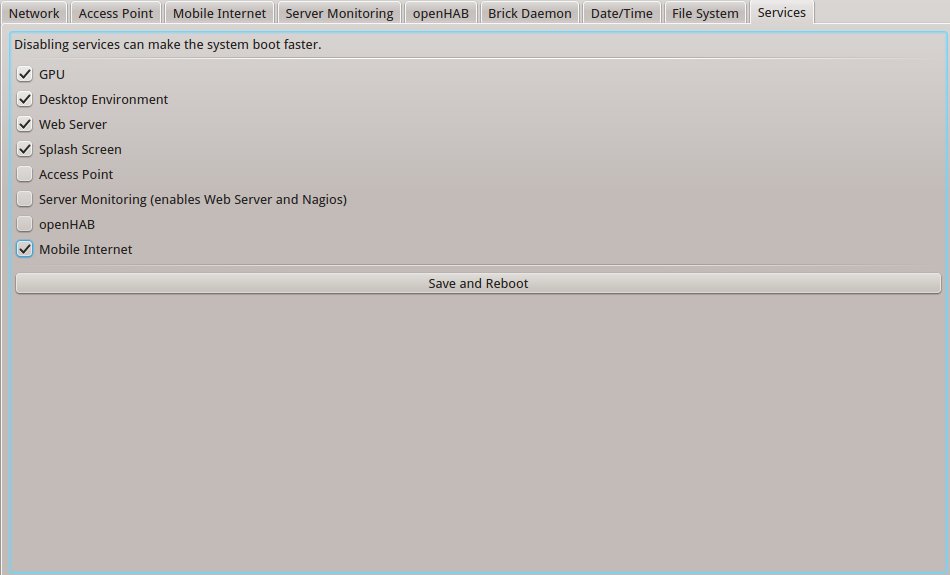
In the Services section (requires Image >= 1.4 and Brick Viewer >= 2.2.2) you can enable and disable different services on the RED Brick. If you don't need a web server or a desktop environment on your RED Brick you can disable them and make the RED Brick boot faster. You can also enable the wireless access point mode to directly connect from your smart phone or notebook to the RED Brick.
- GPU: Enables hardware acceleration for graphics. If you enable this, some parts of the RAM are shared with the GPU. If you don't use HDMI we would recommend to disable the GPU.
- Desktop Environment: Starting the desktop environment (LXDE) takes some time, if you don't use it you can disable it to save boot time
- Web Server: The web server is necessary if you want to use web services on the RED Brick. If enabled, it adds about 10 seconds to the boot time!
- Splash Screen: If enabled, a splash screen is shown on startup (during the boot process of the Linux kernel). If disabled you can see the kernel messages.
- Access Point: If access point mode is enabled, you can configure the RED Brick to be an access point in the settings tab.
- Server Monitoring: Enables the Nagios monitoring system, see server monitoring in the settings tab.
- openHAB: Enables the openHAB runtime, see openHAB in the settings tab.
- Mobile Internet: If mobile Internet is enabled, you can configure the a mobile Internet connection in the settings tab.
If you change the services and save the changes, the RED Brick will reboot and the new configuration will be available after the reboot.
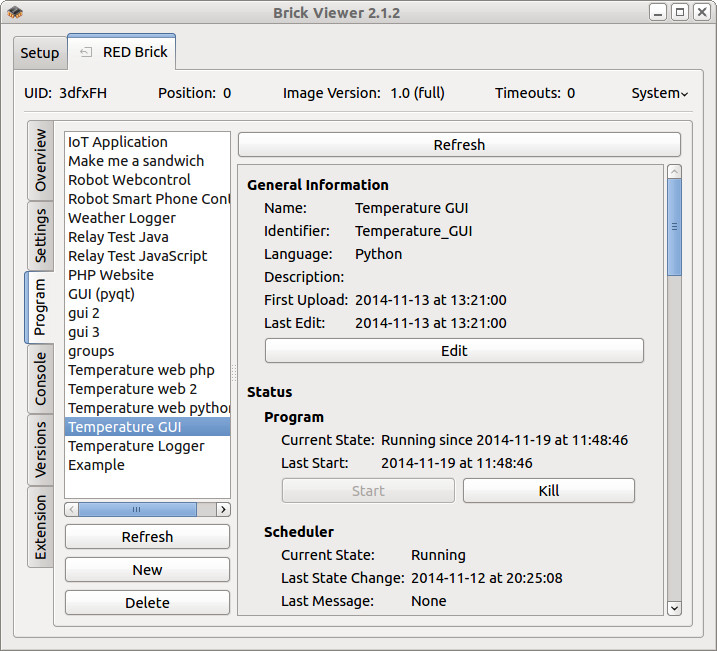
Program Tab (Upload and Execution)
The documentation of the program tab can be found on a separate site.
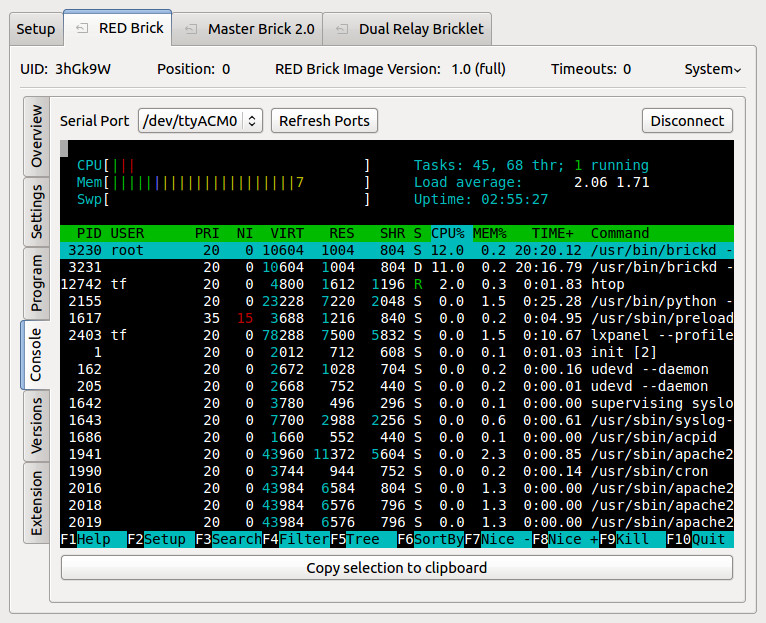
Console Tab (Remote Access)
If you have attached the RED Brick over its
Mini-USB connector to your PC it will also register
a USB serial interface. This serial interface can be used to access the Linux
shell of the Brick. Select the serial port of the Brick and press Connect.
Under Linux the typical interface is /dev/ttyACMX (X is number) under
Windows it is Serial Port COMX (X is number) with device name
RED Brick Serial Console and on OS X usually shows up as
/dev/tty.usbmodemXYZ with XYZ is part of RED Bricks UID. You can log in as
user tf with password tf. If you are not sure what the right port is
test them all, until you see the shell. It might be necessary to press ENTER to
see the prompt.
Below you can see a screenshot of the console executing htop.
A good shell tutorial can be found at linuxcommand.org.
Versions Tab (Daemon, Bindings and Libraries)
The versions tab shows version information of the installed Brick Daemon and RED Brick API Daemon as well as the installed Bindings and their associated libraries.
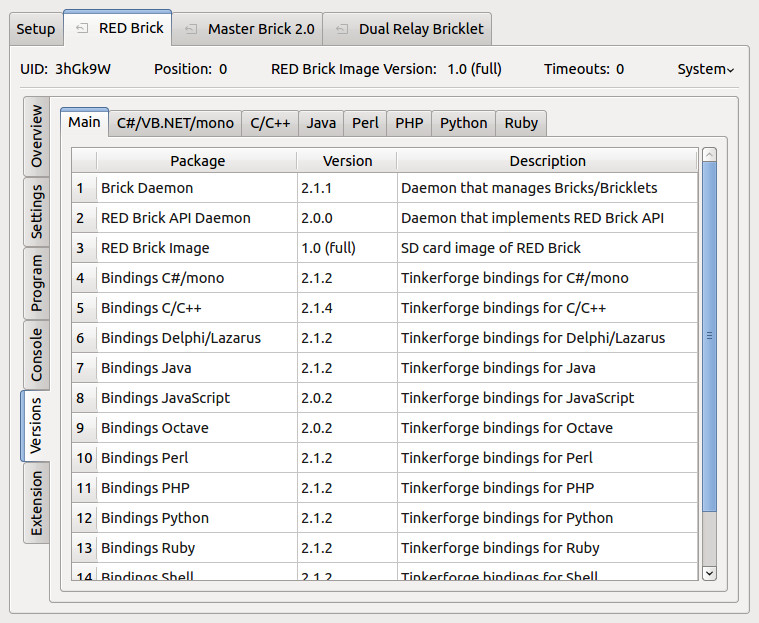
If you want to use other libraries than the installed ones, you can
upload them with your program or use the
console to install them via apt-get,
pip, pear, npm or similar package managers. The listed package
managers are all installed in all RED Brick images.
Extensions Tab (Configure, Manage)
Two Master Extensions are supported by the RED Brick: Ethernet Extension and RS485 Extension.
Changing the settings on either of the Extensions will restart the Brick Daemon on the RED Brick, i.e. your RED Brick tab in the Brick Viewer will disappear for a few seconds and then pop up again.
Ethernet Extension
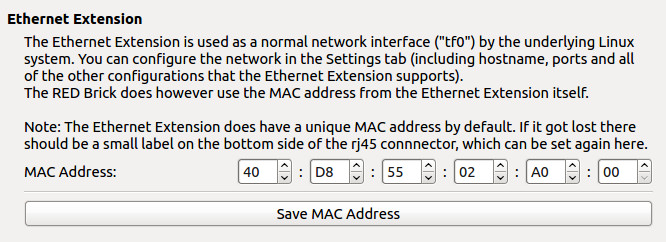
Only the MAC address of the Ethernet Extension can be changed here. Since the Ethernet Extension shows up as a normal network interface in the underlying Linux, you can configure it like any other network interface through the Settings Tab.
RS485 Extension
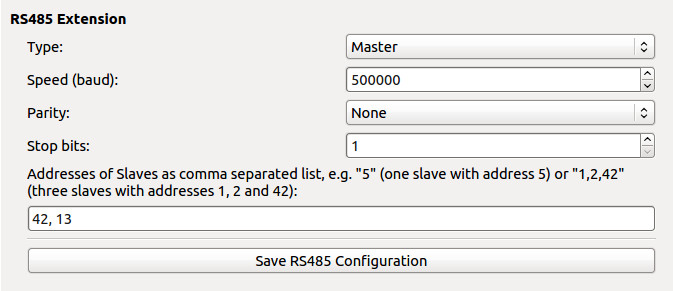
The configuration of the RS485 Extension is the same as it can be done through a Master Brick. See the RS485 Extension documentation.
The supported baudrates that can be used on the RED Brick are 500000, 250000, 166666, 125000, 100000, 83333, 71428, 62500, 55555, 50000, 45454 or 41666 baud.
Import/Export
The Import/Export tab (requires Brick Viewer >= 2.2.2) allows to import/export programs and system logs.
System Logs
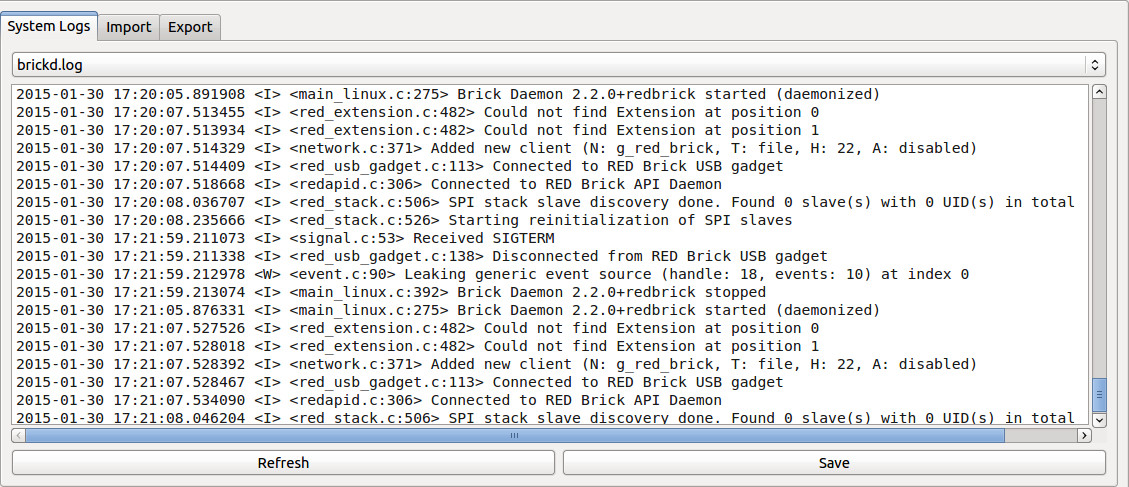
Choose a log file and click Refresh to download it from the RED Brick and
show it in the viewer. With the Save button you can save it on your disk.
Import
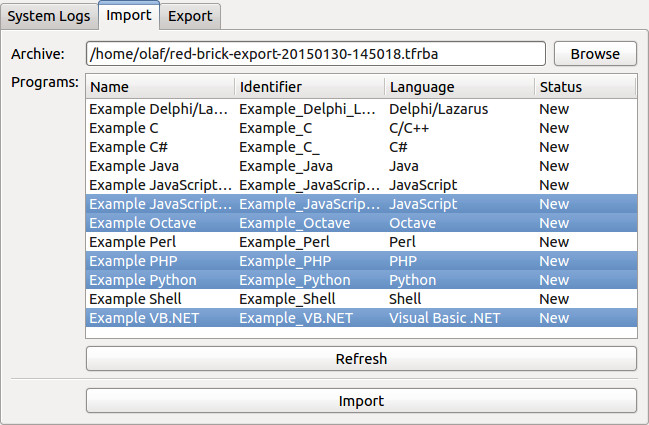
Choose a file you previously exported (see below) and select the
programs you want to import to your RED Brick. Press Import
to upload the selected programs.
Export
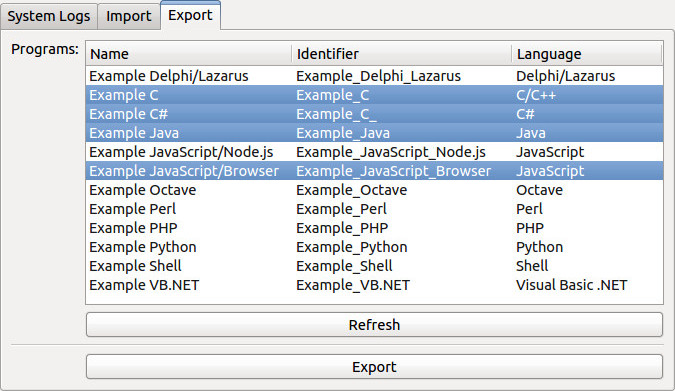
In the export tab you can select the programs that you want to export
from the RED Brick. Press Export to save them on your disk.
The export file will contain the configuration of the program, all of the program files as well as the logs that have been accumulated. If your program is running and continuously writing files, you may want to shut the program down before you export it. Otherwise you might export the program with a file that is only partly written.
With this option programs can be exported and on a different RED Brick be imported (see above).
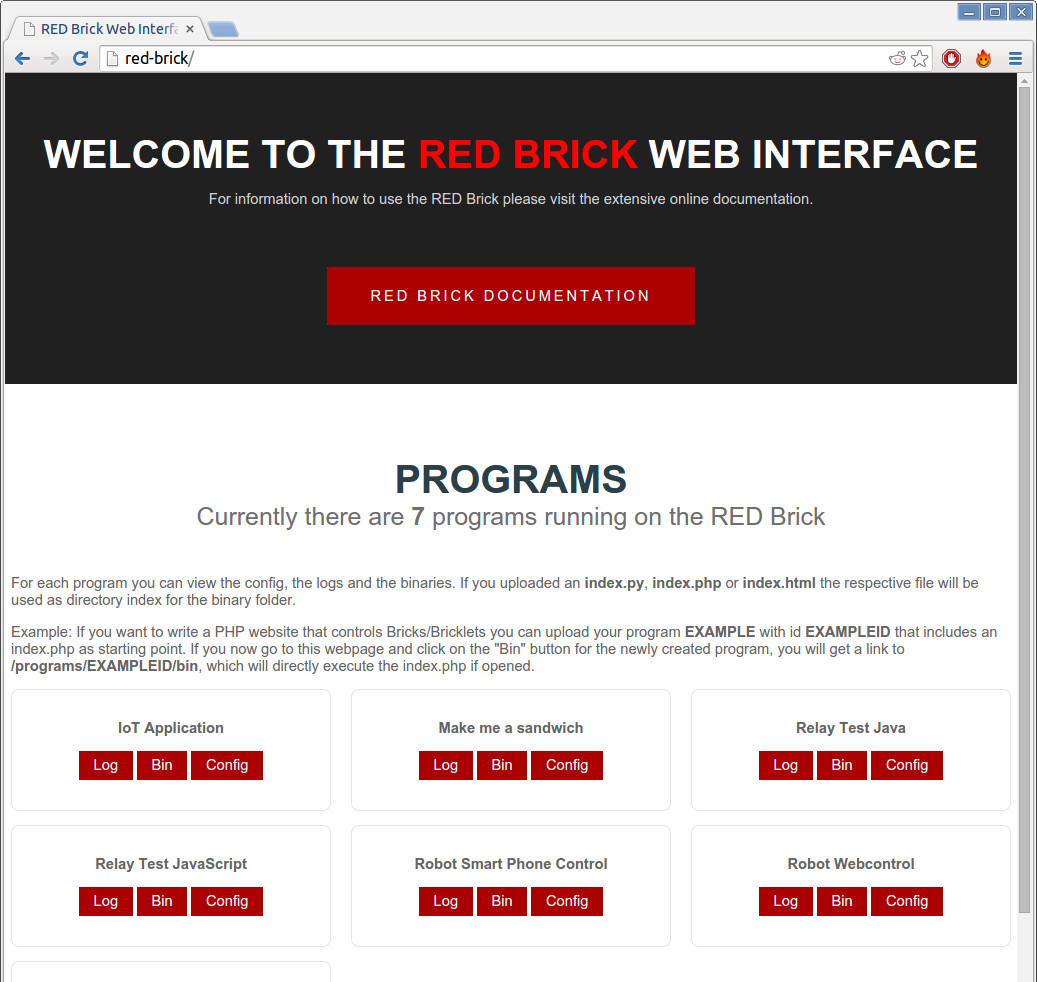
RED Brick Web Interface
If your RED Brick is equipped with a Wi-Fi USB adapter, an Ethernet
Extension or has other network connectivity, you can access a
web interface. The web interface is available at the IP address of the
RED Brick or the hostname (red-brick by default).
The RED Brick web interface shows the installed programs. You can view the logs and configs of the programs as well as the uploaded binaries. Since Image version 1.6 the available openHAB sitemaps and a link to the server monitoring website are included as well.
Besides the default web interface you can also put your own
web interfaces on the RED Brick. Currently we support web applications
written in HTML/JavaScript, Python and PHP. If you upload an index.py,
index.php or index.html, the respective file will be used as
directory index for the binary folder.
Example to clarify: If you want to write a PHP website that controls
Bricks/Bricklets you can upload your PHP program EXAMPLE with id
EXAMPLE-ID that includes an index.php as starting point. If you now
go to the RED Brick web interface and click on the "Bin" button for the
newly created EXAMPLE program, you will get a link to
/programs/EXAMPLE-ID/bin, which will directly execute the index.php
if opened since it will act as index for this directory.
This way you can easily implement a web page that shows environment information gathered from Temperature/Barometer/Humidity Bricklets or you can have a web page with buttons that control Relay Bricklets, etc.
With the RED Brick it is super simple to write web applications that can control hardware.
HTML/JavaScript
If you upload HTML with embedded JavaScript you can use the JavaScript Bindings. They are available in the root directory, import them with:
<script src="/Tinkerforge.js" type='text/javascript'></script>
Note that the JavaScript is executed in the browser of the user and not on the RED Brick, so you have to connect to the IP address of the RED Brick, not localhost!
Python
The webserver on the RED Brick (Apache) uses WSGI
(mod_wsgi) to interface with
Python programs. It is configured to recognize an index.py as the
starting point for a WSGI script. All of the common Python web frameworks
support WSGI. The Flask framework is
preinstalled on the RED Brick (including
Werkzeug and
Jinja).
A minimal flask web interface that can be uploaded to the RED Brick
is an index.py with the following content:
from flask import Flask       # Use Flask framework
application = Flask(__name__) # Function "application" is used by Apache/wsgi
app = application             # Use shortcut for routing

@app.route('/')
def index():
    return '<html><body>Hello World!</body></html>'
To control Bricks/Bricklets you can just import the Tinkerforge Bindings as for all Python programs:
from tinkerforge.ip_connection import IPConnection
from tinkerforge.bricklet_temperature import Temperature

# ...
The default web interface of the RED Brick uses Python/Flask. You can find the code on GitHub.
It is of course also possible to use templates, static files and so on. You can just use them as it is shown in most Flask tutorials.
PHP
The webserver on the RED Brick is configured to recognize an index.php.
An minimal hello world index.php might look like this:
<?php $greeting = 'Hello World!'; ?>

<html>
 <head>
  <title>PHP Example</title>
 </head>
 <body>
  <p><?php echo $greeting; ?><p>
  <p><?php phpinfo(); ?><p>
 </body>
</html>
To control Bricks/Bricklets you can import the Tinkerforge Bindings:
require_once('Tinkerforge/IPConnection.php');
require_once('Tinkerforge/BrickletTemperature.php');

// ...
RED Brick Software Image
The RED Brick software image is based on Debian and is stored on a Micro-SD-Card. Previously the image was available in two different flavors: The "full" and the "fast" image. Since image version 1.4 there is only one image (previously known as the full image) with configurable services (desktop environment, web server, wireless access point, etc.) that allow to customize your image for your individual requirements.
The image comes with a driver for the GPU and all necessary graphical user interface libraries. If enabled, it boots an X server and the LXDE desktop environment with auto login. If the program you run on the RED Brick uses a graphical interface it will show up on the desktop. The screen resolution should automatically adapt to the preferred resolution of the connected HDMI monitor. If you want to change it, you can configure the screen resolution through LXDE. You don't have to use the HDMI port and can execute non graphical programs on this image.
New software can be installed. See the description of the versions tab on how to install new software.
A list of pre-installed programming language libraries is available: Installed library versions.
If you want to log into the Linux system by command line or LXDE, the standard
user is tf with default password tf. The user is a sudoer, i.e.
you can get root access by calling:
sudo -s
The images can be downloaded from the download page.
Build your own Image
For the building steps we are assuming a Debian Linux or derivative (Ubuntu etc) as the host platform.
- Clone the RED Brick repository from GitHub
- Change to the
imagefolder, open theREADME.rstfile and execute the documented steps.
The build process will take at least 4-6 hours, depending on the processing power of your PC it might also take considerably longer.
Copy Image to SD Card
Start by downloading the image from the download page and unpack it. You'll also need a Micro-SD card and a card reader. We recommend a fast card (e.g. Class 10, > 30MB/s read) with enough space (at least 8GB).
We recommend Etcher for writing the image to a Micro-SD card:
- Start Etcher
- Select the unpacked image
- Select the Micro-SD card
- Click "Flash!" to write the image
Change Default Password
The default password of user tf is tf. To change the password open
the console tab.
Choose the correct serial port and press the Connect
button. You should be logged in as user tf (if you see nothing press Enter).
Type passwd. You will be asked for the current password. Type tf. After
that you can enter your new password.
Change HDMI Display Resolution
The RED Brick will automatically configure the correct display resolution using the Extended Display Identification Data (EDID) interface of the connected display. But EDID only works reliable if the display is already connected to HDMI and powered on before the RED Brick boots.
If you connect the display to HDMI or power on the display when the RED Brick is already running then EDID might not work and a wrong resolution might be configured. The easiest way to fix this is to reboot the RED Brick so that the display is connected and powered on before the RED Brick boots.
If you have to connect the display when the RED Brick is already running or the
automatically configured resolution is wrong for some other reason you can
manually set the resolution using the tf-set-resolution tool.
Using tf-set-resolution
Note
Starting from image version 1.10 the tool tf-set-resolution is not available anymore. More information available here section.
To change the display resolution open the console tab. Choose the correct serial port and press the
Connect button. You should be logged in as user tf (if you see nothing
press Enter). Type the following command (you might be asked to enter the
password for tf, the default password is tf):
sudo tf-set-resolution hdmi mode <mode-number>
But instead of <mode-number> you need to put the number of the mode you
want to enable. The following manually settable modes are currently supported:
- 0 = 480i
- 1 = 576i
- 2 = 480p
- 3 = 576p
- 4 = 720p @ 50Hz
- 5 = 720p @ 60Hz
- 6 = 1080i @ 50Hz
- 7 = 1080i @ 60Hz
- 8 = 1080p @ 24Hz
- 9 = 1080p @ 50Hz
- 10 = 1080p @ 60Hz
- 11 = PAL
- 12 = PAL (S-Video)
- 14 = NTSC
- 15 = NTSC (S-Video)
- 17 = PAL-M
- 18 = PAL-M (S-Video)
- 20 = PAL-NC
- 21 = PAL-NC (S-Video)
- 23 = 1080p @ 24Hz (3D)
- 24 = 720p @ 50Hz (3D)
- 25 = 720p @ 60Hz (3D)
- 26 = 1360 x 768 @ 60Hz
- 27 = 1280 x 1024 @ 60Hz
- 28 = 800 x 480 @ 60Hz (requires Image version >= 1.6)
If your desired display resolution is not listed as a settable mode above then we can extend the kernel tables for this to support it. To do this you need to tell us the relevant information for your display. First, ensure that the resolution for your display was properly automatically configured on boot. Then type the following command:
dmesg | egrep "(PCLK=|disp clks:)"
and send us an email (info@tinkerforge.com) with the output of that command.
Example Programs
Several example programs are available on GitHub:
- Set GPS time as system time: If you can't use NTP (i.e. the RED Brick does not have Internet access), you can use the GPS Bricklet to set a proper system time.
- Set Real-Time Clock Bricklet's time as system time: If you can't use NTP (i.e. the RED Brick does not have Internet access), you can use the Real-Time Clock Bricklet Bricklet to set a proper system time.
- Synchronize system time via web browser: If you can't use NTP or a GPS Bricklet or a Real-Time Clock Bricklet to set a proper system time, you can manually synchronize it using your web browser.
- Get humidity callback reading via SMS: This example demonstrates how Bricklet callback values can be reported via SMS if you have a GSM modem connected to the RED Brick.
- Get GPS location from SMS request: This example demonstrates how GPS location can be reported via SMS if you have a GPS Bricklet and a GSM modem connected to the RED Brick.
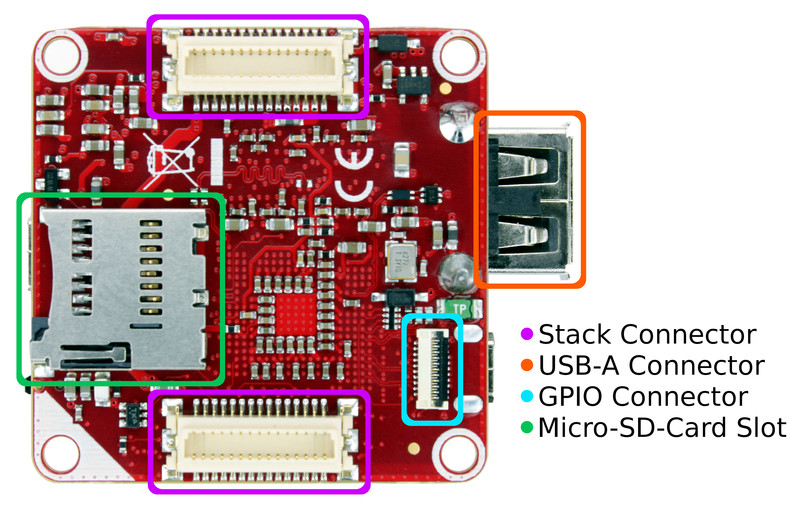
Hardware Description
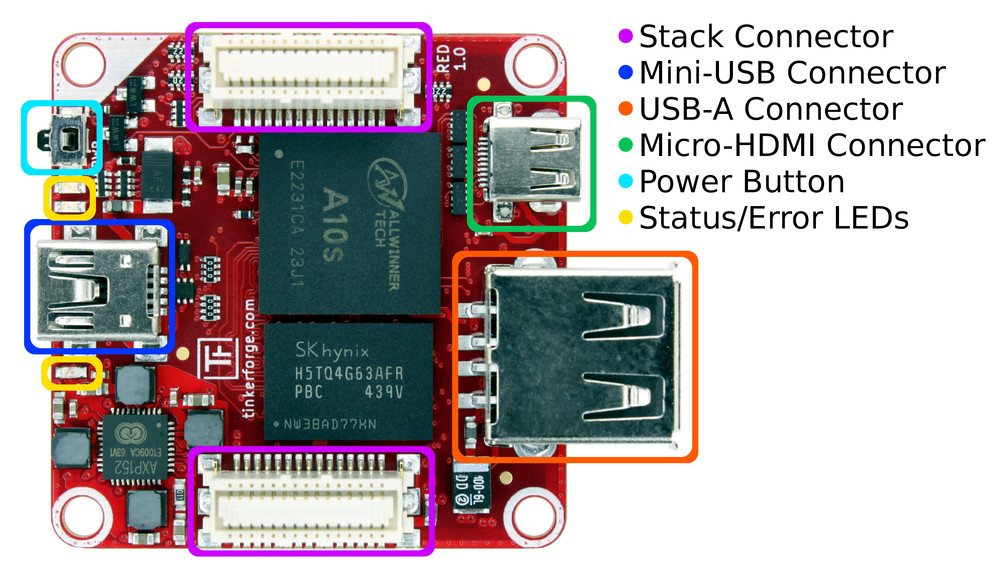

Power Button
The button on the RED Brick is a power button. Press it longer than 5 seconds and the RED Brick will turn off immediately. If the Brick is off, press the button until the blue LED lights up (ca. 3 seconds) and the Brick will boot again.
LEDs
The RED Brick has three LEDs on the top side: A blue, a red and a green LED.
- The blue LED is directly connected to the internal power supply of the processor. The LED is on if the processor is powered.
- The red LED shows if an error is present. If the red LED stays on during startup, no image could be found. There may be no SD card inserted or there is no valid image on the SD card.
- The green LED shows the current state. If on startup the red LED is off and the green LED does not turn on, Linux could not boot properly. During boot-time the green LED turns on. After the RED Brick has booted up and all of the services are available the green led starts showing a heartbeat.
To summarize, a proper boot up of the RED Brick will result in the following sequence:
- Blue and red on, green off (power on).
- Red turns off (U-Boot loaded).
- Green turns on (Linux boots).
- Green starts blinking (heartbeat: Linux booted successfully and all services available).
You can change the function of the green and red LED. They can also show CPU or SD card usage instead of a heartbeat.
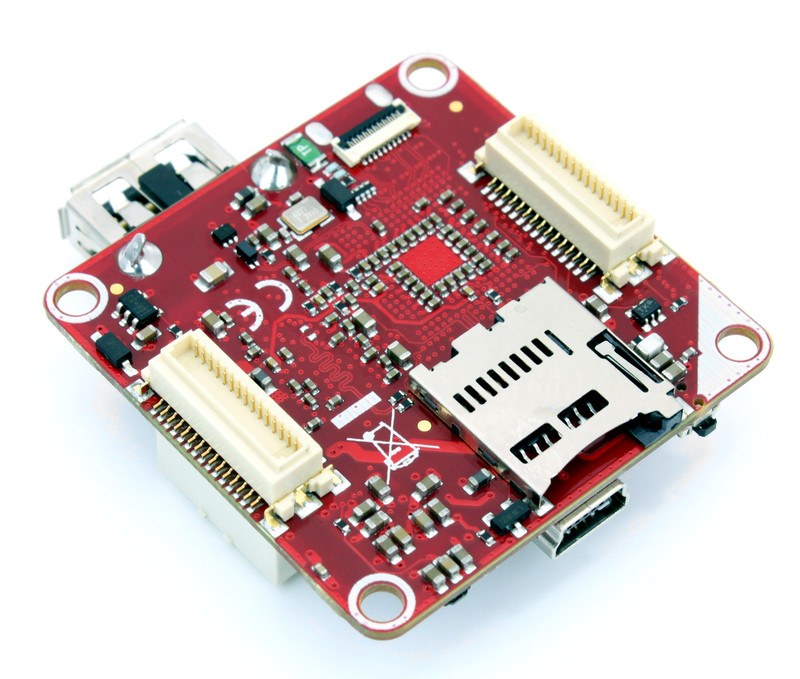
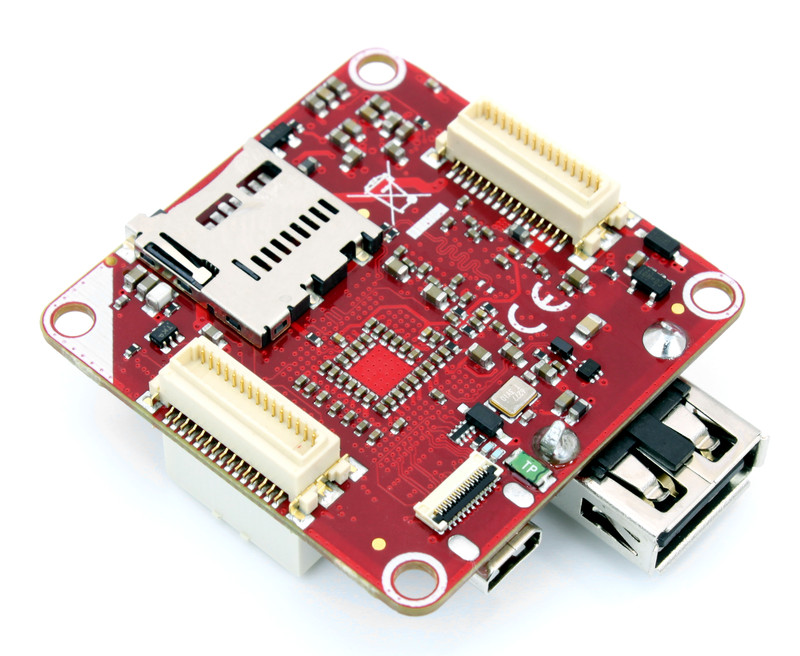
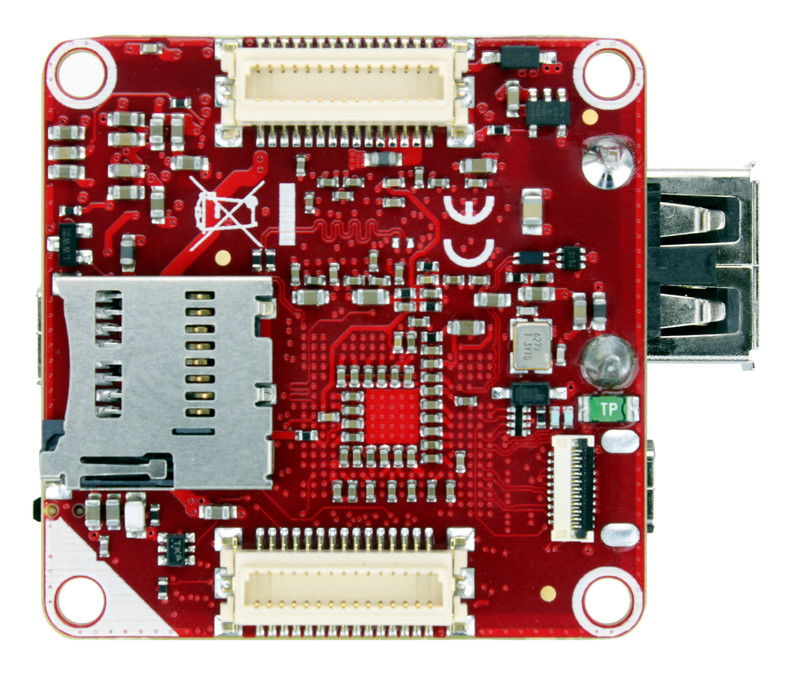
Micro-SD-Card Slot
The Linux system and your data is stored on a Micro-SD card. The slot is located at the bottom side of the Brick. Micro-SD (1.0), Micro-SDHC (2.0) and Micro-SDXC (3.0) cards are supported. As a minimum we recommend a class 10 Micro-SD Card, with a read data rate of 30MB/s as minimum, to ensure fast reads and writes.
A description of the images can be found in the image section.
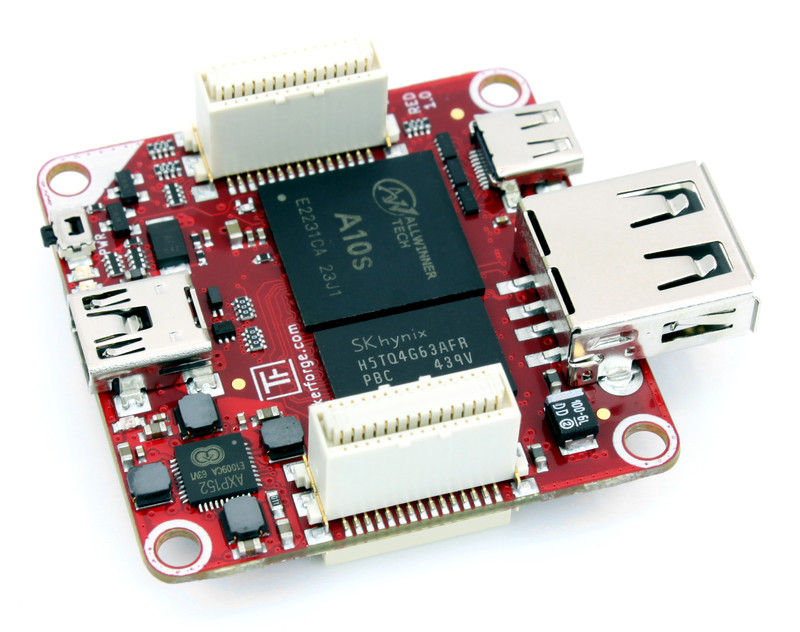
USB 2.0 Host
The RED Brick is equipped with a standard USB 2.0 (480Mb/s) type A jack. It can power other USB devices with up to 7.5W (5V/1.5A) and is short circuit protected. Typical USB devices such as Wi-Fi or Ethernet USB adapter, webcams, printers, keyboards, mouses or USB touch screens are supported, if the required drivers are present on the RED Brick.
Some Ethernet or Wi-Fi USB adapters can be directly configured with the Brick Viewer. Supported USB adapters can be found in our shop. Other devices might have to be configured directly in the Linux system and can't be configured with the Brick Viewer.
Mini-USB
With the Mini-USB connector, the RED Brick can be controlled and configured through the Brick Viewer. It can also be used to power the Brick.
Micro-HDMI
With the Micro-HDMI connector (also called type D), all standard HDMI monitors and TVs can be connected to the RED Brick. HDMI Ethernet Channel (HEC) is not supported.
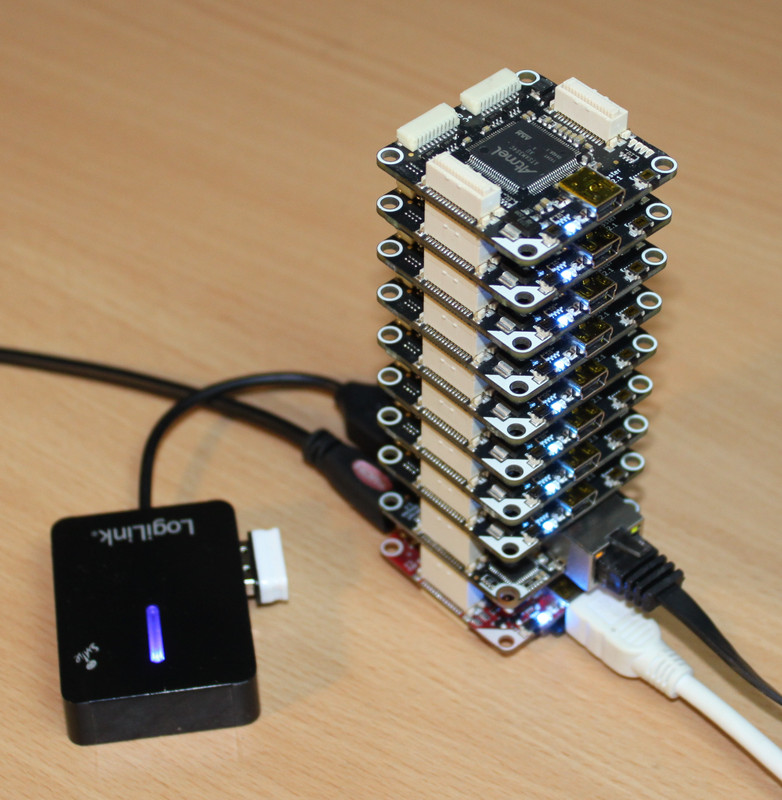
Brick Stack Connector
The RED Brick can control up to eight other Bricks through the stack connectors. Additionally up to two Master Extensions can be used with the RED Brick. Currently only the RS485 Extension all versions of the Ethernet Extension are supported. In a stack each Extension can only be present one time, such that two RS485 or two Ethernet Extension can't be used.
The WIFI Extension is currently not supported. We recommend to use a Wi-Fi USB adapter to add Wi-Fi connectivity to the RED Brick.
The Ethernet Extension shows up as a normal Ethernet interface in the underlying Linux system.
A Step-Down Power Supply can be put below the RED Brick and can power the whole stack.
Power Supply
The RED Brick needs to be powered by a 5V supply. It can be powered through the Mini-USB connector or a Step-Down Power Supply. A single RED Brick needs up to 1.1 Watts, so that a typical 5W (5V/1A) USB power supply will suffice to power it and a Master Brick with a few connected Bricklets. If you use a larger setup, calculate the power requirements and choose a suitable power supply with enough power reserves. Don't forget to add the consumption of additionally connected USB devices.
FAQ
Q: I connected the RED Brick to my Linux PC. Why is there no
/dev/ttyACM0device to access its serial console?A: The
cdc_acmdriver has to be loaded for this to work.Q: The red and blue LED are on. But nothing happens.
A: The RED Brick is not booting. Please check your Micro-SD card.
Known Issues
Second Master Extension does not work all the time (solved)
The kernel configuration in image version 1.0 is erroneous. This results in the second Master Extension not working all the time if two Extension are used at the same time.
Since image version 1.1 the kernel configuration is fixed and this problem does not occur anymore.
C# program crashes on startup (solved)
Image version 1.0 contain C# bindings, that were compiled for CLR version 4. With this C# bindings Mono crashes if the C# program was compiled for CLR version 2:
Missing method .ctor in assembly /usr/lib/Tinkerforge.dll, type System.Runtime.Versioning.TargetFrameworkAttribute
This problem can be avoided by compiling the C# program for CLR version 4 or by adding the following line to the Mono options in C# configuration of the program:
--runtime=v4.0
This problem only affect image version 1.0. Since image version 1.1 the C# bindings are compiled for CLR version 2 again, which fixes the problem.
Stack with NFC/RFID Bricklet on RED Brick does not show up in Brick Viewer (solved)
Problematic setup: Master Brick with NFC/RFID Bricklet and any other Bricklet on top of a RED Brick. In this cases on the RED Brick shows up in Brick Viewer but none of the Bricks and Bricklets in the stack.
The problem is caused by an incompatibility in the NFC/RFID Bricklet plugin version 2.0.0. The incompatibility is fixed in plugin version 2.0.1.
FPC (Delphi/Lazarus) Library not available on RED Brick (solved)
Unfortunately we introduced a bug in the Delphi/Lazarus Bindings through a last-minute change. Because of the bug there is no FPC Library installed on the RED Brick image (version 1.0 and 1.1). This will be fixed in version 1.2, in the meantime you can fix this issue through the console with the following commands:
sudo su
# password = tf

cd /usr/tinkerforge/bindings/delphi/source/
sed -i -e 's/BrickRED//g' Makefile.fpc
export FPCDIR=/usr/lib/fpc/`ls /usr/lib/fpc/ | grep -E [0-9].[0-9].[0-9] | head -n1`
fpcmake
make
make install
Now the FPC Library should be installed properly and everything should work as expected!
The problem only affects image version 1.0 and 1.1, it is fixed since image version 1.2.
No name resolution (solved)
In Image version 1.2 there is no name resolution (DNS) by default. You can fix this through the console:
sudo su
# enter password tf

echo "nameserver 8.8.8.8" > /etc/resolv.conf
The problem only affects image version 1.2, it is fixed since image version 1.3.
Ethernet Extension shows up in Extension tab but not in network settings (solved)
In Image version 1.4 the RED Bricks may have problems finding the driver for the Ethernet extension. If you encounter this problem you can fix this through the console:
sudo su
# enter password tf

ln -s /lib/modules/3.4.103+/kernel/drivers/net/ethernet/wiznet/w5x00.ko /lib/modules/3.4.90+/kernel/drivers/net/ethernet/wiznet/
The problem only affects the RED Brick Image with version 1.4, it is fixed since image version 1.5.
Display resolution cannot be changed (open)
In Image version 1.10 the tf-set-resolution tool isn't available anymore,
because of the Kernel upgrade vom 3.4 to 4.13.
Therefore, the resolution of a connected display cannot be changed at the
moment.
openHAB2 reports missing OSGi packages (open)
In Image version 1.10 openHAB2 is used. After its first activation it installed some OSGi packages on its own. If this installation is aborted by a restart of the RED Brick, or if no Internet connection was available, then openHAB2 can end up in this situation.
This problem can be avoided by making sure that an Internet connection is available if the openHAB service is enabled for the first time and that the RED Brick is not restarted during the installation process. The progress of the installation process can be monitored on the opneHAB webinterface.
History
The development of the RED Brick took almost a year and is documented in several blog posts:
Programming Interface
The RED Brick API is meant to be used by the Brick Viewer to implement the offered functionality (getting status information, managing programs etc.). Normal users will not need to use this API, it may only be interesting for power users.
See Programming Interface for a detailed description.
| Language | API | Examples | Installation |
|---|---|---|---|
| C/C++ | API | Installation | |
| C# | API | Installation | |
| Delphi/Lazarus | API | Examples | Installation |
| Go | API | Installation | |
| Java | API | Examples | Installation |
| JavaScript | API | Installation | |
| LabVIEW | API | Examples | Installation |
| Mathematica | API | Installation | |
| MATLAB/Octave | API | Installation | |
| MQTT | API | Installation | |
| openHAB | API | Examples | Installation |
| Perl | API | Installation | |
| PHP | API | Installation | |
| Python | API | Examples | Installation |
| Ruby | API | Installation | |
| Rust | API | Installation | |
| Shell | API | Installation | |
| Visual Basic .NET | API | Installation | |
| TCP/IP | API | ||
| Modbus | API |