- Getting Started
- Hardware
- Bricks
- Bricklets
- Accelerometer Bricklet 2.0
- Air Quality Bricklet
- Ambient Light Bricklet 3.0
- Analog In Bricklet 3.0
- Analog Out Bricklet 2.0
- Analog Out Bricklet 3.0
- Barometer Bricklet
- Barometer Bricklet 2.0
- Breakout Bricklet
- CAN Bricklet
- CAN Bricklet 2.0
- CO2 Bricklet 2.0
- Color Bricklet
- Color Bricklet 2.0
- Compass Bricklet
- DC Bricklet 2.0
- Distance IR Bricklet
- Distance IR Bricklet 2.0
- Distance US Bricklet 2.0
- DMX Bricklet
- Dual Button Bricklet 2.0
- Dust Detector Bricklet
- E-Paper 296x128 Bricklet
- Energy Monitor Bricklet
- GPS Bricklet 2.0
- GPS Bricklet 3.0
- Hall Effect Bricklet
- Hall Effect Bricklet 2.0
- Humidity Bricklet 2.0
- IMU Bricklet 3.0
- Industrial Analog Out Bricklet 2.0
- Industrial Counter Bricklet
- Industrial Digital In 4 Bricklet 2.0
- Industrial Digital Out 4 Bricklet
- Industrial Digital Out 4 Bricklet 2.0
- Industrial Dual 0-20mA Bricklet
- Industrial Dual 0-20mA Bricklet 2.0
- Industrial Dual AC Relay Bricklet
- Industrial Dual Analog In Bricklet 2.0
- Industrial Dual Relay Bricklet
- Industrial PTC Bricklet
- Industrial Quad Relay Bricklet 2.0
- IO-16 Bricklet
- IO-16 Bricklet 2.0
- IO-4 Bricklet 2.0
- Isolator Bricklet
- Joystick Bricklet
- Joystick Bricklet 2.0
- Laser Range Finder Bricklet 2.0
- LCD 128x64 Bricklet
- LCD 20x4 Bricklet
- LED Strip Bricklet 2.0
- Line Bricklet
- Linear Poti Bricklet
- Linear Poti Bricklet 2.0
- Load Cell Bricklet 2.0
- Motion Detector Bricklet 2.0
- Motorized Linear Poti Bricklet
- Multi Touch Bricklet
- Multi Touch Bricklet 2.0
- NFC Bricklet
- OLED 128x64 Bricklet 2.0
- OLED 64x48 Bricklet
- One Wire Bricklet
- Outdoor Weather Bricklet
- Particulate Matter Bricklet
- Performance DC Bricklet
- Piezo Speaker Bricklet
- Piezo Speaker Bricklet 2.0
- Real-Time Clock Bricklet
- Real-Time Clock Bricklet 2.0
- Remote Switch Bricklet 2.0
- RGB LED Bricklet 2.0
- RGB LED Button Bricklet
- Rotary Encoder Bricklet 2.0
- Rotary Poti Bricklet
- Rotary Poti Bricklet 2.0
- RS232 Bricklet
- RS232 Bricklet 2.0
- RS485 Bricklet
- Segment Display 4x7 Bricklet
- Segment Display 4x7 Bricklet 2.0
- Servo Bricklet 2.0
- Silent Stepper Bricklet 2.0
- Solid State Relay Bricklet 2.0
- Sound Intensity Bricklet
- Sound Pressure Level Bricklet
- Temperature Bricklet
- Temperature Bricklet 2.0
- Temperature IR Bricklet 2.0
- Thermal Imaging Bricklet
- Thermocouple Bricklet 2.0
- Tilt Bricklet
- UV Light Bricklet 2.0
- Voltage/Current Bricklet 2.0
- XMC1400 Breakout Bricklet
- Master Extensions
- Power Supplies
- Discontinued Products
- Timeline
- Software
- Kits
- Embedded Boards
- Specifications
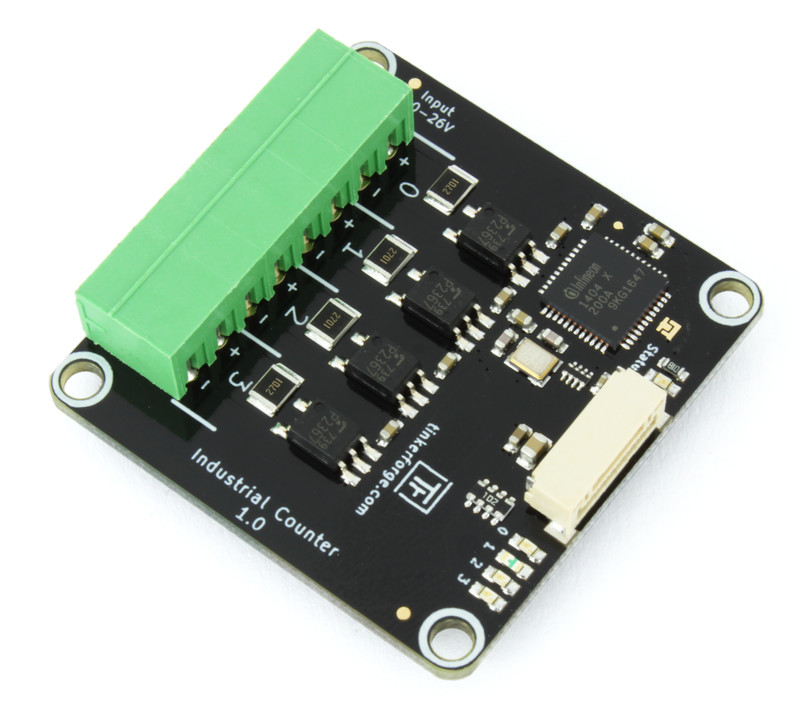
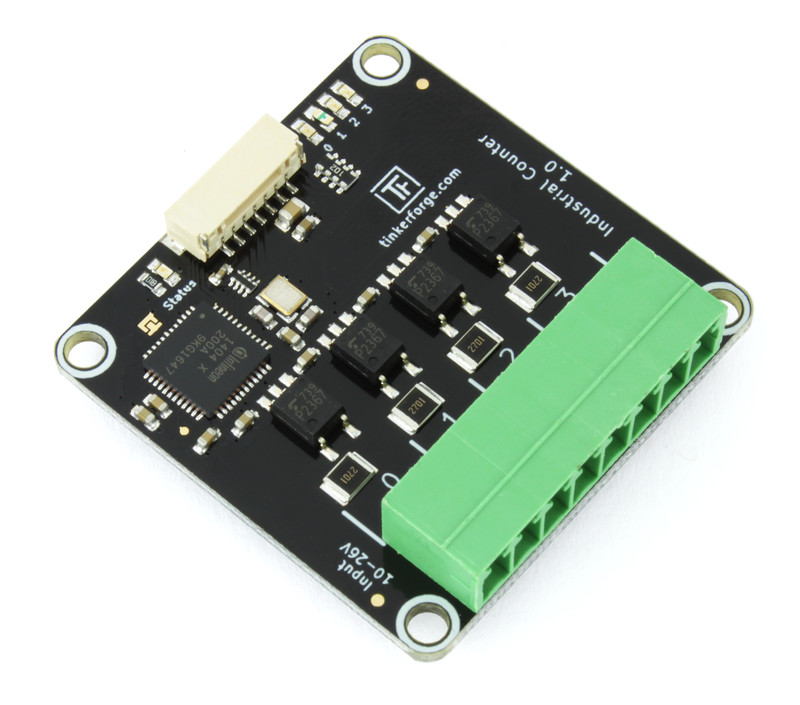
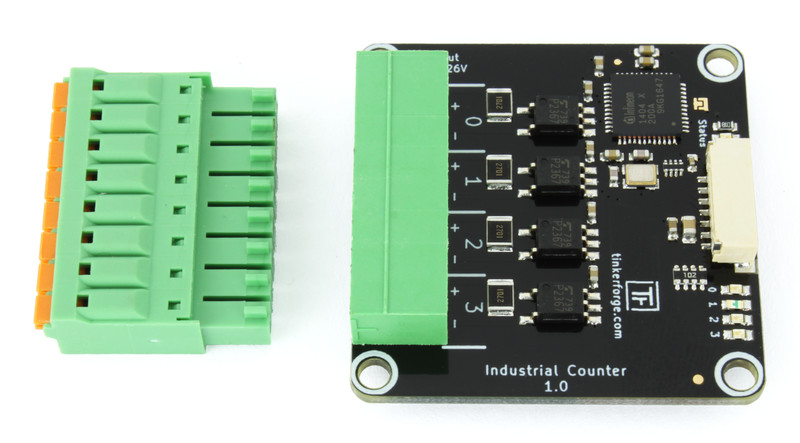
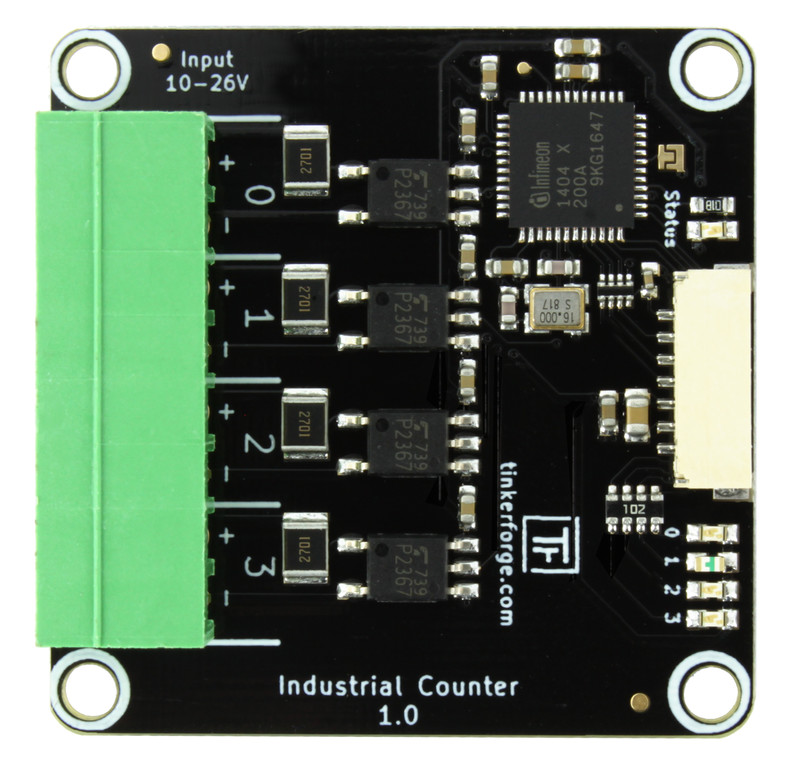
Industrial Counter Bricklet
Features
- 4 channel galvanically isolated frequency counter
- Configurable edge count per channel
- Measures duty cycle, period and frequency per channel
- Frequency range from 0.03Hz to 4MHz
- Time resolution up to 10.4ns and frequency resolution up to 0.03Hz
Description
The Industrial Counter Bricklet can be used to extend Bricks by four frequency counter channels.
The Bricklet has an integrated edge counter and it can measure duty cycle, period, frequency and value per channel. The frequency can be as high as 4MHz.
The edge counter can count rising edges, falling edges or both. The direction of the count (up or down) is configurable. It is also possible to use the value of one channel as the direction (e.g. high = up, low = down) for another channel.
All 4 channels are galvanically isolated.
Example applications for the Bricklet are reading of a PWM signal and reading of sensors that have edge counts or frequency as output.
Technical Specifications
| Property | Value |
|---|---|
| Current Consumption | 100mW (20mA at 5V) |
| Input Type | Four optocoupled inputs (including 2.7kΩ series resistor) |
| Input Current | Depending on input voltage, ca. 3.85mA/12V, ca. 8.3mA/24V |
| Maximum Input Voltage | 26V (DC) |
| Low Level Voltage | 0-2V |
| High Level Voltage | 10-26V |
| Isolation | 3750Vrms (optocoupler value) |
| Minimum Input Frequency | 0.03Hz |
| Maximum Input Frequency | 4Mhz |
| Time resolution | up to 10.4ns (Duty Cycle Prescaler set to 1) |
| Frequency resolution | up to 0.03Hz (Frequency Integration Time set to 32768ms) |
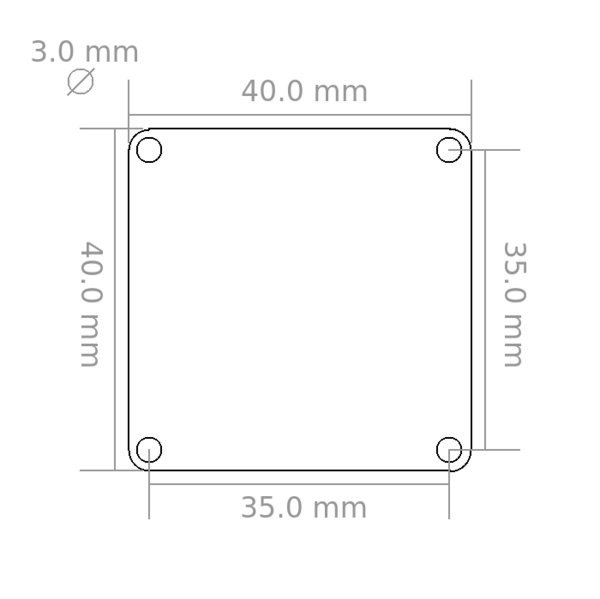
| Dimensions (W x D x H) | 40 x 40 x 11mm (1.57 x 1.57 x 0.43") |
| Weight | 8.4g |
Resources
Quadrature Encoder
The Industrial Counter Bricklet can be used to read out up to two quadrature encoders.
One A/B-pair of the encoder can be connected to the Channels 0/2 and the other pair can be connected to the channels 1/3.

As an example we use a LPD3806-600BM encoder. It has a simple interface consisting of A, B, VCC and GND/SHD and it can be powered by a 24V power supply.
To use it with the Industrial Counter Bricklet we connected A and B with a 1k ohm pull-up to VCC and A to CH0-, B to CH2- as well as VCC to CH0+ and CH2+.
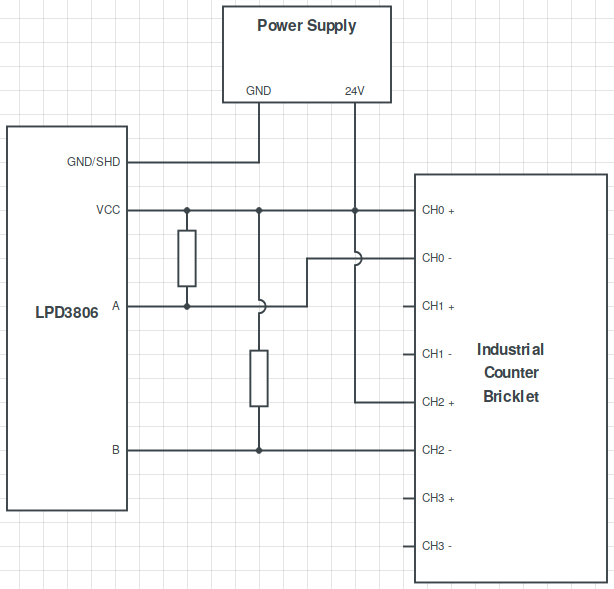
In software we configure channel 0 to count up on rising edge if channel 2 is low (see Extern Count Direction for more information on this configuration).
The following example code (Python) does the necessary configuration, starts one full revolution with a Silent Stepper Brick and prints the count of channel 0 of the Industrial Counter Bricklet. The LPD3806-600BM encoder has 600 steps per rotation, so the expected count is 600.
HOST = "localhost"
PORT = 4223
UID_COUNTER = "GfX"
UID_SILENT_STEPPER = "63noND"

from tinkerforge.ip_connection import IPConnection
from tinkerforge.bricklet_industrial_counter import BrickletIndustrialCounter
from tinkerforge.brick_silent_stepper import BrickSilentStepper
import time

if __name__ == "__main__":
    ipcon = IPConnection() # Create IP connection
    counter = BrickletIndustrialCounter(UID_COUNTER, ipcon) # Create device object
    ss = BrickSilentStepper(UID_SILENT_STEPPER, ipcon) # Create device object

    ipcon.connect(HOST, PORT) # Connect to brickd
    # Don't use device before ipcon is connected


    # Configure channel 0 to count up if channel 2 is low
    counter.set_counter_configuration(counter.CHANNEL_0,
                                      counter.COUNT_EDGE_RISING,
                                      counter.COUNT_DIRECTION_EXTERNAL_DOWN,
                                      counter.DUTY_CYCLE_PRESCALER_1,
                                      counter.FREQUENCY_INTEGRATION_TIME_1024_MS)
    counter.set_all_counter_active([True, False, False, False])
    counter.set_counter(0, 0)

    # Configure stepper motor with 800mA, 10000steps/s² acceleration,
    # 1/16 step resolution, velocity 3200 steps/s and enable motor.
    ss.set_motor_current(800)
    ss.set_speed_ramping(10000, 10000)
    ss.set_step_configuration(ss.STEP_RESOLUTION_16, True)
    ss.set_max_velocity(3200)
    ss.enable() # Enable motor power

    # Move 3200 steps (at 1/16 step resolution and 200 steps per revolution
    # this is exactly 1 full revolution)
    ss.set_steps(3200)

    # Wait for 3200 steps to finish
    time.sleep(2)

    # Get counter value.
    # We expect this to return a value of 600 for the LPD3806-600BM encoder
    encoder_count = counter.get_counter(0)
    print('Encoder Count: {0}'.format(encoder_count))

    ipcon.disconnect()
In our test the output of the program was exactly as expected:
tf@pc:~/tests$ python count.py
> Encoder Count: 600
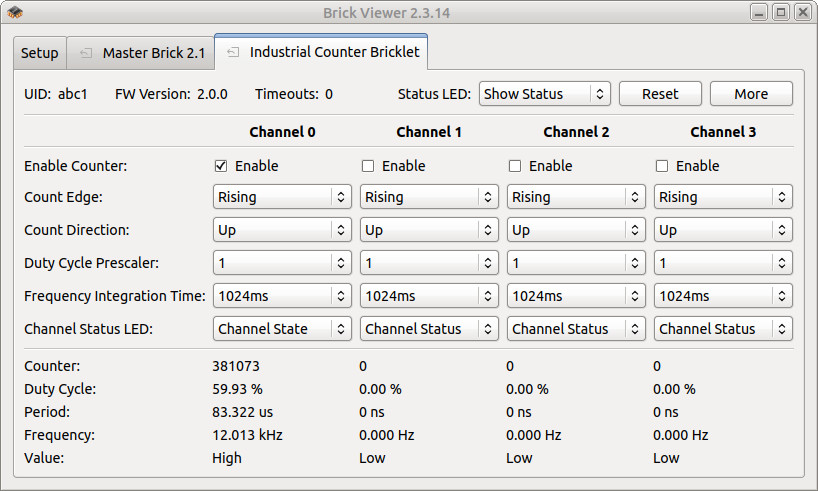
Channel Status LEDs
The Bricklet has the standard status LED with four additional LEDs (one for each channel).
By default the channel status LEDs are on if the corresponding channel is high and off otherwise. You can also turn each LED individually on/off and show other status information through the API.
Duty Cycle Prescaler and Frequency Integration Time
The Bricklet has two important configurations per channel:
Duty Cycle Prescaler: Prescaler for internal clock.
Internally the Bricklet uses a 96MHz clock. The prescaler is a divider for this internal clock. If the input frequency is smaller than 1465Hz, the internal counter can overflow and the frequency measurement becomes distorted. In this case the prescaler needs to be increased.
If your frequency is above 1465Hz, you can always use a prescaler of 1. If your input frequency is below 1465Hz, you can look at the list below for the prescaler that gives you the highest resolution for a given frequency.
- 1: minimum frequency 1465Hz, resolution 10.4ns
- 2: minimum frequency 733Hz, resolution 20.8ns
- 4: minimum frequency 367Hz, resolution 41.6ns
- 8: minimum frequency 184Hz, resolution 83.3ns
- 16: minimum frequency 92Hz, resolution 166.6ns
- 32: minimum frequency 46Hz, resolution 333.3ns
- 64: minimum frequency 23Hz, resolution 0.66us
- 12: minimum frequency 12Hz, resolution 1.33us
- 256: minimum frequency 6Hz, resolution 2.66us
- 512: minimum frequency 3Hz, resolution 5.33us
- 1024: minimum frequency 2Hz, resolution 10.66us
- 2048: minimum frequency 0.7Hz, resolution 21.33us
- 4096: minimum frequency 0.36Hz, resolution 42.66us
- 8192: minimum frequency 0.18Hz, resolution 85.33us
- 16384: minimum frequency 0.09Hz, resolution 170.66us
- 32768: minimum frequency 0.045Hz, resolution 341.33us
Frequency Integration Time: Time that is used to calculate the frequency.
The frequency is calculated by dividing the number of edges by the integration time. Example: If the Frequency Integration Time is set to 2048ms and the Bricklet sees 40960 edge changes in this time, the resulting frequency is 20kHz (40960 edges divided by 2.048 seconds).
For the frequency integration to work, the frequency integration time needs to be higher then the period of the measured frequency.
The update rate of the frequency corresponds to the Frequency Integration Time. So a small integration time means that the value is updated more often. If (for example) you change the Frequency Integration Time to 4096ms, it will take ~4 seconds until you get a proper frequency for the first time and the value will be updated every 4 seconds.
The resolution of the measured frequency increases with increased integration time:
- 128ms: 7.81Hz
- 256ms: 3.90Hz
- 512ms: 1.95Hz
- 1024ms: 0.98Hz
- 2048ms: 0.49Hz
- 4096ms: 0.24Hz
- 8192ms: 0.12Hz
- 16384ms: 0.06Hz
- 32768ms: 0.03Hz
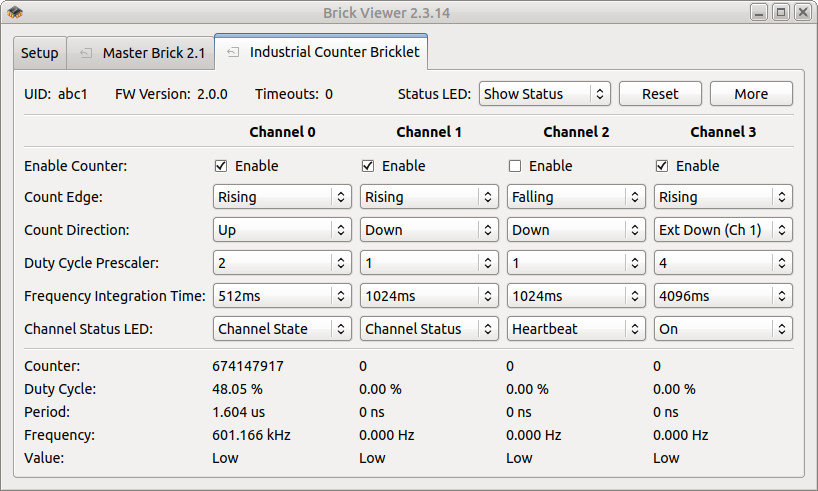
Count, Duty Cycle, Period, Frequency, Value
The Industrial Counter Bricklet has five different measurements:
Count: Is the number of counted edges. The Bricklet can count rising edges, falling edges or both edges. The direction of the counting (up or down) can be configured. For channel 0 and 3 it is also possible to use another channel as the input for counting up or down.
Duty Cycle: Is the percentage that the signal is high in a cycle.
Period: Is the duration of one cycle.
Frequency: Is the frequency of the signal measured over a longer time period.
Value: Is the current state of the channel (either high or low).
Duty Cycle and Period are always given for the last cycle seen. The frequency is calculated using the configured Frequency Integration Time. If the cycles have a bit of jitter, the frequency will stay stable while the period and duty cycle will show the jitter.
If the resolution of the period is high enough, the frequency of the signal is stable and there is no jitter, the frequency will be equal to 1/period.
Below you can find an oscilloscope screenshot that shows the different measurements of a 12kHz signal with 60% duty cycle
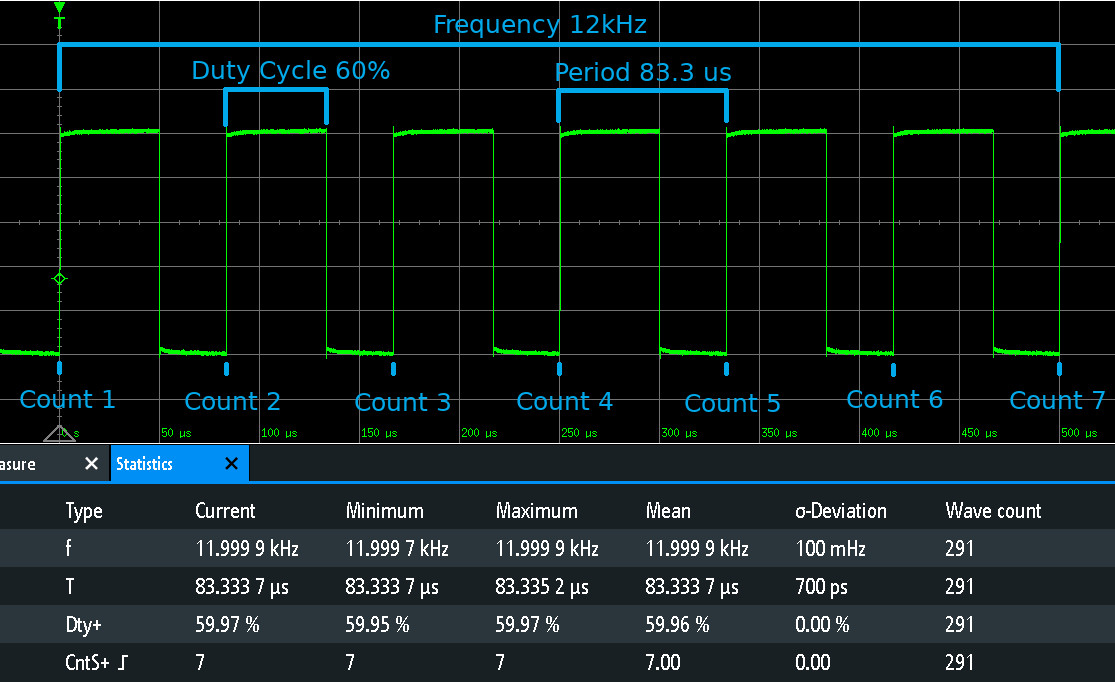
and the corresponding Brick Viewer screenshot of the same signal connected to the Industrial Counter Bricklet.
External Count Direction
The count direction (up or down) can be configured and changed on-the-fly for each channel. Channel 0 additionally supports to use the input of channel 2 as direction. You can configure channel 0 to count up if the value of channel 2 is high and down if the value is low and the other way around.
Additionally channel 3 can use channel 1 as direction input in the same manner.
Test your Industrial Counter Bricklet
To test a Industrial Counter Bricklet you need to have Brick Daemon and Brick Viewer installed. Brick Daemon acts as a proxy between the USB interface of the Bricks and the API bindings. Brick Viewer connects to Brick Daemon. It helps to figure out basic information about the connected Bricks and Bricklets and allows to test them.
Connect the Industrial Counter Bricklet to a Brick with a Bricklet Cable.
If you connect the Brick to the PC over USB, you should see a new tab named "Industrial Counter Bricklet" in the Brick Viewer after a moment. Select this tab. If everything went as expected you can now configure the channels and see the counter values.
After this test you can go on with writing your own application. See the Programming Interface section for the API of the Industrial Counter Bricklet and examples in different programming languages.
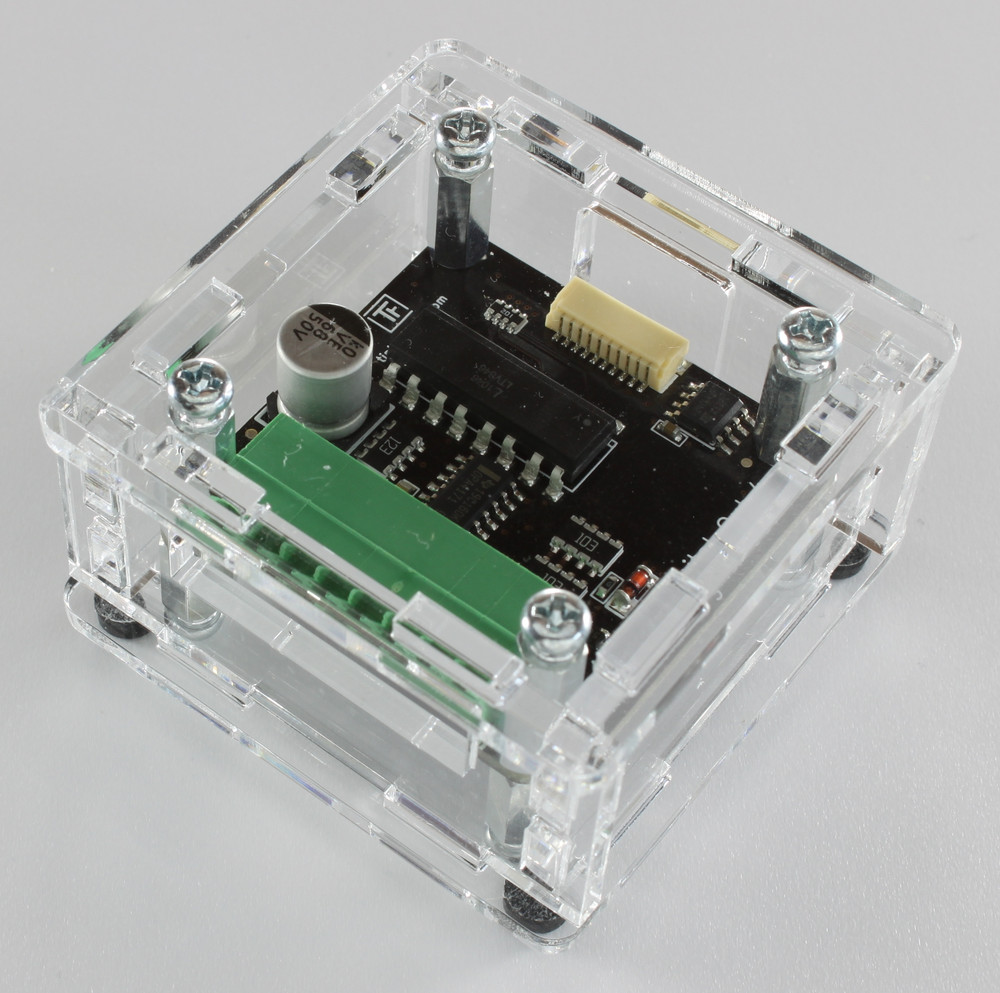
Case
A laser-cut case for the Industrial Counter Bricklet is available.
The assembly is easiest if you follow the following steps:
- Screw spacers to the Bricklet,
- screw bottom plate to bottom spacers,
- build up side plates,
- plug side plates into bottom plate and
- screw top plate to top spacers.
Below you can see an exploded assembly drawing of the Industrial Counter Bricklet case:
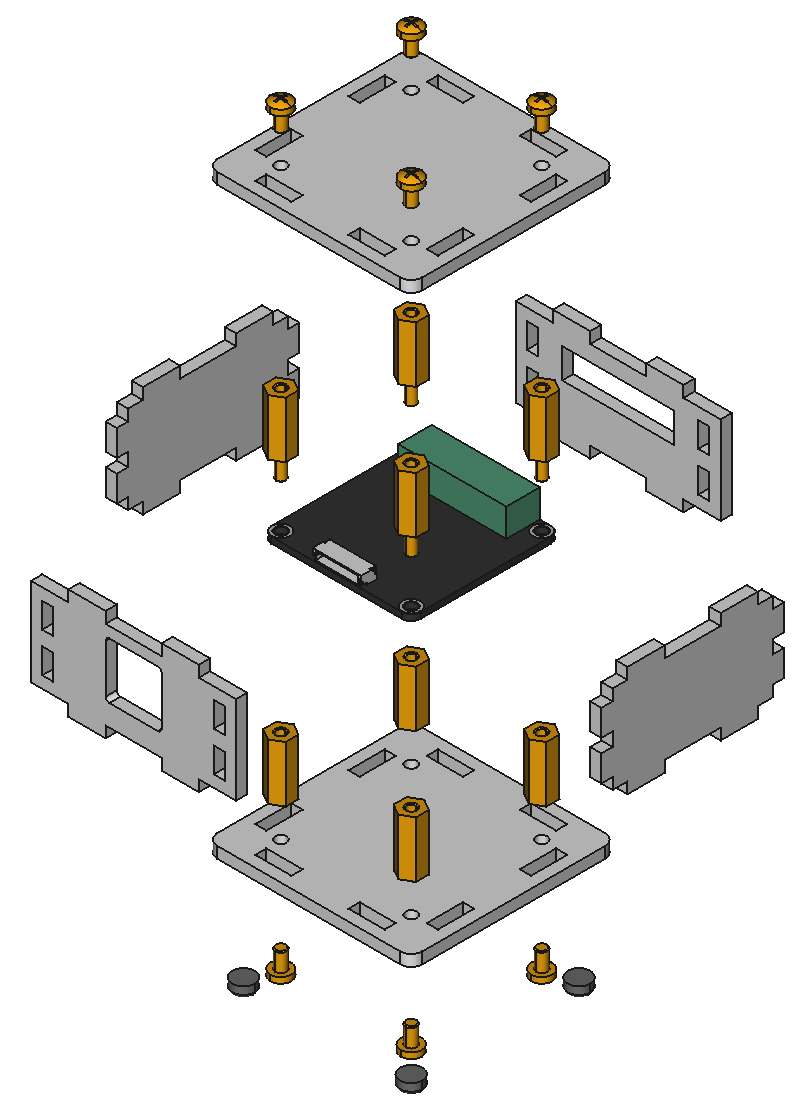
Hint: There is a protective film on both sides of the plates, you have to remove it before assembly.
Programming Interface
See Programming Interface for a detailed description.
| Language | API | Examples | Installation |
|---|---|---|---|
| C/C++ | API | Examples | Installation |
| C/C++ for Microcontrollers | API | Examples | Installation |
| C# | API | Examples | Installation |
| Delphi/Lazarus | API | Examples | Installation |
| Go | API | Examples | Installation |
| Java | API | Examples | Installation |
| JavaScript | API | Examples | Installation |
| LabVIEW | API | Examples | Installation |
| Mathematica | API | Examples | Installation |
| MATLAB/Octave | API | Examples | Installation |
| MQTT | API | Examples | Installation |
| openHAB | API | Examples | Installation |
| Perl | API | Examples | Installation |
| PHP | API | Examples | Installation |
| Python | API | Examples | Installation |
| Ruby | API | Examples | Installation |
| Rust | API | Examples | Installation |
| Shell | API | Examples | Installation |
| Visual Basic .NET | API | Examples | Installation |
| TCP/IP | API | ||
| Modbus | API |