- Getting Started
- Hardware
- Bricks
- Bricklets
- Master Extensions
- Power Supplies
- Discontinued Products
- Timeline
- Software
- Kits
- Embedded Boards
- Specifications
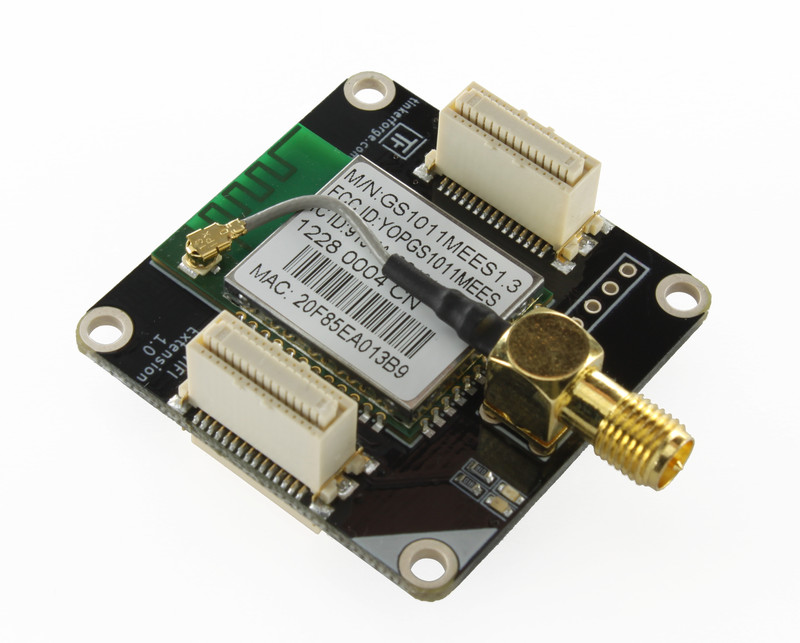
WIFI Master Extension

Note
The WIFI Extension has been superseded by the superior WIFI Extension 2.0. The old WIFI Extension is still available, but you should only use it if you need an external antenna connector. See the blog post about the WIFI Extension 2.0 for a more detailed comparison.
Features
Control Bricks/Bricklets wirelessly over your mobile phone or tablet
Operates with 802.11b/g/n access points, WEP, WPA, WPA2 Personal and Enterprise encryption
Equipped with 18dBm power amplifier for extended range
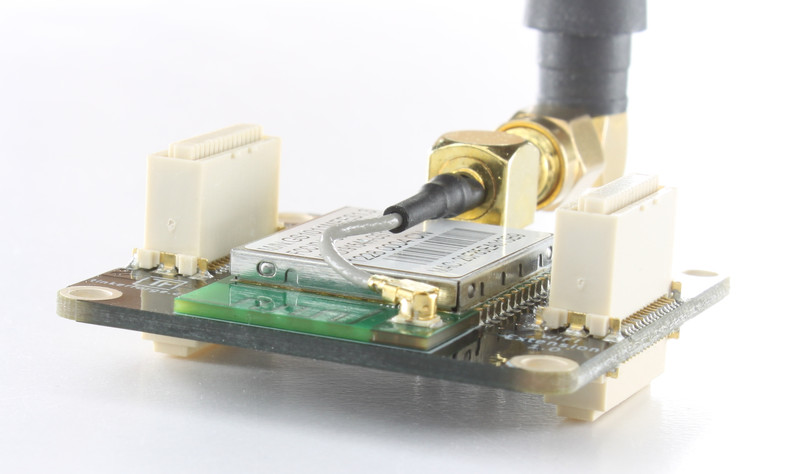
External RP-SMA and U.FL antenna connector
Description
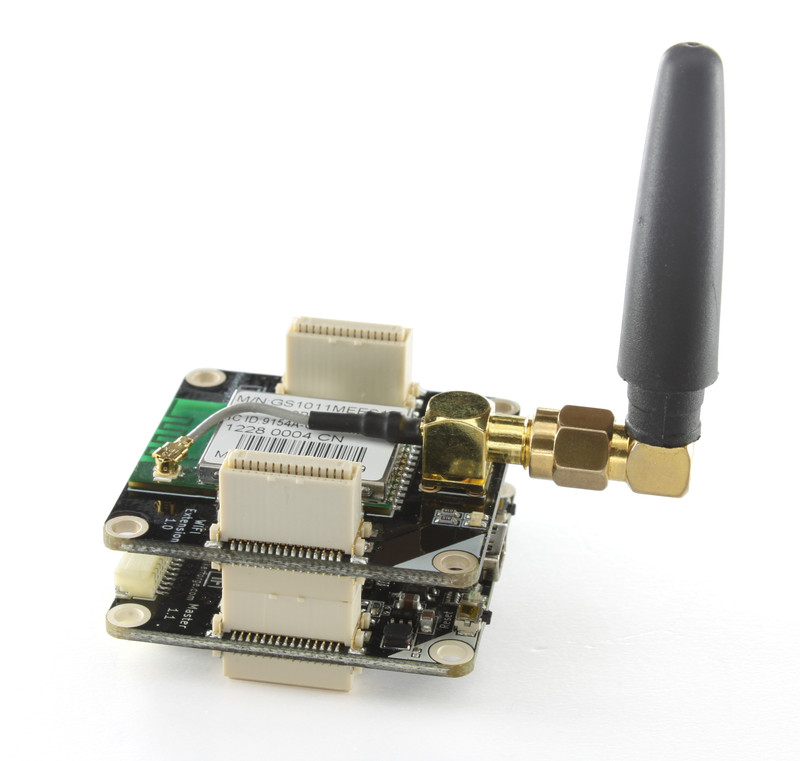
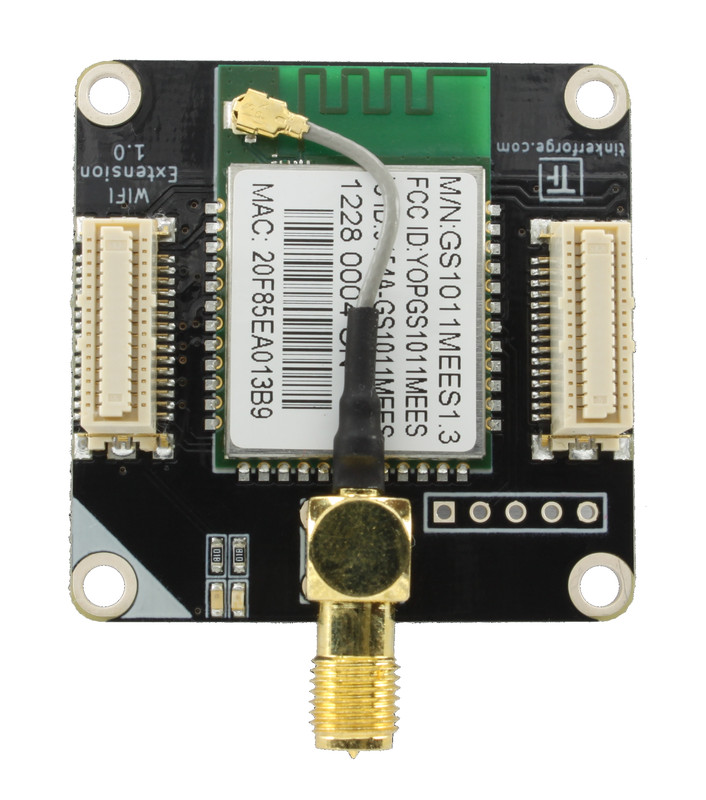
With this WIFI Extension you can control Bricks and Bricklets wirelessly over your mobile phone, tablet or your PC. For the Master Extension concept please take a look at the general description. The Extension is equipped with a GainSpan GS1011MEES Wi-Fi module with an internal power amplifier which allows for superior range compared to other Wi-Fi modules.
The devices supports two modes. In Full Speed Mode the device Wi-Fi transceiver is always on. New incoming data will be immediately handled. In Low Power Mode the devices is not always on, the transceiver enters sleep mode after each message. This leads to a significantly lower power consumption and data throughput.
Since the device itself handles TCP/IP packages generated by the API, it is possible to connect directly from your controlling device (mobile phone, tablet, (embedded) PC). A Brick Daemon is not necessary.
To use the WIFI Extension a Master Brick is mandatory. The RED Brick is currently not supported. If you want to use other Bricks, you can build a stack and plug them also on top of the Master Brick. If you want to use Bricklets you can attach them to the Master Brick or to other Bricks in the stack. From the programming perspective this is completely transparent, i.e. all Bricks and Bricklets can be used exactly the same way as if they were connected to your controlling device via USB.
You need a Master Brick with firmware version 1.3.0 or newer to use this extension.
The following combinations with other Extensions in a stack are possible (regardless of order):
WIFI / RS485 Master
Technical Specifications
Property |
Value |
|---|---|
Current Consumption |
110mA (transmit), 23mA (during sleep) |
Maximum Range (Outdoor) |
TBD |
Maximum Transfer Rate |
TBD |
Maximum Concurrent Connections |
15 |
RF Output Power (Typical) |
18dBm |
External Antenna Connector |
RP-SMA Female (with pin inside) and U.FL |
Security Protocols |
WEP, WPA, WPA2 (Personal and Enterprise), EAP-FAST, EAP-TLS, EAP-TTLS, PEAP |
Supported Standards |
IEEE 802.11b/g/n, with DSSS and CCK modulation |
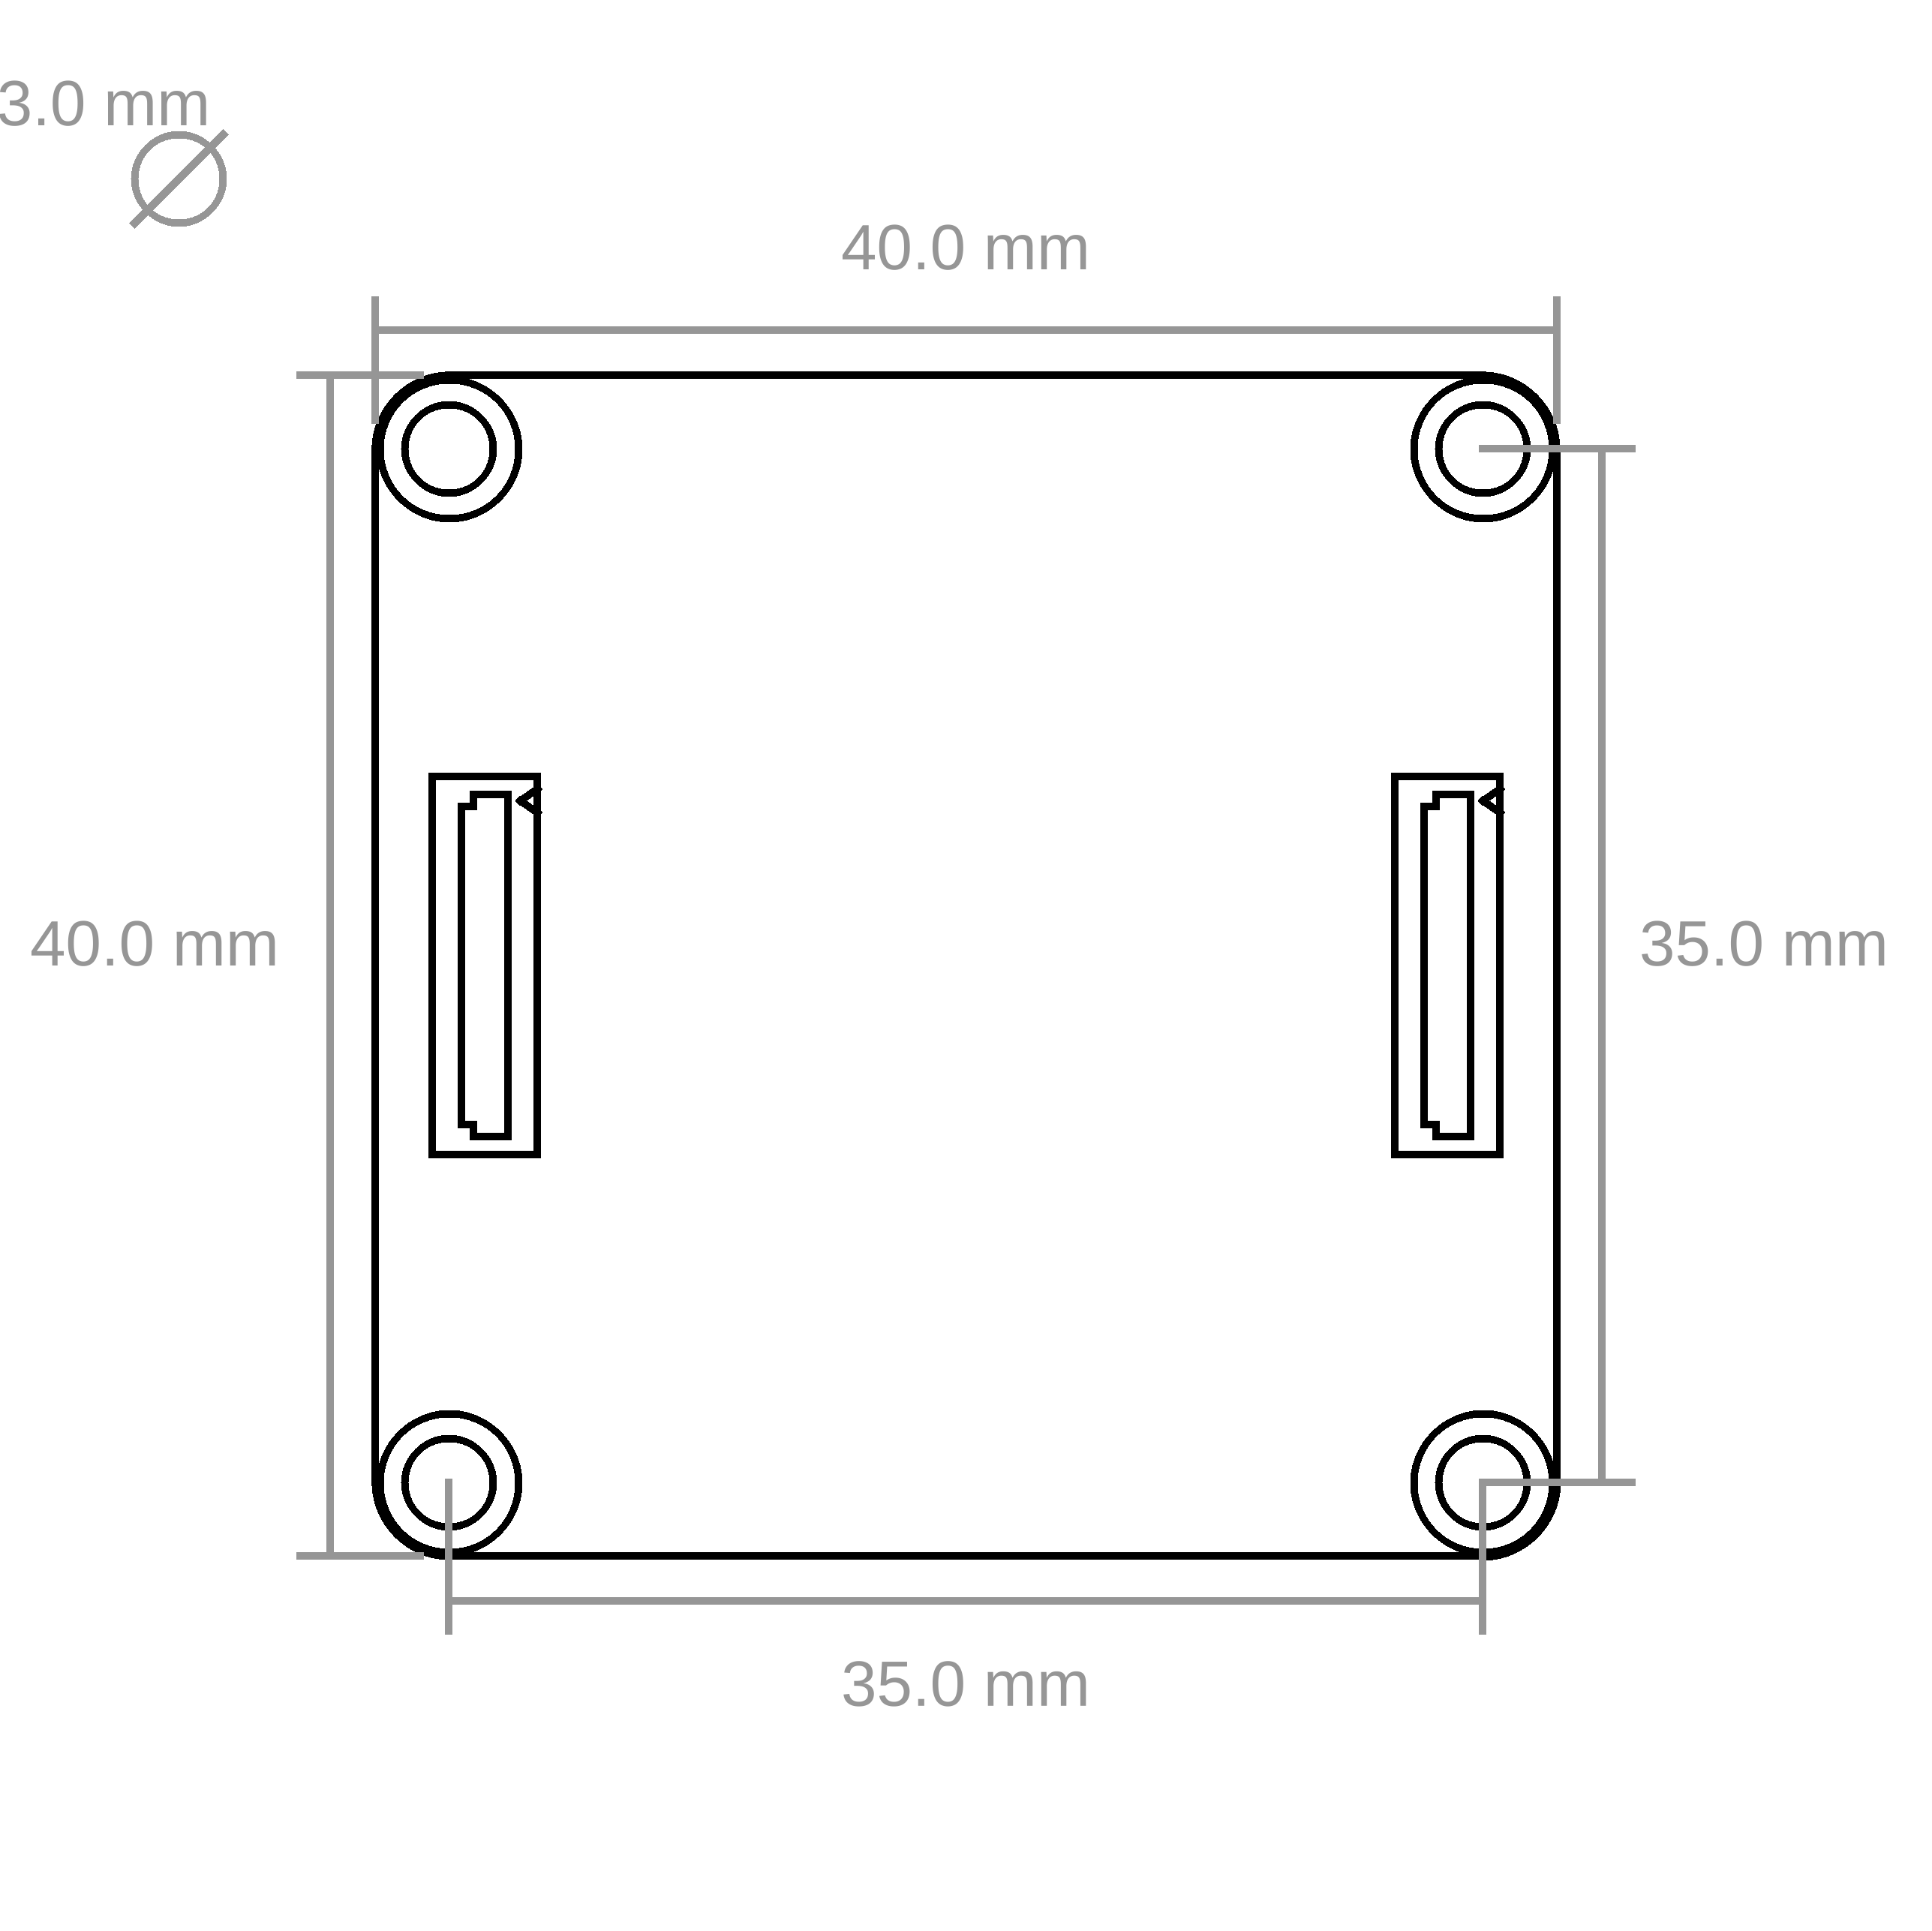
Dimensions (W x D x H) |
40 x 40 x 16mm (1.57 x 1.57 x 0.63") |
Weight |
18g |
Resources
WIFI Network
With this Master Extension you will be able to create a wireless connection to a Master Brick and all of its connected Bricks and Bricklets. No Brick Daemon is necessary if you use this Extension.
If you want to connect the Brick Viewer with your WIFI setup, you have to enter the IP of the WIFI Extension and the configured port in the Setup Tab. After pressing "Connect" you will not connect to your local running Brick Daemon but to your WIFI Extension.
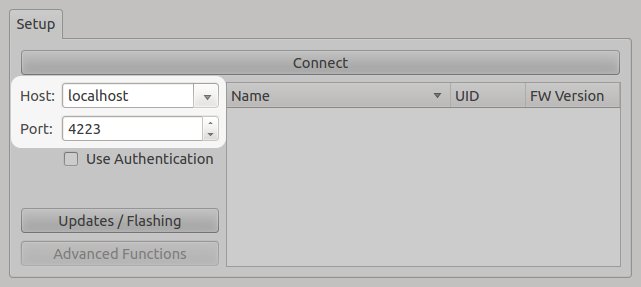
For your own code modify the passed host and port to your connect call, e.g.:
ipcon.connect("localhost", 4223)
has to be changed to
ipcon.connect("192.168.0.25", 4223)
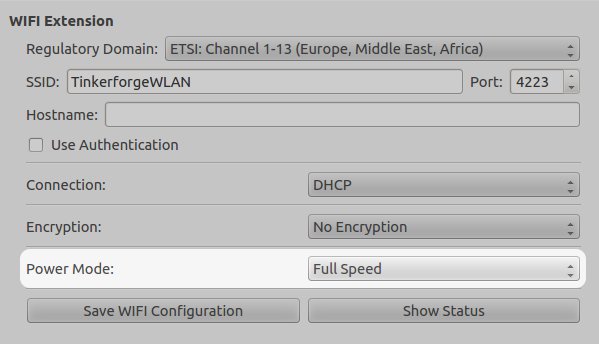
WIFI Configuration
To configure the WIFI Extension open the Master Brick Tab in the Brick Viewer. First of all you have to enter the SSID of your wireless network. The SSID is the name of the wireless network to which the WIFI Extension should connect to in client mode, respectively it is the name of the wireless network the WIFI Extension provides in access point mode or ad hoc mode (this section focuses on client mode). The SSID can be 32 ASCII characters long (quotation mark is not allowed).
IP Address
Then you have to select DHCP or static IP address configuration. In case of you want to use DHCP simply select DHCP and configure the port.
If you want to use a static IP address you have to configure that IP and the port. Additionally configure the subnet mask and gateway address.
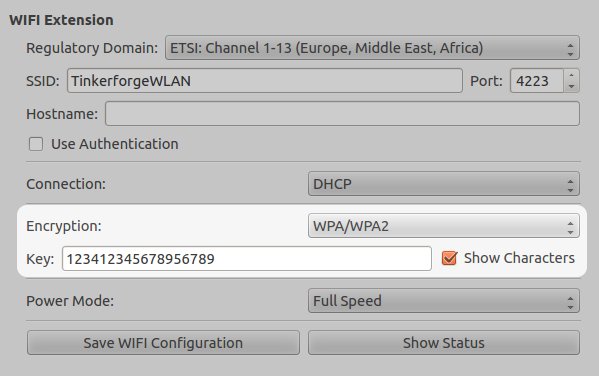
Encryption
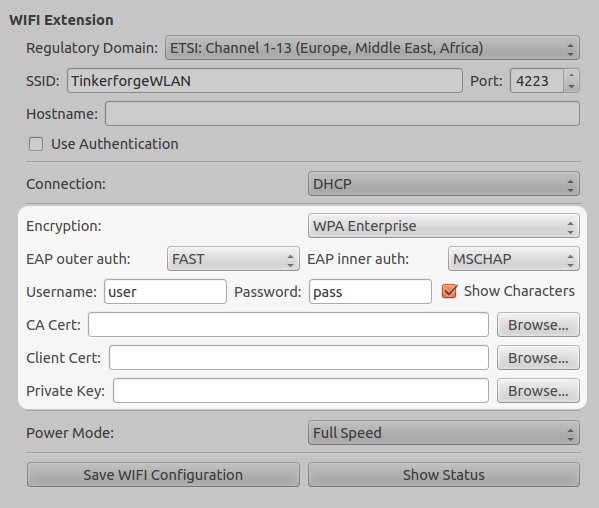
We suggest that you use an encrypted network. You can choose between WPA/WPA2, WPA Enterprise (EAP-FAST, EAP-TLS, EAP-TTLS, PEAP) and WEP.
For WPA you only have to enter the key (limited to ASCII characters, without the quotation mark).
For WPA Enterprise configure outer auth (FAST, TLS, TTLS, PEAP), inner auth (MSCHAP, GTC), user, password and add the necessary certificates (ca cert, client cert, private key).
For WEP enter the key and the key index. If the key index is unknown it is likely 1. Please enter your key in hex notation with the full key length (depending on 64bit and 128bit key).
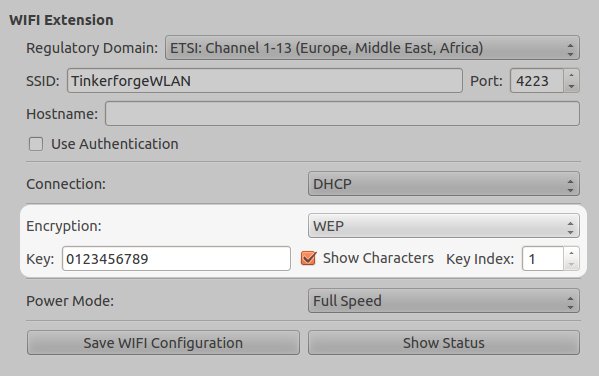
Note
WEP encryption has been broken and it doesn't provide any real security anymore. We strongly suggest to use WPA/WPA2 instead.
If you don't want encryption select "No Encryption".
Power Mode
Finally you have to configure the Power Mode. There are two Power Modes: Full Speed and Low Power. In Full Speed mode the device consumes more power, but you will be able to transmit much more messages. This will be the typical configuration. If you only need to transmit only a few messages per second (e.g. if you want to measure temperatures wirelessly, than you might to use the Low Power Mode and save energy.
Note
The Power Mode is not saved permanently, it will automatically switch back to Full Speed on reset of the Master Brick. Because Low Power Mode is not fast enough for the initial enumeration after a reset. Therefore, you need to enable Low Power Mode after each reset.
At the end, press "Save WIFI Configuration" to save the configuration permanently on the WIFI Extension. If another option besides the Power Mode has be changed then the Master Brick has to be restarted to apply the new configuration. After restart you should be able to reach the Master Brick by entering the IP address and port of the Brick in the Brick Viewer.
Example: Client Mode with dynamic IP Address
This examples shows how to configure the WIFI Extension to connect to a typical Wi-Fi access point. This example assumes that the SSID of your access point is "MyHomeNetwork" and that it is using WPA/WPA2 encryption with "1234567890ABCDEF" as key.
Firstly, enter the SSID (the name of your Wi-Fi network) to connect to. For example:
SSID: MyHomeNetwork
Next, enter a Hostname that you can use to connect to the WIFI Extension without having to figure out which dynamic IP address got assigned to it. For example:
Hostname: WIFI-Extension
Secondly, select "Client: DHCP" for the Mode and Address, "WPA/WPA2" for Encryption and enter the WPA/WPA2 key. For example:
Key: 1234567890ABCDEF
Save the WIFI configuration and restart the Master Brick. Now the WIFI Extension should connect to your access point and you should be able to connect to it with your program and Brick Viewer using "WIFI-Extension" as host.
Access Point Mode and Ad Hoc Mode
Note
Access Point and Ad Hoc mode are available in Master Brick firmware version 1.3.3 and Brick Viewer version 1.1.8 and newer.
It is possible to communicate with the WIFI Extension without an external Access Point. To allow that, the WIFI Extension implements an Access Point and an Ad Hoc mode. Since Ad Hoc mode needs to be specifically supported by the device you want to connect with, we recommend the use of Access Point mode. In AP mode the WIFI Extension simulates an access point and should show up as a normal access point on your PC.
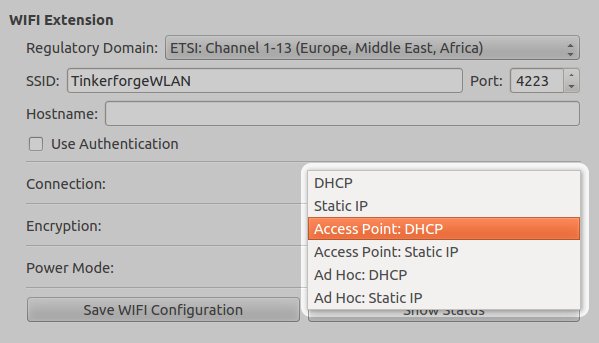
You can choose Ad Hoc and Access Point mode with DHCP and static IP. If you choose DHCP you have to provide the DHCP server! There is no DHCP server implementation in the Wi-Fi module. Since that can be quite cumbersome to get running, we recommend that you use static IP.
As encryption you can use WEP. WPA is unfortunately not supported in Ad Hoc and Access Point mode. The WEP key should be 64 or 128 bit and in hexadecimal notation. You can generate valid WEP keys here.
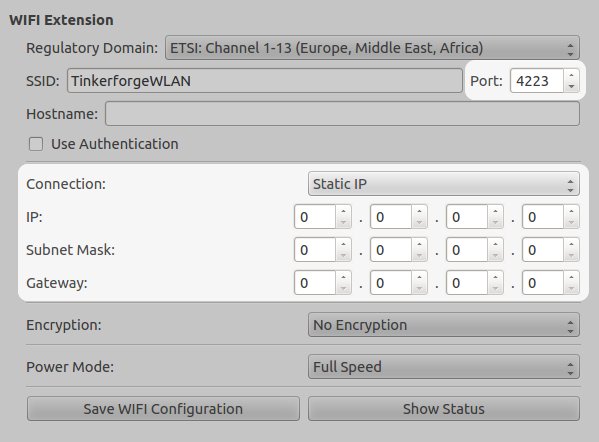
Example: Access Point Mode with static IP Address
This examples shows how to configure the WIFI Extension as access point with a static IP address and how to connect an Android smart phone to it.
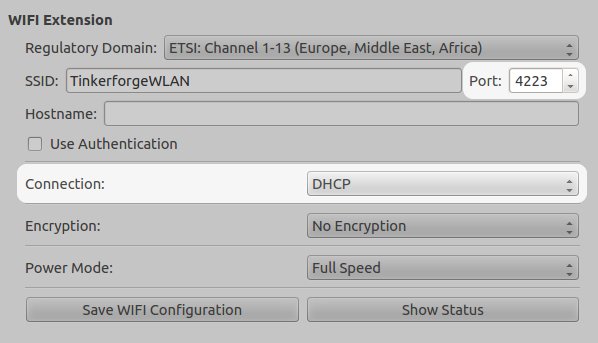
Firstly, select a SSID (the name of the Wi-Fi network). Make sure to use a name that is not already used by another Wi-Fi network near you. For example:
SSID: TinkerforgeWLAN
Secondly, select "Access Point: Static IP" for the Mode and Address and configure IP, Subnet Mask and Gateway. For example:
IP: 192.168.1.17
Subnet Mask: 255.255.255.0
Gateway: 192.168.1.1
Select "No Encryption" or "WEP" for Encryption. If "WEP" should be used then you also have to provide a Key. A 64 or 128 bit WEP key can be generated here. The key has to be entered in hexadecimal notation.
Note
WEP encryption has been broken and it doesn't provide any real security anymore. Unfortunately the WIFI Extension doesn't support WPA/WPA2 encryption in Ad Hoc and Access Point mode.
Save the WIFI configuration and restart the Master Brick. Now the WIFI Extension should act as an access point.
Thirdly, open the Wi-Fi settings on your Android smart phone and add a new network. Enter the SSID of the WIFI Extension (default: TinkerforgeWLAN) and select "None" or "WEP" for Security, according to the configuration of the WIFI Extension. If you selected WEP you have to enter the generated WEP key as Password in hexadecimal notation.
The WIFI Extension does not provide its own DHCP server, therefore you have to configure a static IP address for your smart phone in the advanced options. Change the IP settings from "DHCP" to "Static" and enter IP address, Gateway and Network prefix length. For example:
IP address: 192.168.1.23
Gateway: 192.168.1.1
Network prefix length: 24
Finally, save the new network configuration and connect to it. Now your smart phone should be connected to the access point of the WIFI Extension.
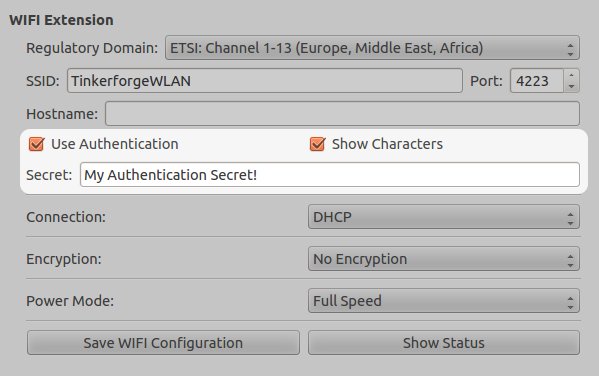
Authentication
The WIFI Extension supports authentication since Master Brick firmware version 2.2.0. Authentication is disabled by default. Tick the "Use Authentication" check box and choose an authentication secret to enable it. This secret can be 64 ASCII characters long. After saving the configuration and restarting the Master Brick authentication is enabled.
Now every TCP/IP connection to the WIFI Extension has to prove to the Master Brick that it knows the authentication secret before normal communication can occur. See the authentication tutorial for more information.
LEDs and Connectivity
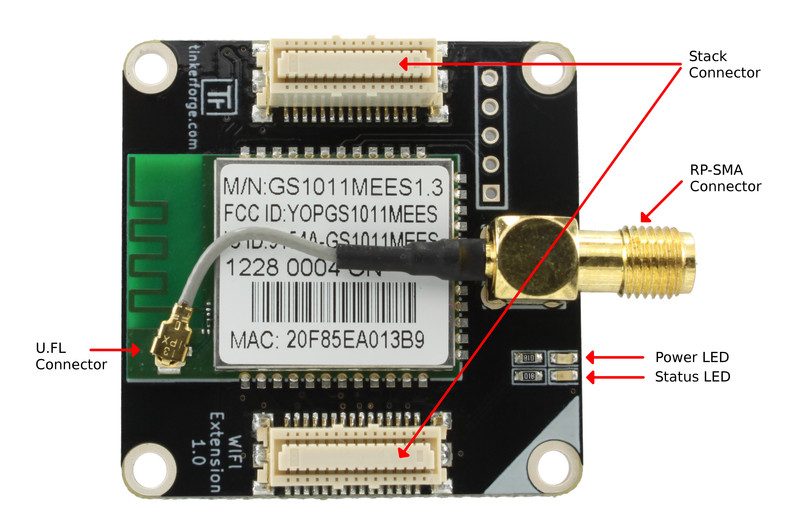
The blue power LED will be on permanently if the device is powered. The green LED is the status LED (permanently off = error, blink = associating, on = associated).
The Wi-Fi module is equipped with an U.FL connector and an 75Ω U.FL to RP-SMA pigtail cable. Depending on your application it is possible to disconnect the pigtail cable and connect your own cable.