- Getting Started
- Hardware
- Software
- Kits
- Starter Kit: Weather Station
- Starter Kit: Hardware Hacking
- Starter Kit: Server Room Monitoring
- Starter Kit: Server Room Monitoring 2.0
- Starter Kit: Blinkenlights
- Starter Kit: Internet of Things
- Starter Kit: Camera Slider
- Tabletop Weather Station
- Embedded Boards
- Specifications
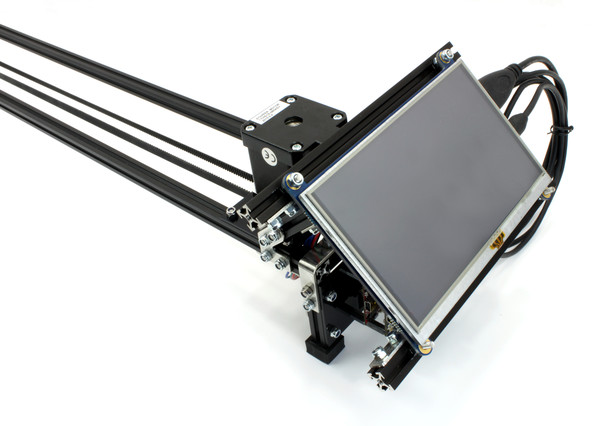
Starter Kit: Camera Slider


Note
The Starter Kit: Camera Slider is discontinued and is no longer sold.
Features
Programmable dolly and time-lapse shots
Easy to modify
Build your own brackets with MakerBeams
Extend functionality of kit with Bricks and Bricklets
Description
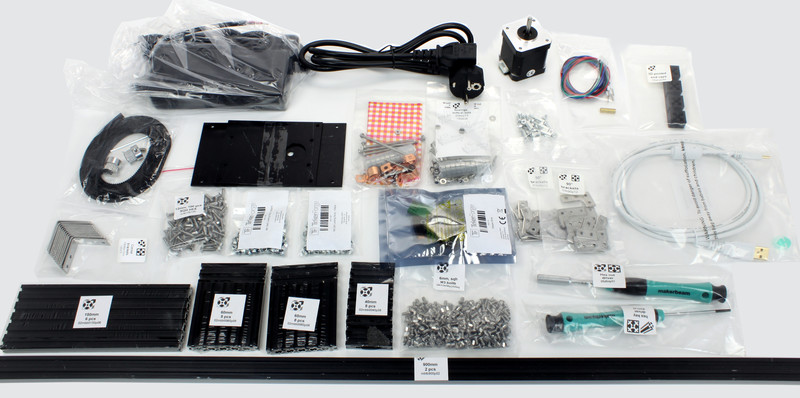
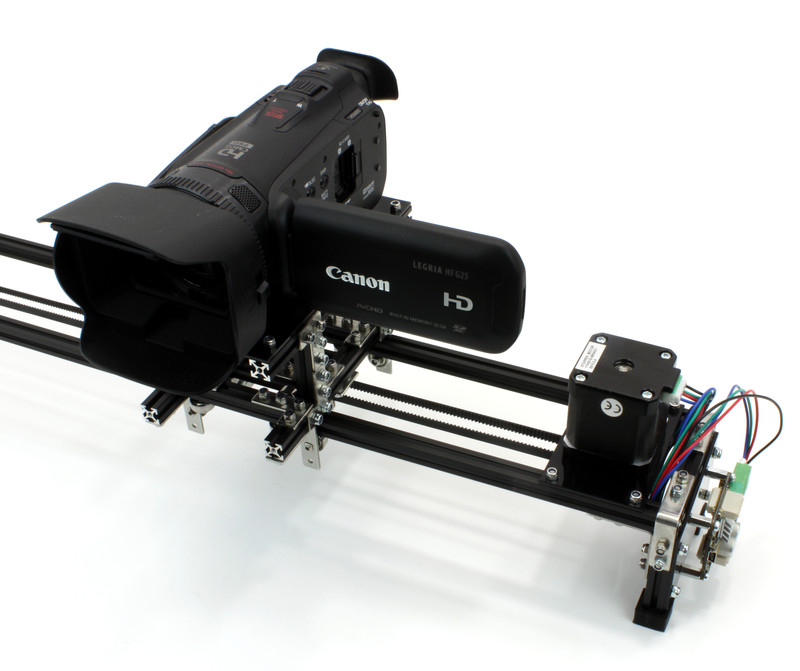
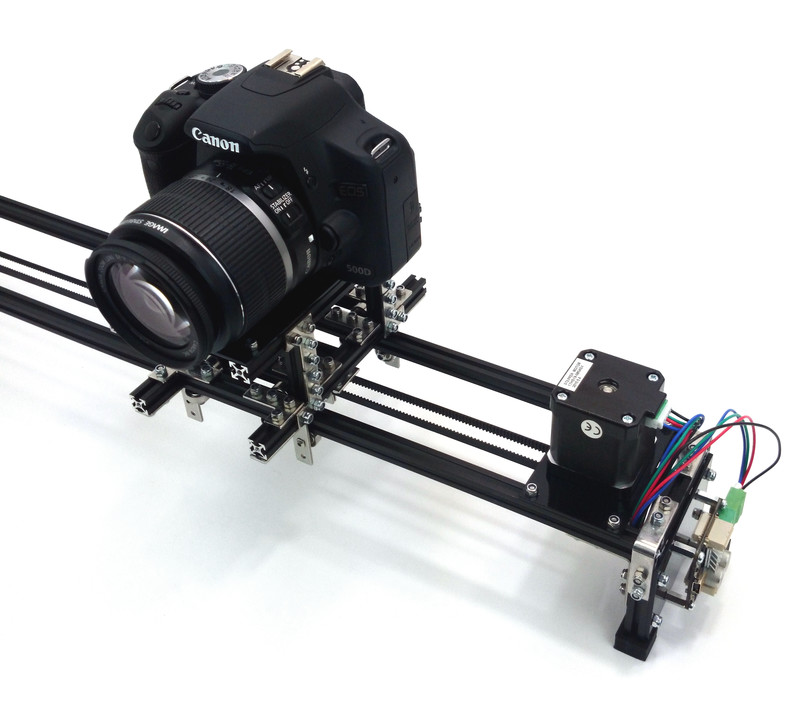
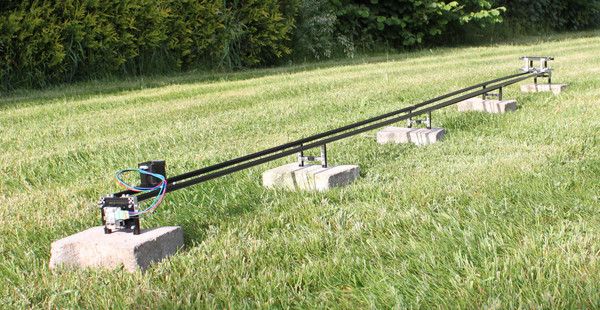
The Starter Kit: Camera Slider allows a automatic and fluid linear motion of photo- and video-cameras. With the provided demo application you can control the slider freely and make automatic time lapse shoots. An easy API can be used to integrate the camera slider into you own project. This means that the kit can be used as a general purpose axis for linear motion.
The kit is build from MakerBeams. Other Beams can be attached easily. This makes it easy to construct your own brackets that can hold other devices. This means that the kit can be used as a general purpose axis for linear motion.
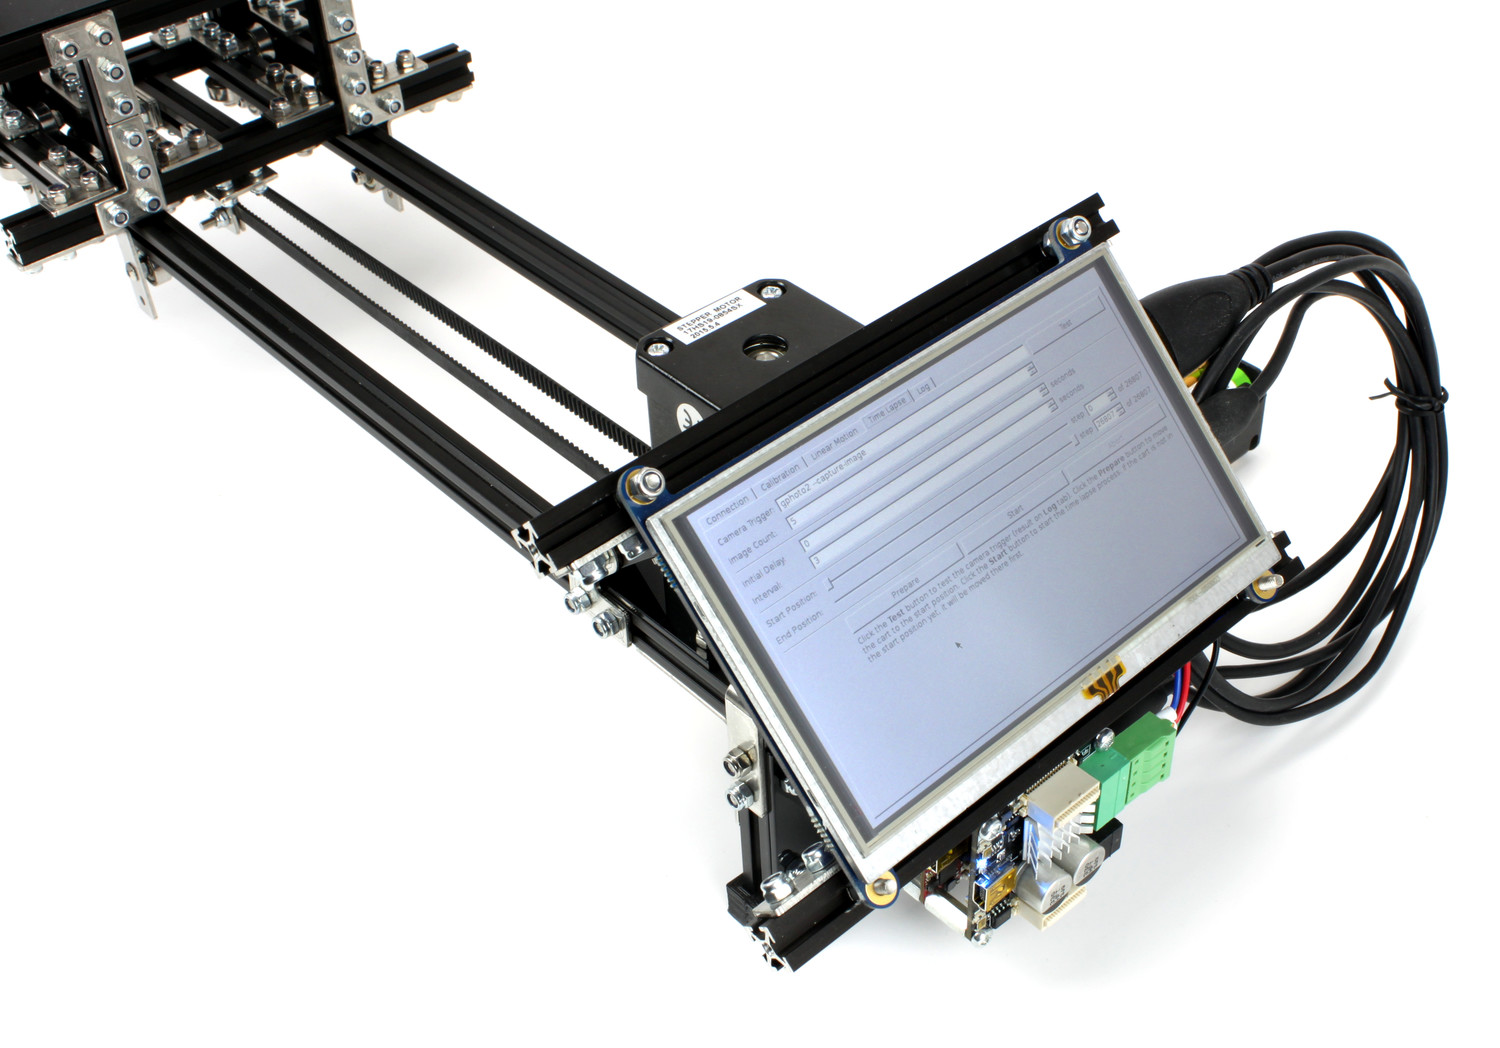
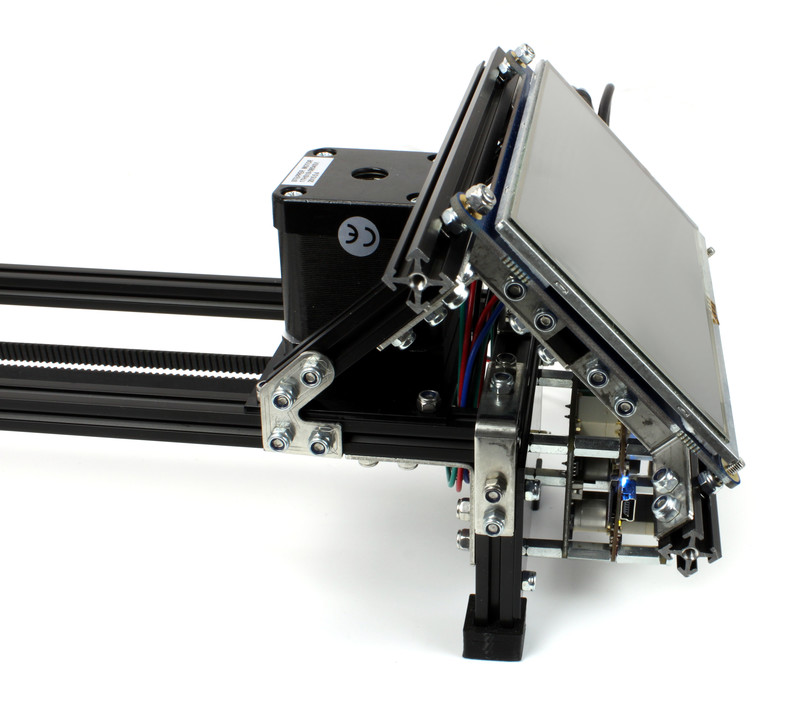
A Stepper Brick moves the cart with millimeter precision and it can be extended with other Bricks and Bricklets. It is for example possible to automatically trigger the camera with a Industrial Quad Relay Bricklet. A RED Brick together with a HDMI touchscreen can be used to implement an autonomous solution that can be controlled via touchscreen.
The following video shows different applications und modifications:
Technical Specifications
Property |
Value |
|---|---|
Motion Range |
70cm (extendable up to 275cm) |
Dimensions (W x D x H) |
94 x 15 x 4cm (37 x 5.9 x 5.5") |
Weight |
1,3kg |
Resources
Camera Slider Brackets as FreeCAD CAD files (Download)
Demo Application (Download: Windows, Linux, macOS, RED Brick, Source Code)
Firmware updating and first tests
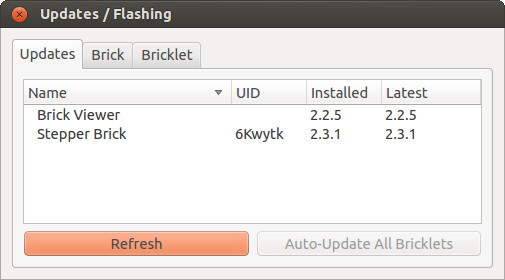
As a very first step you should try out and update your Bricks and Bricklets.
For that you need to install the Brick Daemon and the Brick Viewer. Connect the Remote Switch Bricklet to the Master Brick and connect it via USB to your PC. Afterwards use Brick Viewer to check if all of the firmwares are up to date (Updates / Flashing button). If not, you can update the Bricks and update the Bricklets with the Brick Viewer too:
As the next step test the Stepper Brick with the included stepper motor and 24V power adapter as described here. After that you can start to assemble the kit!
Construction
The construction of the basic kit is described here.
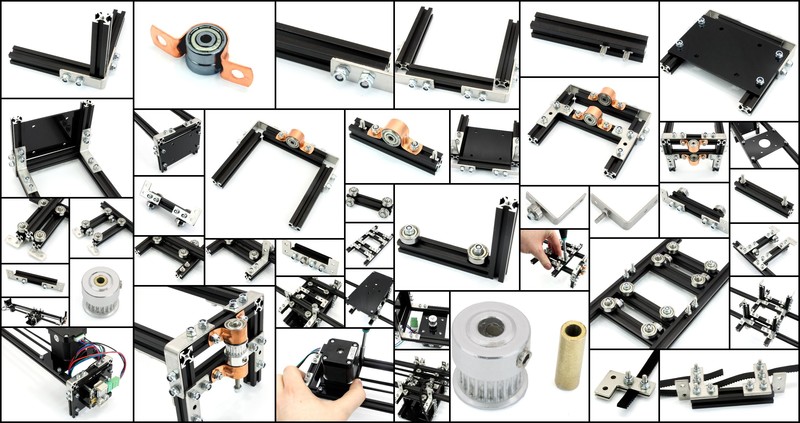
Instead of using 900mm MakerBeams you can use 1500mm MakerBeams or even connect two 1500mm MakerBeams to get up to 3m of motion range. How to modify the frame for this is described here.
You can also use a RED Brick with an HDMI touchscreen instead of using an external PC to control the camera slider. How to add a RED Brick and a HDMI touchscreen to the frame is described here.
Demo Application
The demo application shows two possible uses cases for this kit:
Linear motion
Moving time-lapse photography
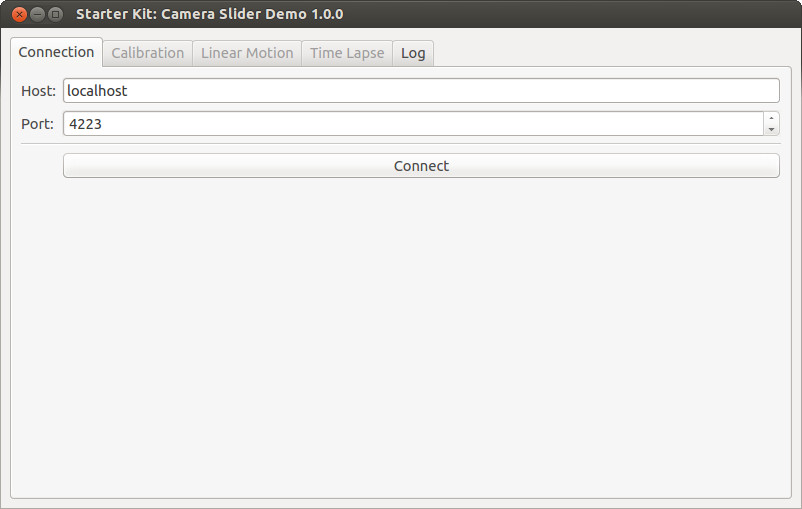
Before starting you have to configure the host and port. If the Stepper Brick is connected to your PC over USB then "localhost" and "4223" is fine. If you extended the kit with an Master Extension or if you connected the kit to another PC then you have to enter the IP address or hostname of the Extension or the other PC where the kit is connected to. Now click the "Connect" button to establish the connection.
Calibration Tab
Initially the demo does not know the current position and the motion range of the cart. Before you can move the cart around you have to calibrate its minimum and maximum position:
Choose the Stepper Brick mounted to the camera slider.
Click the "Start" button to start the calibration process.
Use the "Forward" and "Backward" buttons to move the cart close to one end of the frame and click the "Set Minimum" button.
Use the "Forward" and "Backward" buttons to move the cart close to the opposite end of the frame and click the "Set Maximum" button.
Click the "Apply" button to finish the calibration process.
Now the demo knows and remembers the current position and the motion range of the cart. If the cart is moved manually after calibration, e.g. during transport, then the calibration process has to be repeated.
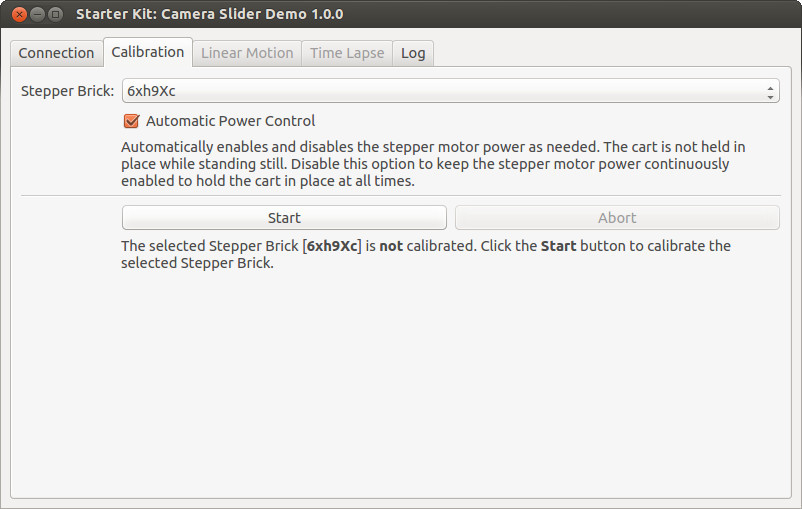
Automatic Power Control
With "Automatic Power Control" enabled the demo automatically enables the stepper motor power only when the cart is ordered to move to a new position and disables the power once the cart has reached that position. This helps to reduce power consumption and noise while the cart is not moving.
As a consequence, the cart is not actively held in place by the stepper motor while it is not moving. This works just fine if the camera slider is used in a horizontal setup. But in a more slanted or even vertical setup the cart will move on its own due to gravity. In this case you can disabled "Automatic Power Control" and have the stepper motor power constantly enabled to hold the cart actively in place at all times.
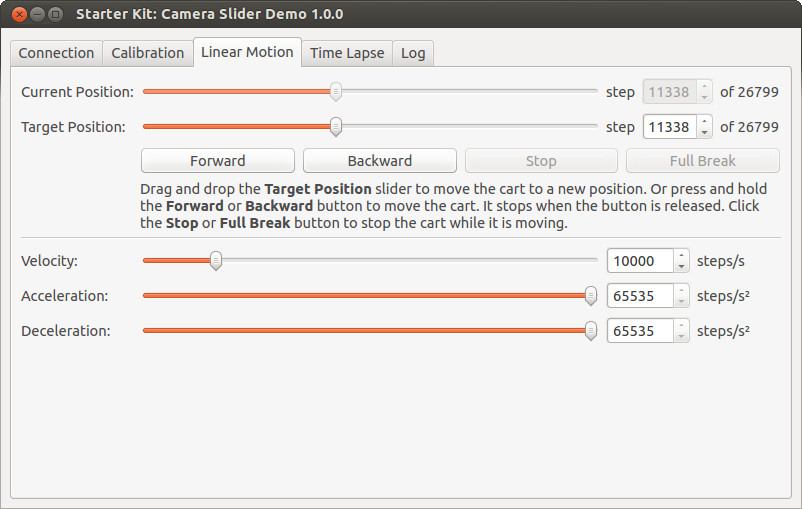
Linear Motion Tab
On this tab you can order the cart to move to a new target position with configurable velocity, acceleration and deceleration. Use the "Target Position" slider to set a new target position or enter its step number. Once the target position changed the cart start moving towards it.
The "Forward" and "Backward" buttons work just as the ones on the "Calibration" tab. But this time the cart moves with the configured velocity, acceleration and deceleration.
The target position can only be changed while the cart is standing still. The cart can be stopped with the configured deceleration by clicking the "Stop" button and with maximum deceleration by clicking the "Full Break" button.
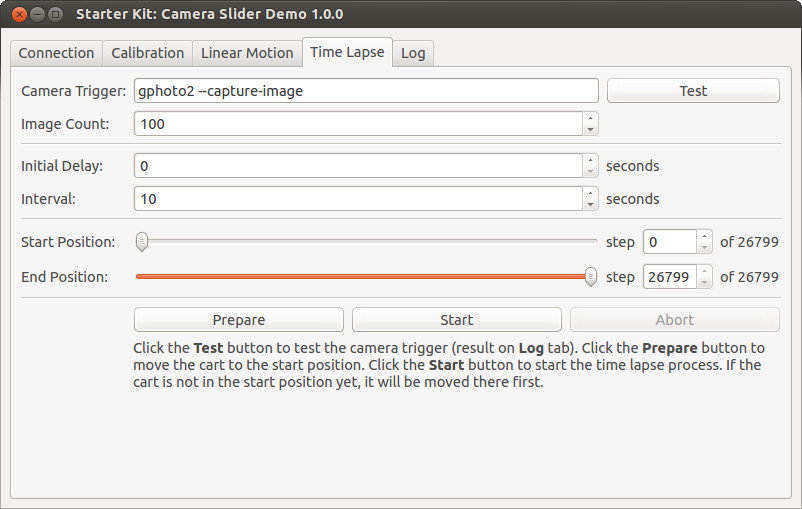
Time Lapse Tab
On this tap you can configure a moving time-lapse photography setup. The demo supports capturing images in constant time and distance intervals.
Because there are many different ways to trigger a camera the demo doesn't settle for any particular way but allows you to enter a shell command to trigger your camera. By default the demo uses gphoto2 that covers a wide range of cameras:
gphoto2 --capture-image
The Windows and macOS installers for the demo include the gphoto2 and the Debian package for Linux depends on the gphoto2 Debian package.
You can test your individual camera trigger command by clicking the "Test" button. The command is executed and the result is shown on the "Log" tab.
gphoto2 Support
Normally gphoto2 works out-of-the-box on Linux, but needs some preparation on Windows and macOS.
On Windows the "Time Lapse" tab has an additional button called "Start Zadig" at the top. Zadig can install a USB driver for your camera that allows gphoto2 to communicate with it:
Connect your camera to USB.
Click the "Start Zadig" button.
In Zadig choose your camera from the combo box. It might be listed as "Digital Still Camera".
In Zadig click the "Replace Driver" button.
After the driver got replace, close Zadig.
Now gphoto2 should be able to communicate with your camera. To remove the newly installed driver again open the Windows Device Manager, select the camera and click the "Uninstall" button. Afterwards disconnect and reconnect the camera to USB and Windows will use the old driver again.
On macOS the "Time Lapse" tab has two additional buttons called "Enable" and "Disable" at the top. Those disable and enable macOS own USB handling for cameras, that interferes with gphoto2. Click the "Enable" button to use gphoto2. Click the "Disable" button when you're done with gphoto2 and want to use macOS own USB handling for cameras again.
Timing and Motion
After the "Start" button is clicked the cart moves to the "Start Position" and waits for "Initial Delay" seconds before the trigger command is executed for the first time. Afterwards the cart moves to the next position and waits "Interval" seconds before the trigger command is executed again. This repeats until the trigger command has been executed "Image Count" times and the "End Position" is reached or the "Abort" button is clicked.
The initial delay and interval handling takes the time into account it takes to execute the trigger command and to move the cart to the next position. This allows to achieve accurate timing as long as the time it takes to execute the trigger command and to move the cart to the next position is shorter than the configured interval.
The motion velocity, acceleration and deceleration can be configured on the "Linear Motion" tab.
Industrial Quad Relay Bricklet as Trigger
Many cameras support external triggers that are basically simple switches. An Industrial Quad Relay Bricklet can act as such as switch to trigger the camera instead of gphoto2.
The Canon EOS camera series uses a 2.5mm 3-pole stereo jack as connector for the external focus and shutter trigger. You can find the exact pinout for this and several other cameras here. With the appropriate cable and an Industrial Quad Relay Bricklet we built our own external trigger cable:
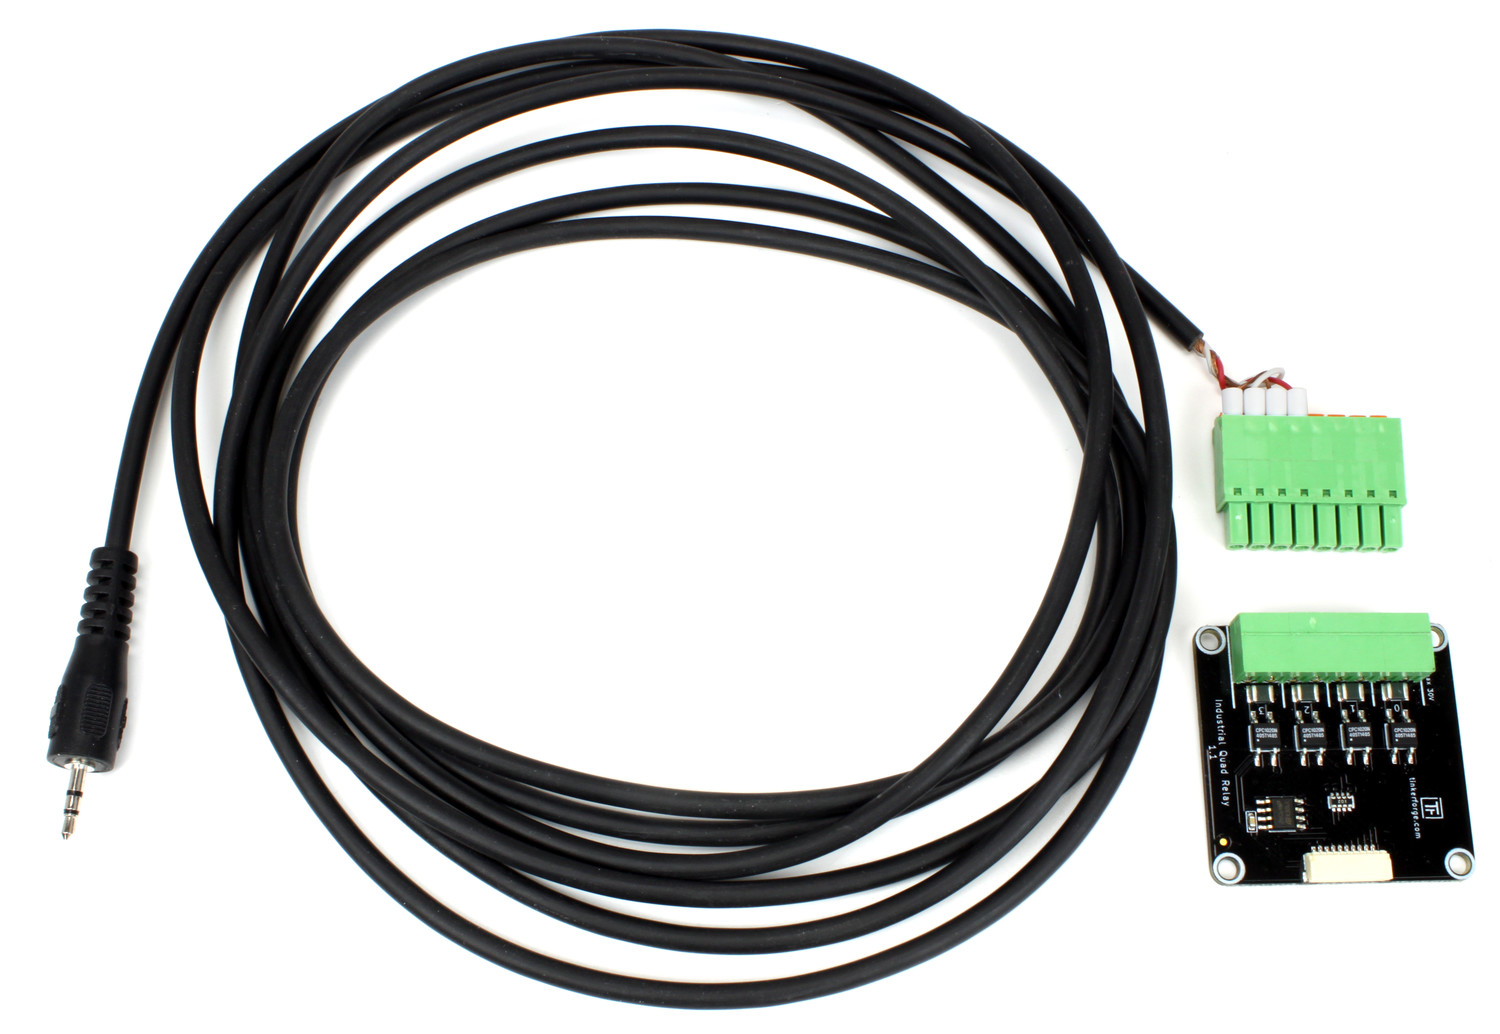
A trigger script for the Industrial Quad Relay Bricklet can be downloaded here. To use it you need to have Python and the Python API bindings installed. Its command line syntax is as follows:
python <path>/trigger_iqr.py <host> <port> <iqr-uid> <relay> <trigger-duration> <wait-duration>
Here is an example for an Industrial Quad Relay Bricklet with UID n5d
reachable on localhost at port 4223. The trigger script was downloaded to
Karl's Windows desktop before:
python C:/Users/Karl/Desktop/trigger_iqr.py localhost 4223 n5d 0 50 1000
The shutter and ground pins of the external trigger cable are connected to relay 0. The relay will short out for 50 milliseconds. Afterwards the script will wait for 1000 milliseconds so the camera has some time to process and store the captured image.
RED Brick Program as Trigger
If your time lapse setup includes a RED Brick then another RED Brick program can be used for the camera trigger logic. A trigger script for this can be downloaded here. Its command line syntax is as follows:
python <path>/trigger_red.py <host> <port> <red-uid> <program-identifier> <wait-duration>
Here is an example for a RED Brick with UID 3JpHZL reachable on localhost
at port 4223 that starts the program trigger-example once and waits 1000
milliseconds afterwards. The demo for the RED Brick already includes the
trigger script, so the path to the script can be omitted:
python trigger_red.py localhost 4223 3JpHZL trigger-example 1000
The program can then perform the specific trigger sequence for your time lapse setup.
Import on RED Brick
The demo application can also be uploaded to a RED Brick for stand-alone use-cases. Download the latest version as archive for the RED Brick and import it using the RED Brick Import/Export tab of Brick Viewer. The demo will then autostart in fullscreen mode.