- Getting Started
- Hardware
- Software
- Kits
- Starter Kit: Weather Station
- Starter Kit: Hardware Hacking
- Starter Kit: Server Room Monitoring
- Starter Kit: Server Room Monitoring 2.0
- Starter Kit: Blinkenlights
- Starter Kit: Internet of Things
- Starter Kit: Camera Slider
- Tabletop Weather Station
- Embedded Boards
- Specifications
Starter Kit: Internet of Things

Features
Allows to control devices over the Internet
Supports 433MHz actuators
External antenna, big range
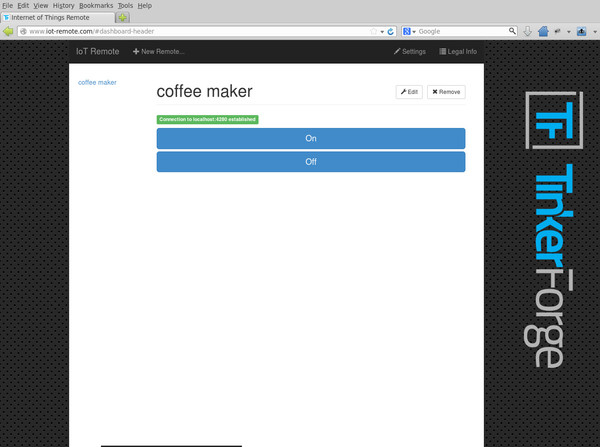
Controllable by www.iot-remote.com
Description
The kit is not sold anymore. But all parts are still available in our shop.
The Internet of Things is an evolution of the Internet. It interconnects not only human and computer as before but also physical objects (things).
The Starter Kit: Internet of Things offers an easy access into the world of the Internet of Things. It allows to control many devices over the Internet. For that the kit is equipped with a Remote Switch Bricklet 2.0. It can be used to remotely control 433MHz mains switches, dimmers and home automation components. You can find a list of supported actuators in the documentation of the Bricklet.
With the API Bindings it is possible to control the wireless actuators with any (Embedded-)PC, smart phone or tablet over the Internet.
With the kit nothing stands in the way of turning your coffee maker on while you are heading home or to dim your living room illumination with your own cloud or with a Raspberry Pi. The website www.iot-remote.com gives you direct access to wireless actuators from any web-enabled device.
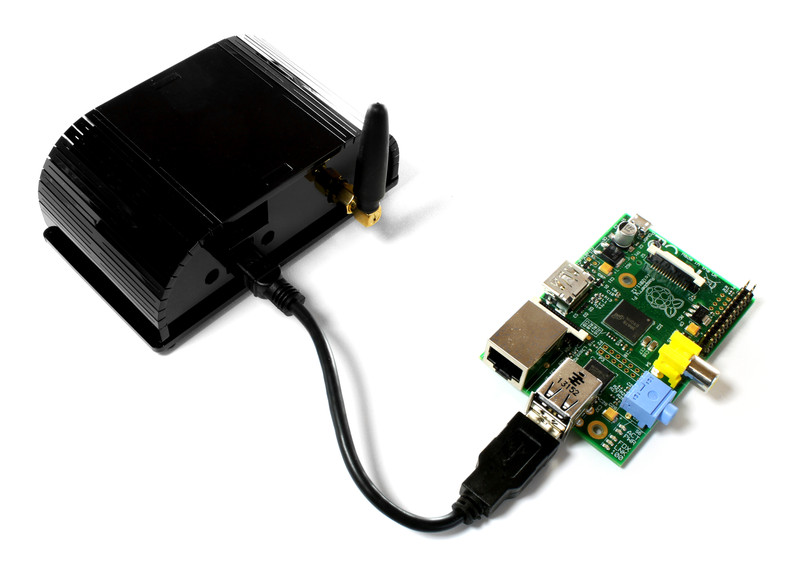
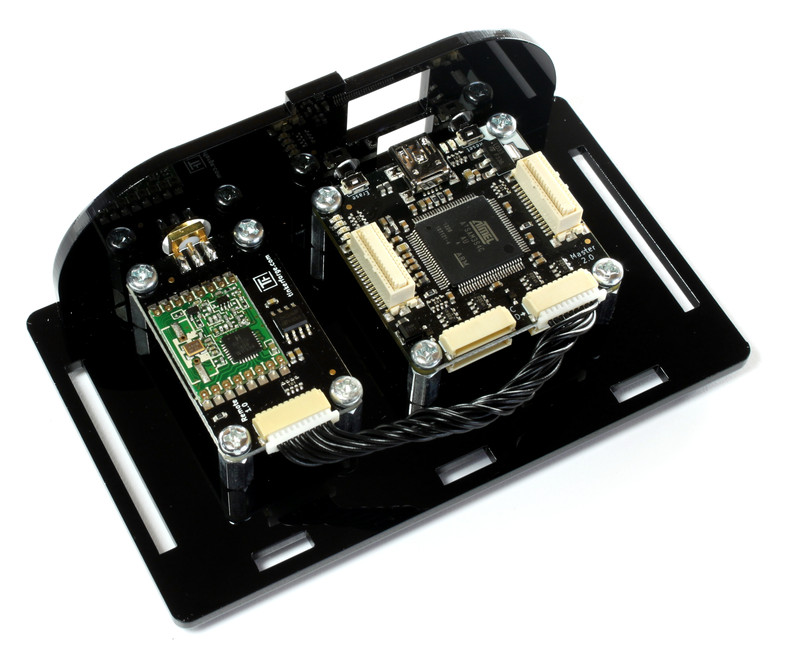
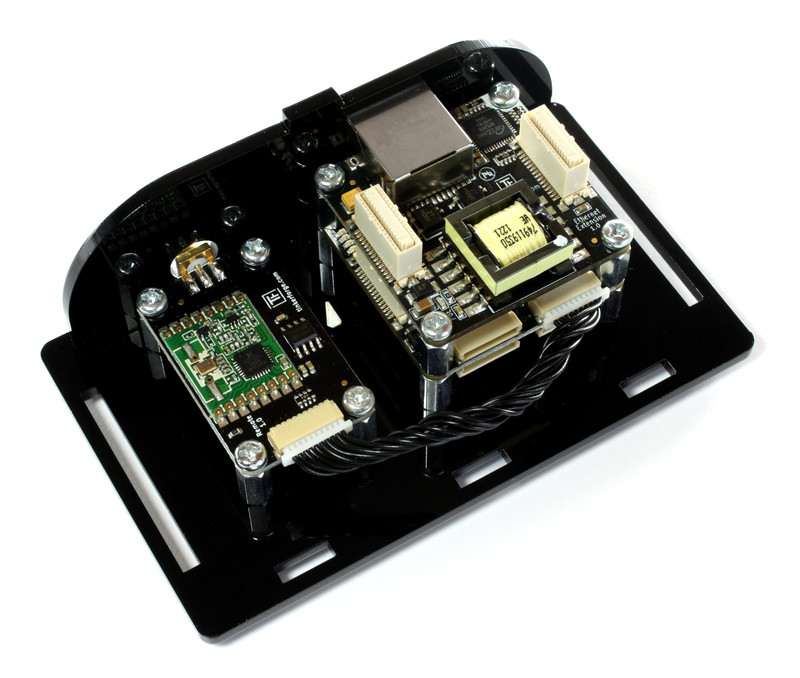
The kit basically consists of a Master Brick and a Remote Switch Bricklet 2.0 which is equipped with a 433MHz transceiver. Over the USB connection of the Master Brick you can control remote control mains switches or similar. An (Embedded-)PC (e.g. Raspberry Pi) either does the switching itself or it can serve as a gateway. With an additional Ethernet Master Extension it is possible to go without a gateway.
With additional modules from the Tinkerforge building blocks you can extend the kit. It is for example possible to measure temperature (Temperature, Temperature IR or PTC Bricklet) or to react on movements (Motion Detector Bricklet).
This Kit was updated on March 20th 2018. We updated the Remote Switch Bricklet to version 2.0 and the Bricklet cable to the 7p-10p variety. All of the software was udpated to be compatible to both versions.
Technical Specifications
Property |
Value |
|---|---|
Radio Module |
RFM69HW |
Current Consumption |
10mA (idle), 40mA (sending) |
Radio Frequency |
433MHz |
Dimensions (W x D x H) |
11cm x 6.5cm x 4.5cm (assembled kit) |
Weight |
130g (assembled kit) |
Resources
Firmware updating and first tests
As a very first step you should try out and update your Bricks and Bricklets.
For that you need to install the Brick Daemon and the Brick Viewer. Connect the Remote Switch Bricklet 2.0 to the Master Brick and connect it via USB to your PC. Afterwards use Brick Viewer to check if all of the firmwares are up to date (Updates / Flashing button). If not, you can update the Bricks and update the Bricklets with the Brick Viewer too:
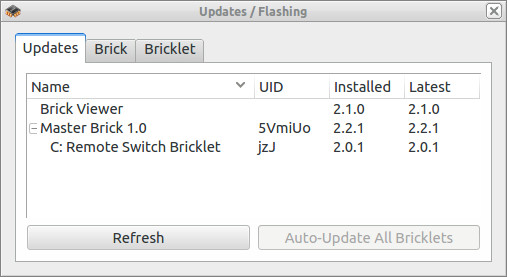
As the next step test the Remote Switch Bricklet 2.0 with a remotely controlled mains switch. After that you can start to assemble the kit!
Construction
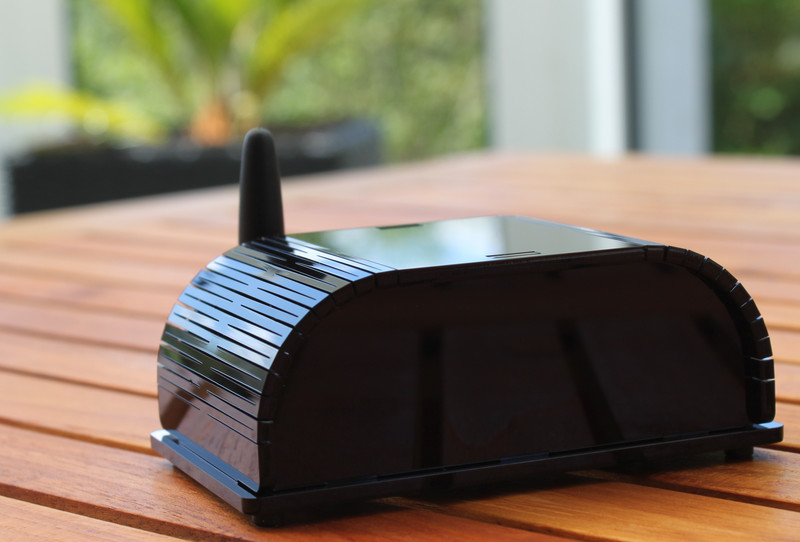
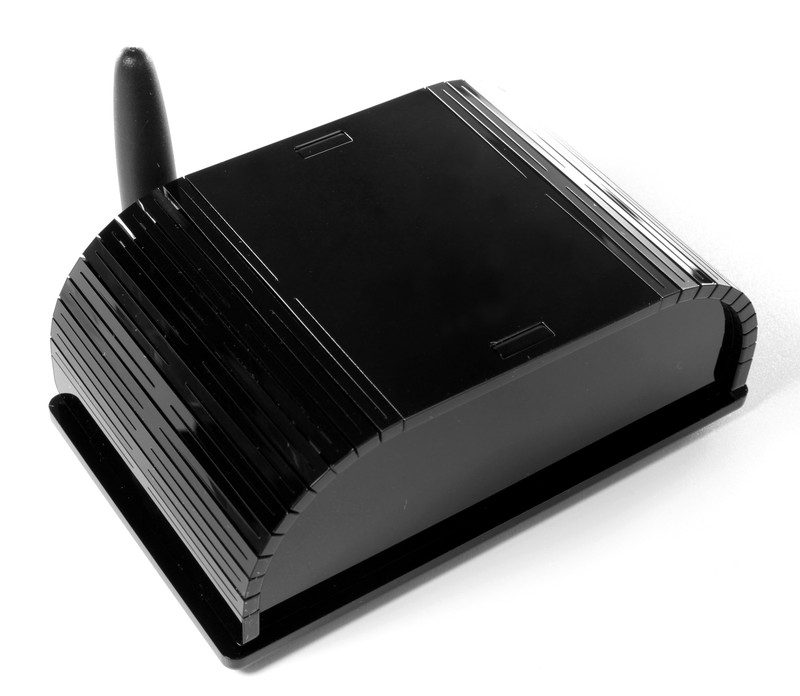
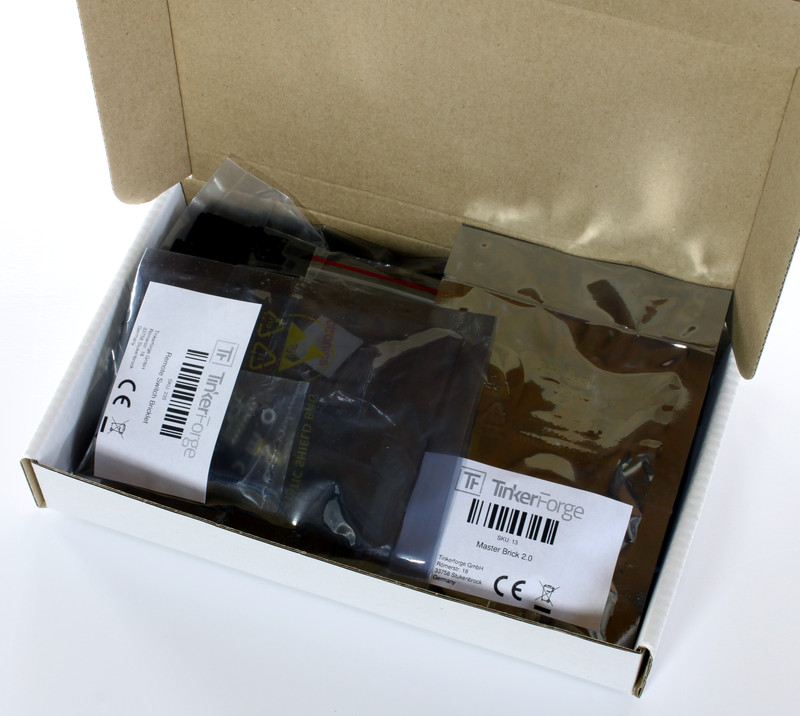
The Starter Kit: Internet of Things comes with Master Brick, Remote Switch Bricklet 2.0, a 6cm Bricklet cable, two mounting kits and self-adhesive non-slip rubber feet.
Building the case can be done in four easy steps.
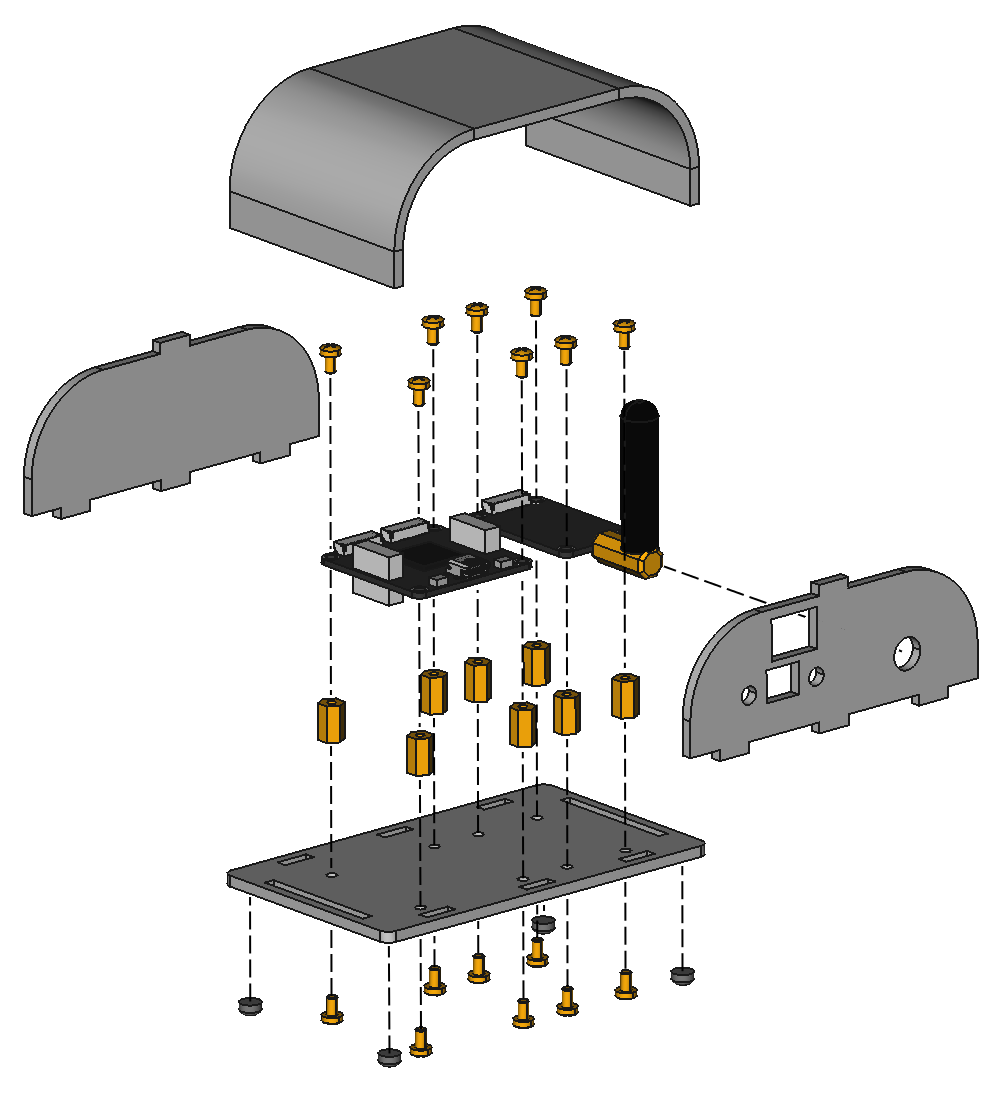
Step 0: Remove protective foils
At first the protective foils on all case parts have to be removed. There is a foil on the front and back side. In some cases the protective foils may be hard to remove, you can use a cutter or similar as a lever to get to the foil.
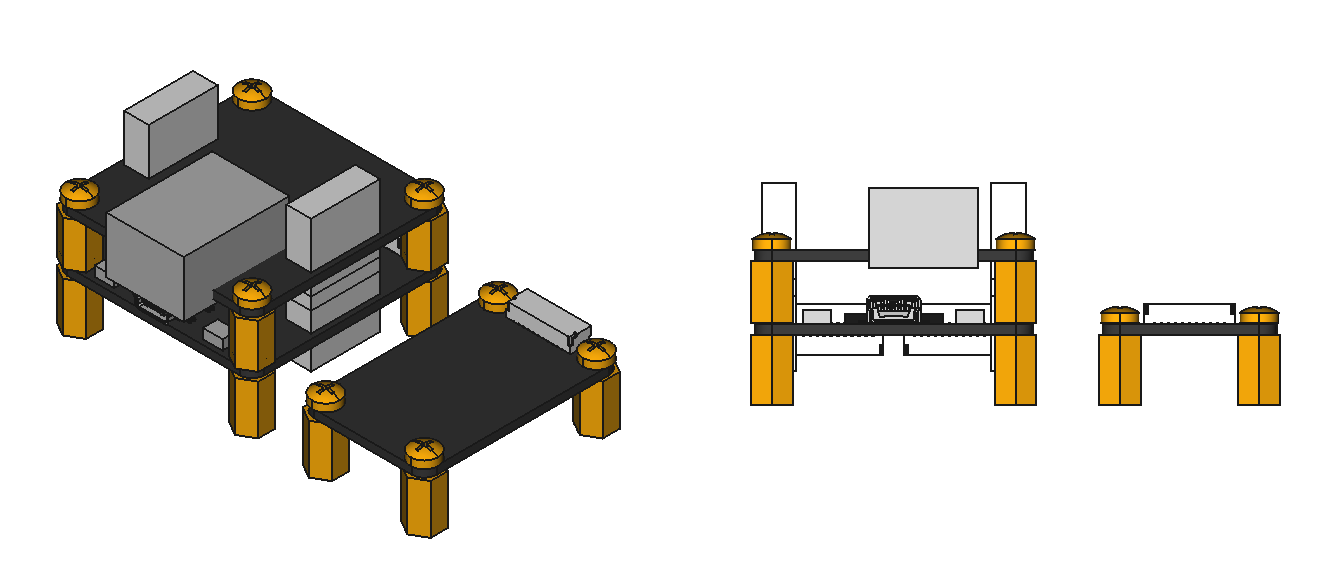
Step 1: Use mounting kit
Screw the 10mm spacers (thread inside/inside) to the Master Brick and the Remote Switch Bricklet 2.0.
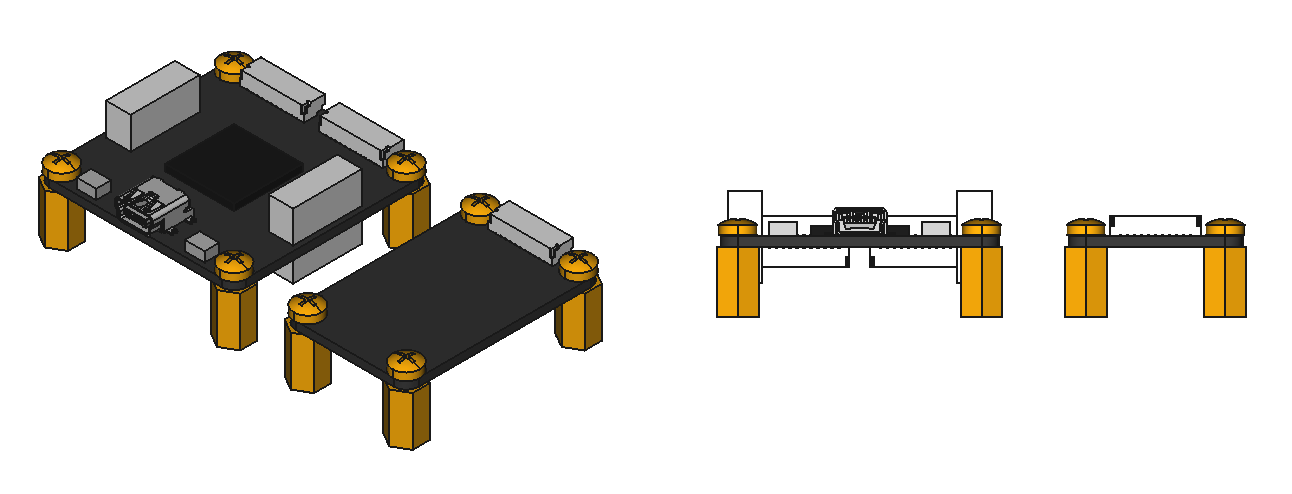
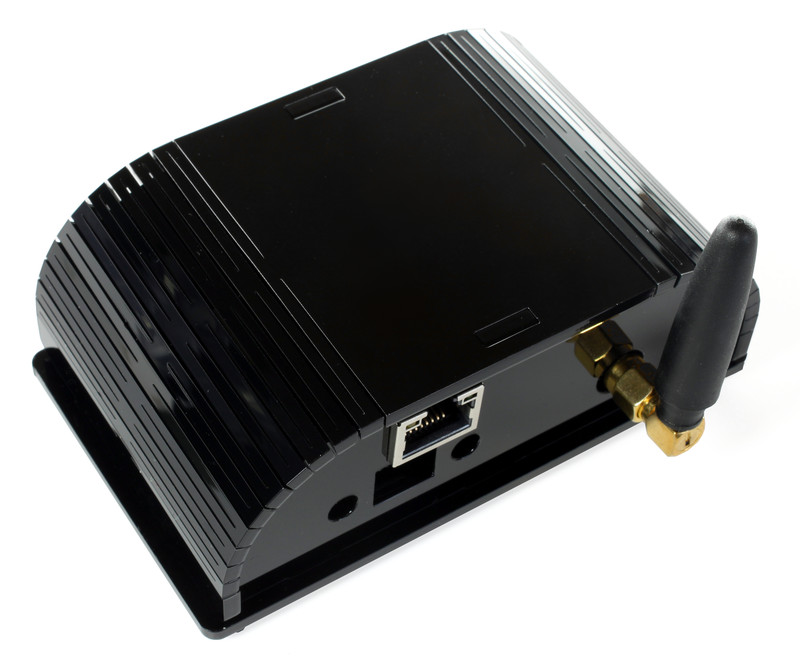
If you want to use the Ethernet Extension, you should attach it to the Master Brick with 12mm spacers (thread inside/outside).
Step 2: Screw to bottom
Now screw the Master Brick (with or without Ethernet Extension) and the Remote Switch Bricklet 2.0 to the bottom part of the case. You should use the following sequence:
Plug front part of case into bottom part
Screw Master Brick and Remote Switch Bricklet 2.0 to bottom part
Add self-adhesive non-slip rubber feet to bottom part
Add Bricklet cable between Master Brick and Remote Switch Bricklet 2.0
Screw antenna to Remote Switch Bricklet 2.0
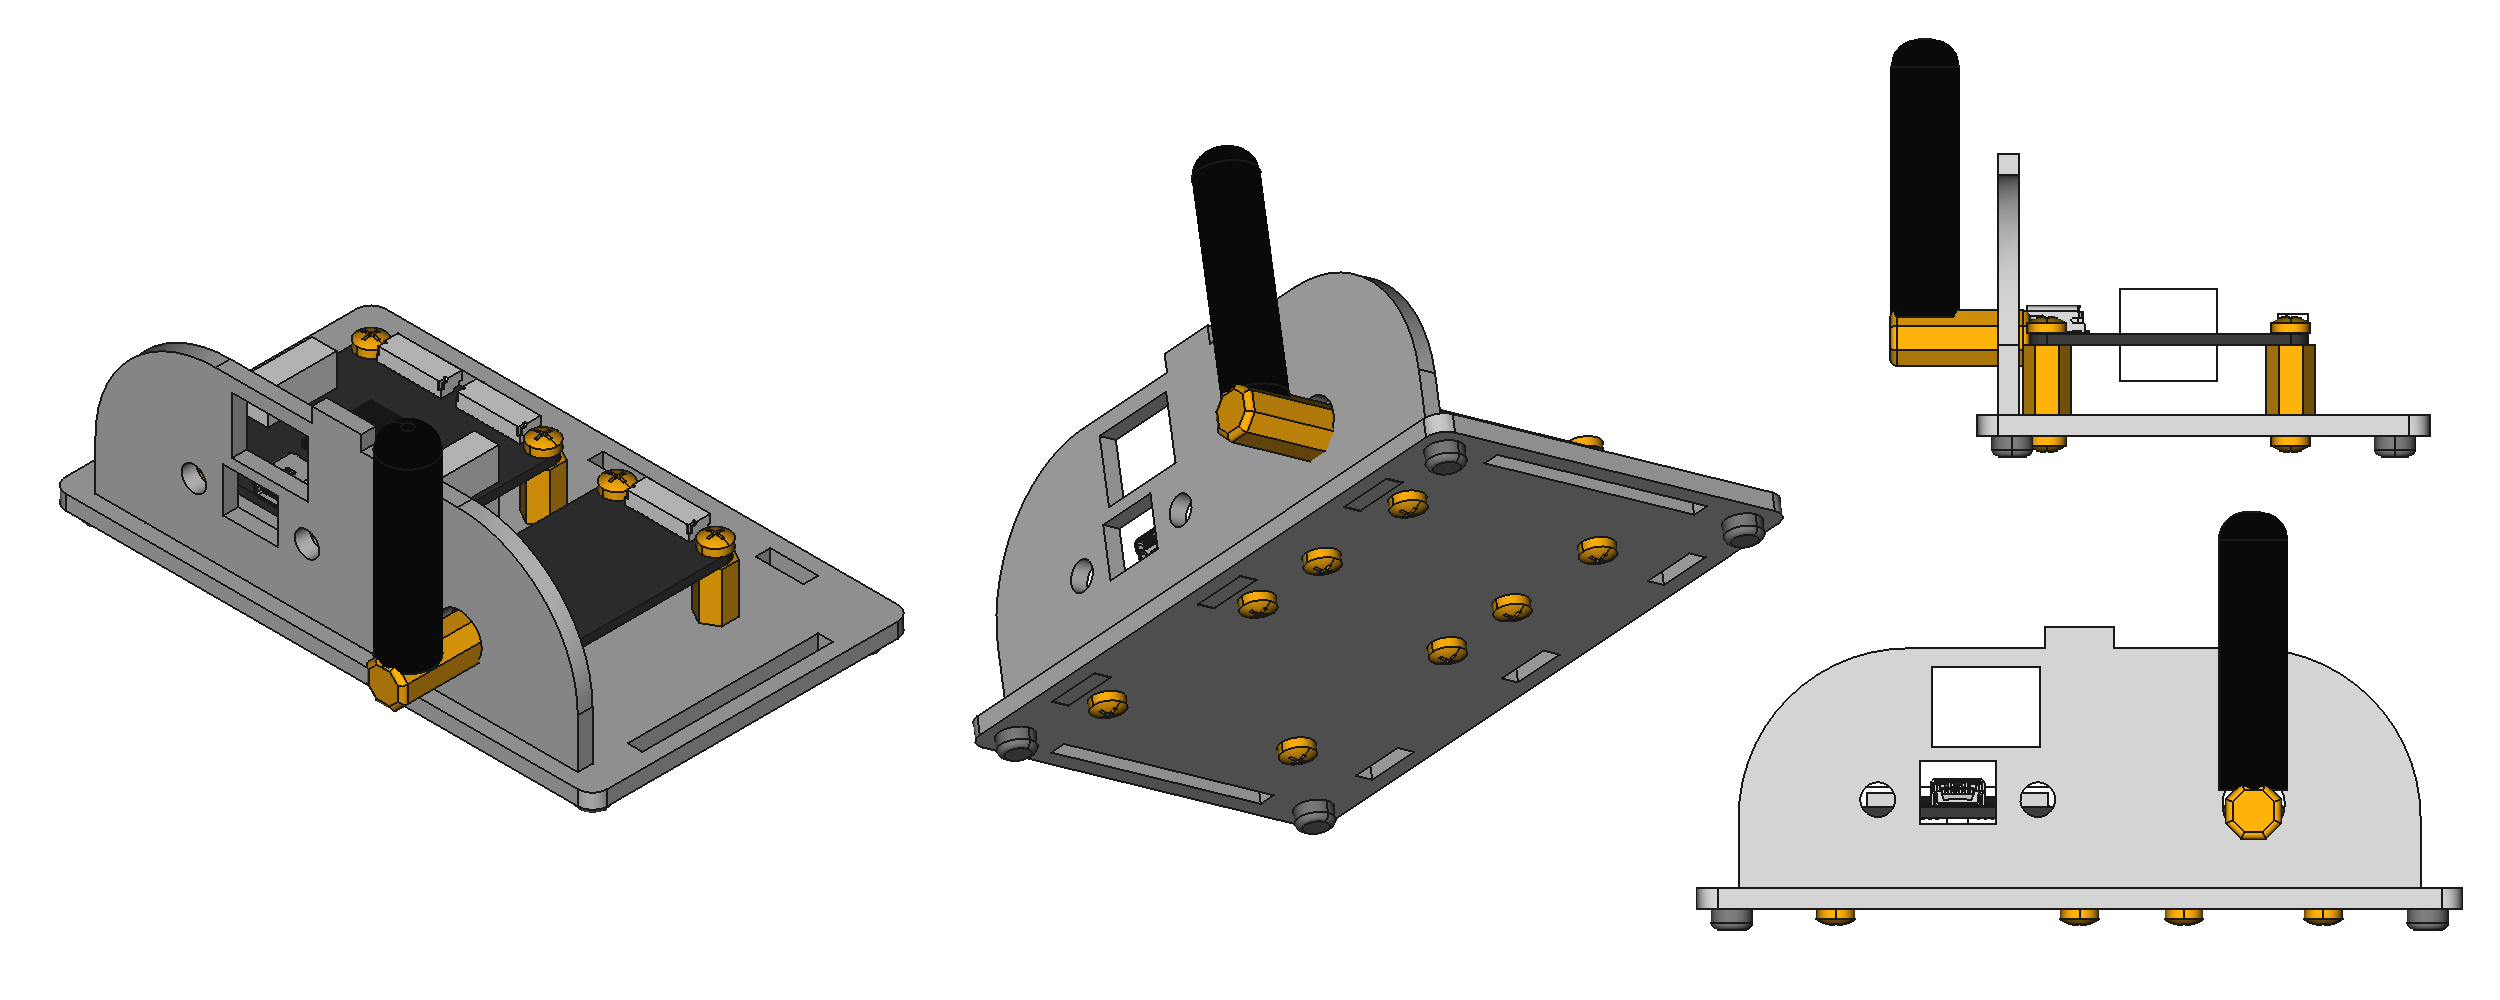
Step 3: Attach dome
In the last step you just have to plug the back part of the case into the bottom part. After that bend and attach the top part. Thats it, we are done already!

Applications
Control by your own tablet, smart phone or PC
433MHz mains switches, dimmers and home automation components can be controlled through www.iot-remote.com without any programming. The web site uses JavaScript, which is directly executed by the browser. After the web site is loaded there is no communication between a server and the local device or the hardware that should be controlled. For offline usage the web site can be downloaded.
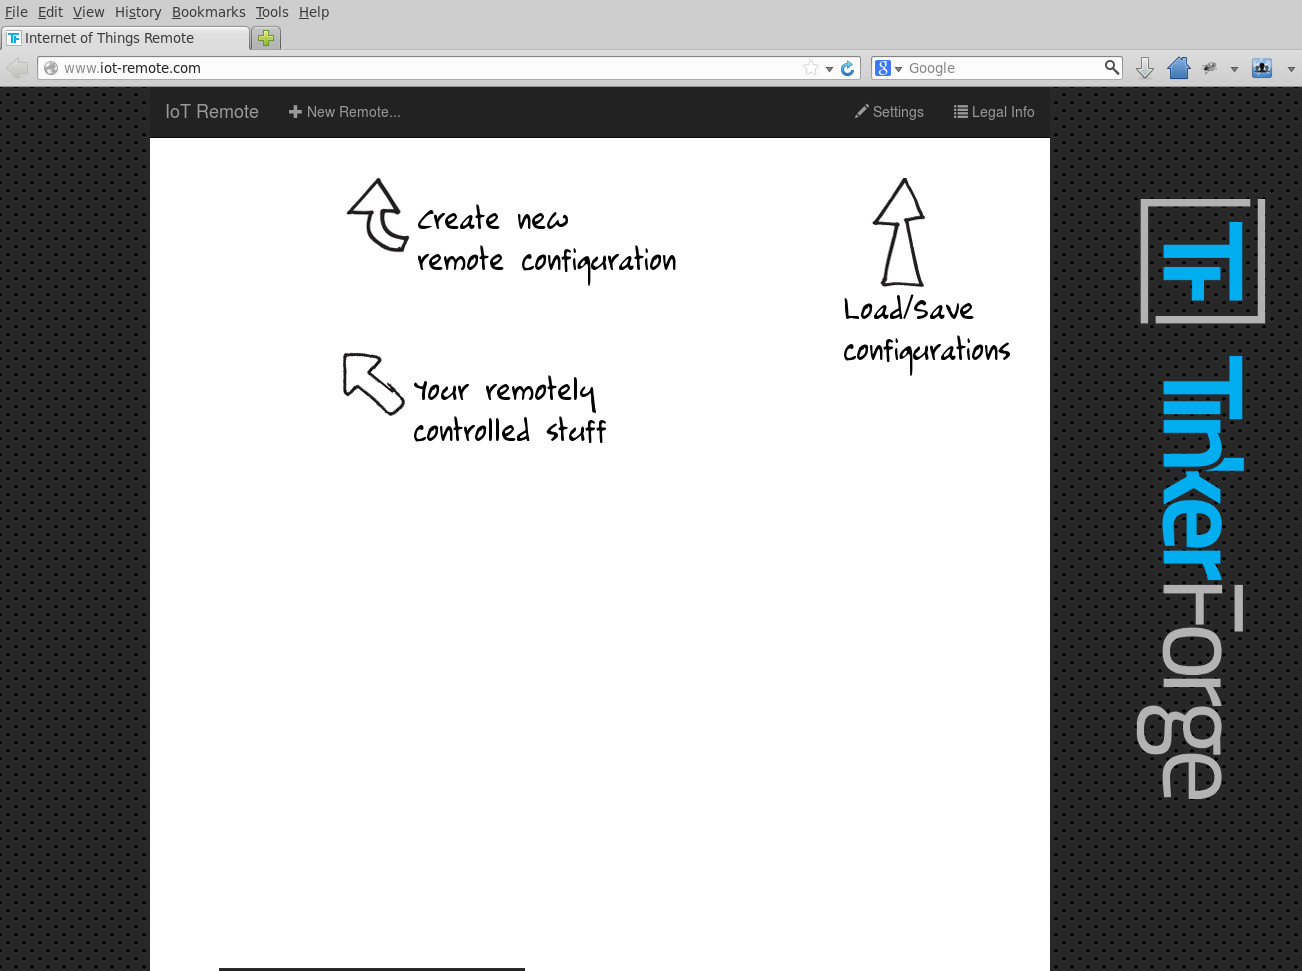
The web site is very easy to use. With "+ New Remote..." you can add new devices. There are four types: A (Switch), B (Switch), B (Dimmer), C (Switch). The types can be configured dependent on the actuators that will be controlled (see list of supported actuators).
Depending on the actuator there are different forms to fill. A precise description of the actuator types can be found in the documentation of the Remote Switch Bricklet 2.0.
Type A (Switch):

Type B (Switch):
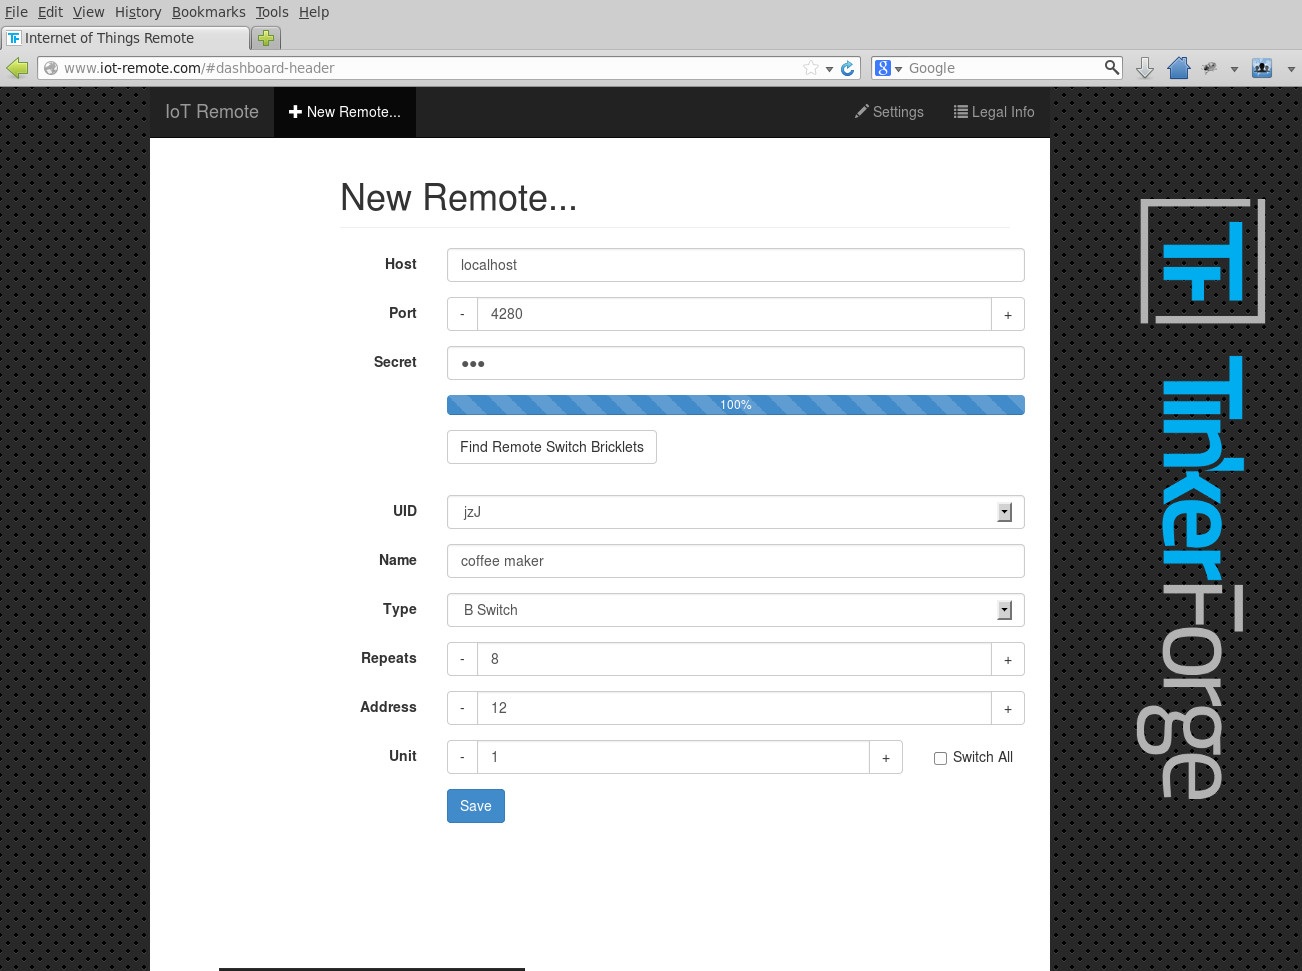
Type B (Dimmer):

Type C (Switch):

Controlling a device
Devices can be controlled by clicking on the appropriate entry in the list. In the following we have the controlling site of a type A switch.

Save/Load configuration
The web site www.iot-remote.com does not have a log-in function. This keeps the site simple and to it is simple to start your own instance of the web site. The configuration is saved locally in the browser with a cookie, by default it is not transferred to a server. If you only use the web site from one browser this is good enough.
To use an already created configuration in different browsers it is possible to save the configuration on www.iot-remote.com and load it again in another browser.
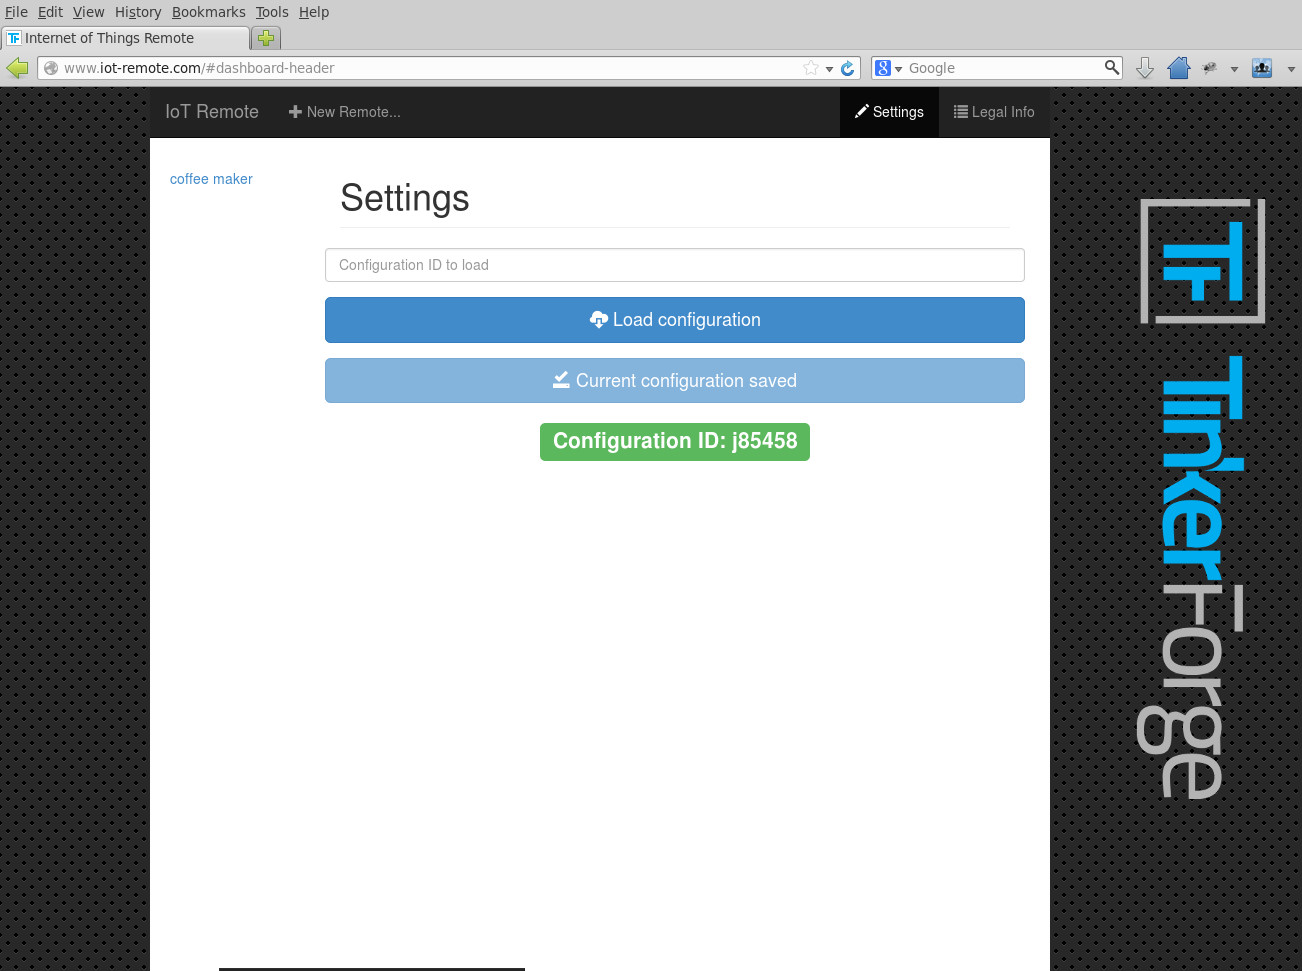
After a configuration is created it can be saved. You just have to click on "Settings" and then on "Save configuration". The server creates an configuration ID that represents the current configuration.
Loading a configuration can be done analogously. Just enter the configuration ID in the appropriate field and click on "Load configuration". Subsequently the devices that are saved by this ID are shown on the left.
Offline/Local usage
The complete web site can be downloaded (including the JavaScript) and used locally. After that it is not necessary to use www.iot-remote.com. The easiest way is to download the project from GitHub as a ZIP. The web site can be found in the "web" folder.
Unfortunately Chrome/Chromium does not support File-Cookies by default. Those are necessary to use cookies offline. To circumvent this problem you can start Chrome/Chromium with the following parameter:
--enable-file-cookies
If used locally, the web site can still use the www.iot-remote.com server to save/load configurations. It is however also easy to host the server yourself. You have to adjust the following source code parts:
web/js/remote/pages/PageSettings:this.HOST,this.PORTas well asserver/server.py:CONFIGURATION_PATHandLOCAL_PROXY_PORT.
The dependencies of the Python server are python-twisted and python-autobahn. The server can be started with Python:
python server.py
It is as easy as that to host your own Internet of Things web server that can save configurations over WebSockets!
Develop your own programs
Beside the direct usage of www.iot-remote.com it is of course also possible to develop your own programs. The basis of this is the API of the Remote Switch Bricklets. The API is available for many different programming languages. The documentation of the API does have example applications for all of the programing languages that we support. Those examples are a good starting point if you are just starting to program the Tinkerforge hardware.
Ethernet Extension
If you don't want to use a USB <-> Ethernet Gateway (PC, Raspberry PI, etc), you can use the Ethernet Master Extension. With the Ethernet Master Extension it is possible to directly communicate with the kit by a smart phone or tablet. The case of the IoT kit does have the necessary slits to accommodate the Extension. The documentation has more information regarding the usage of the Ethernet Extension.
Interaction with other things
The kit can communicate with lots of different other "things". It is very easy to integrate other Bricks and Bricklets from the Tinkerforge building blocks. You can also use product specific interfaces or online services such as Xively, Cumulocity, Carriots or similar to interact with other devices. In the following we will show some examples:
Motion detection with Motion Detector Bricklet: The Motion Detector Bricklet allows to detect movement. Together with the kit it is possible to turn devices on or off dependent on the presence of persons.
Temperature-based control of window motors: With Bricklets such as Temperature, Temperature IR or the PTC Bricklet you can measure temperatures. Together with 433MHz home automation components you can open and close windows depending on the temperature.
Daylight dependent blind control: With the Ambient Light Bricklet 2.0 you can measure the light intensity, it allows to control blinds dependent on light level.
GPS based home automation: By using the GPS Bricklet or your smart phone with GPS you can control your home dependent on your position. As an example you could turn on the outdoor lighting if it is dark and you are approaching your home.
Load switching dependent on electricity prices: If your electricity price depends on the time of day or on the current market prices you can switch loads on if the prices are cheap and off if they are expensive.
Load switching dependent on power usage: Many intelligent electricity meters allow you to get access to the current power usage. Alternatively you can read the revolutions of an electromechanical meter with the Hall-Effect Bricklet. With this information you can control devices dependent on power usage.