- Getting Started
- Hardware
- Bricks
- Debug Brick
- ESP32 Brick
- ESP32 Ethernet Brick
- HAT Brick
- HAT Zero Brick
- IMU Brick 2.0
- Master Brick
- RED Brick
- Features
- Description
- Technical Specifications
- Resources
- First Steps / Test your RED Brick
- Brick Viewer
- Update Tinkerforge Software
- Overview Tab (Status Information)
- Settings Tab
- Program Tab (Upload and Execution)
- Console Tab (Remote Access)
- Versions Tab (Daemon, Bindings and Libraries)
- Extensions Tab (Configure, Manage)
- Import/Export
- RED Brick Web Interface
- RED Brick Software Image
- Example Programs
- Hardware Description
- FAQ
- Known Issues
- History
- Programming Interface
- Silent Stepper Brick
- Bricklets
- Master Extensions
- Power Supplies
- Discontinued Products
- Timeline
- Bricks
- Software
- Kits
- Embedded Boards
- Specifications
RED Brick - Program Tab
The program tab of the RED Brick tab of the Brick Viewer is the most important piece of user interface for the RED Brick. It can help you to upload, modify and monitor your programs.
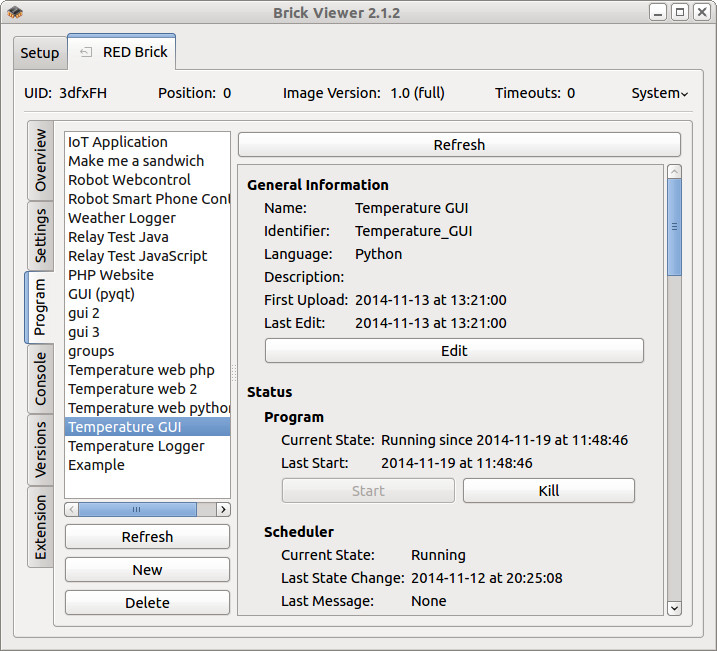
If you start the RED Brick for the first time you will be presented with an empty program list and three buttons:
Refresh: Refreshes programs tab
New: Starts "New Program" wizard
Delete: Deletes selected program
After you have uploaded your first program you can select the program and information about the program will be displayed on the right. You can edit the configuration and also view and download logs.
Uploading a program to the RED Brick consists of 8 easy steps that you are guided through by a wizard:
Wizard Step 1: General Information
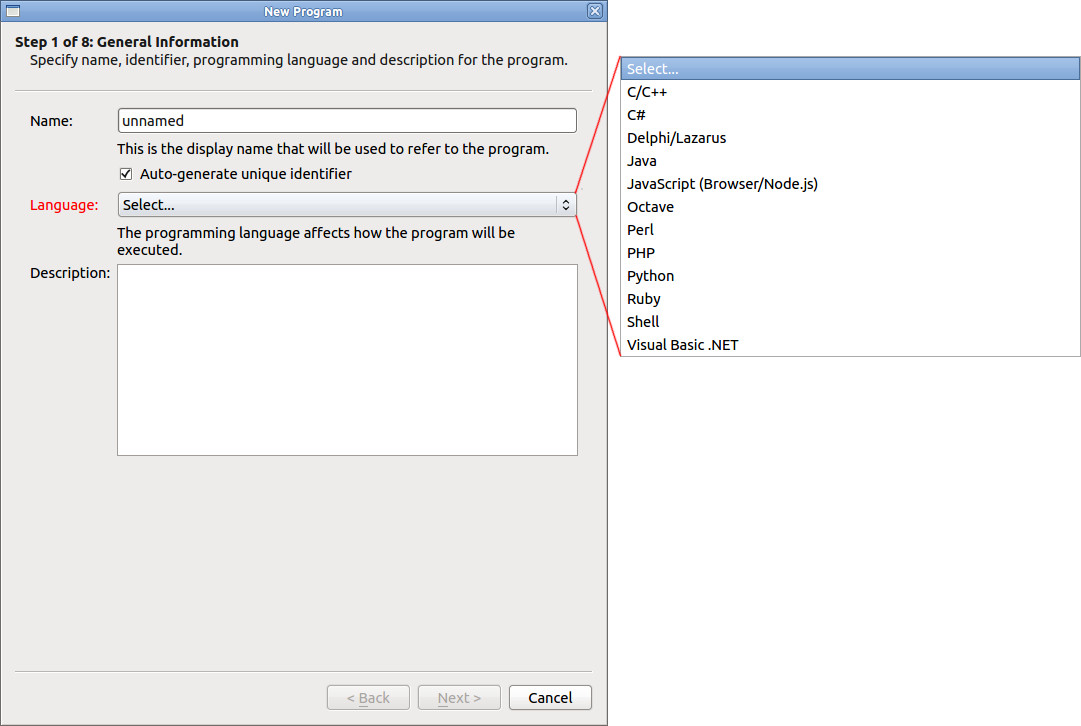
Name: This is the name of your program. It will be shown in the program list and every other time the program is referred to.
Language: Select the language of your program.
Description: The description will be shown in the program, if your program is selected.
Unique Identifier: If you uncheck Auto-Generate Unique Identifier you will have to specify your own identifier. The identifier is mostly used internally. You can use your own identifier if you want to have a specific name of the program folder in the underlying Linux.
Wizard Step 2: Files
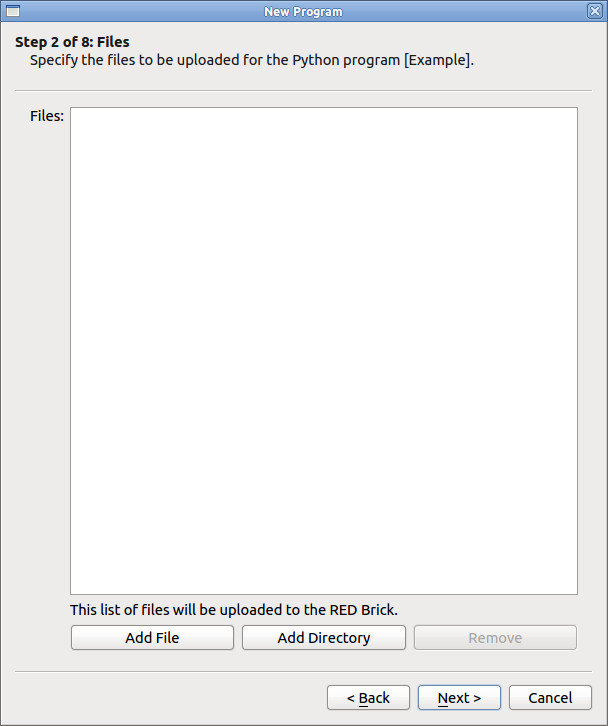
Add Files: Adds single program files.
Add Directory: Adds your program directory, the included files and subdirectories.
Remove: Removes the selected file or directory.
Please note that the hierarchical structure that you create here will be used on the RED Brick exactly as specified. For example, if you want to upload a small web page that is written in Python/Flask with the following structure
myproject/
index.py
templates/
template1.html
template2.html
static/
static.css
static.js
and you want the index.py as well as the two folders to be in the root
directory of your program on the RED Brick, you need to first
select the index.py with Add Files and then independently select the
two folders with Add Directory.
Every "Add" will add the thing you are selecting to the root directory of the RED Brick program.
Depending on the chosen language you have to upload different types of files:
For JavaScript, Perl, PHP, Python and Ruby you can upload the script files (e.g.:
.js,.pl,.php,.py,.rb)For Java, C# and Visual Basic .NET you have to upload already compiled files (e.g.:
.jar,.class,.exe)For C/C++ and Delphi/Lazarus you can upload cross-compiled executable or Makefile with source code (see the description in step below)
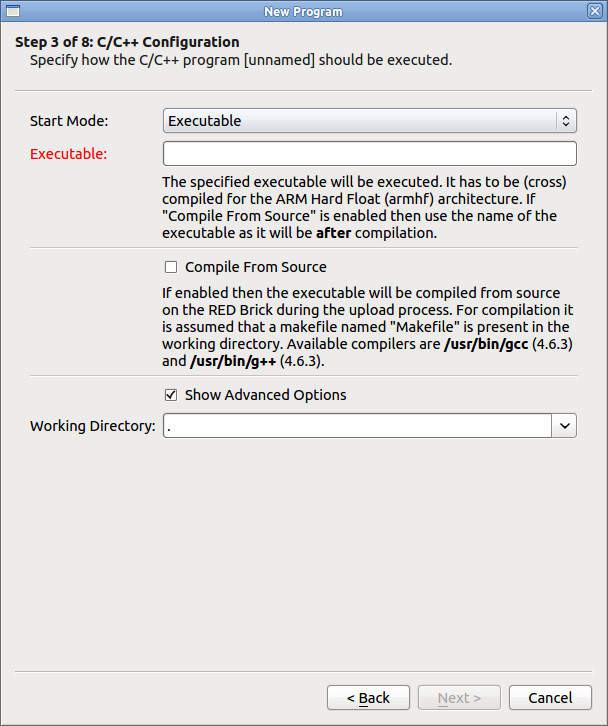
Wizard Step 3: Language Specific Configuration
In step 3 you have to configure the compiler/interpreter of the language that you selected in step 1. This step is documented for each language individually.
C/C++
The Tinkerforge C/C++ Bindings are preinstalled on the RED Brick
(compiled as a library libtinkerforge.so, available in /usr/lib/).
The headers are available in /usr/include/tinkerforge. You can
directly link against this library (see example below).
Start Mode: Currently only Executable is available as start mode.
Executable: Name of the executable that should be called. This is either the name of the cross compiled executable that you are uploading or it is the name of the executable that is created during compilation
Compile From Source: If you check this checkbox, your code will be compiled upon upload. If you use this option your project must contain a
Makefile. An example Makefile for a small project that uses the Tinkerforge Bindings and consists otherwise of the fileexample.clooks as follows:Download (Makefile), Download (example.c)
 1# Defines
 2CC=g++
 3CFLAGS=-c -Wall -I/usr/include/tinkerforge
 4LIBS=-ltinkerforge -lpthread
 5EXE=example
 6SOURCES=example.c
 7OBJECTS=$(SOURCES:.c=.o)
 8
 9# Build Rules
10all: $(SOURCES) $(EXE)
11
12.c.o:
13    $(CC) $(CFLAGS) $< -o $@
14
15$(EXE): $(OBJECTS)
16    $(CC) $(OBJECTS) -o $(EXE) $(LIBS)
17
18clean:
19    rm -f *.o $(EXE)
Working Directory: Specify the working directory of your program. You can use a path that is relative to the root directory of your program. Usually you will leave this as
..Make Options: If you compile from source you can also add make parameters.
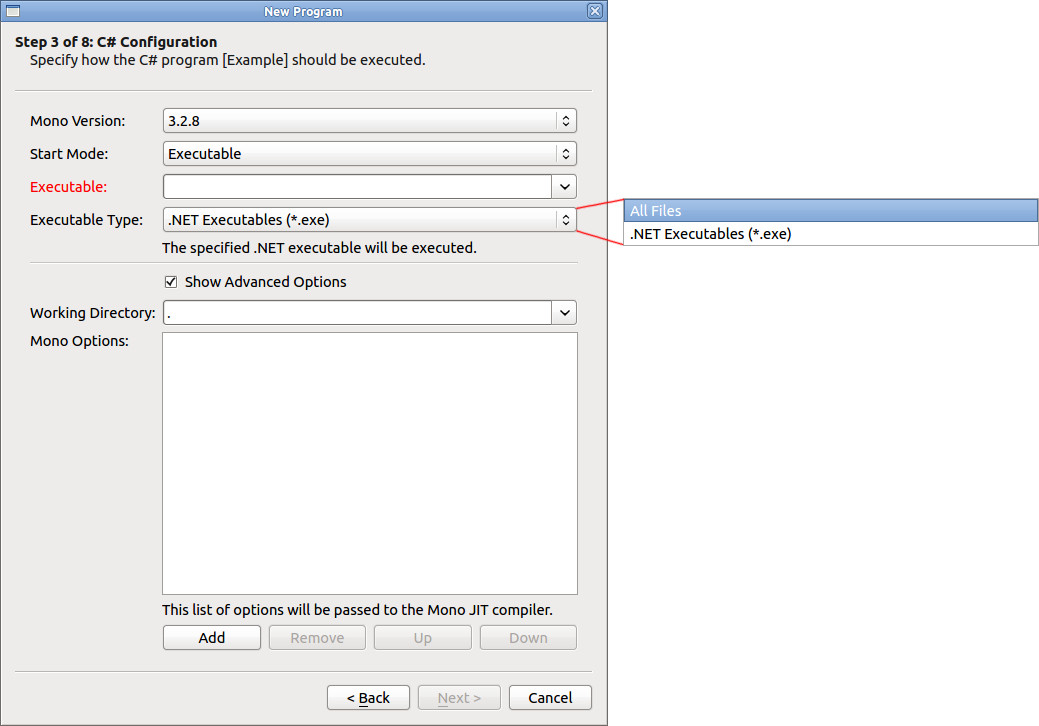
C#
For C# the Tinkerforge.dll is available in /usr/lib/ and can
thus be found by mono. That means, if you compile your C# program
and you use the Tinkerforge.dll as reference, it will be
automatically found on the RED Brick. You don't have to add
the Tinkerforge.dll in step 2.
Mono Version: Currently there is only one mono version installed.
Start Mode: Currently only Executable is available as start mode.
Executable: Choose the .NET executable from the files that you added in step 2. A .NET executable usually has the file ending
.exe.Your executable will be executed with mono, but you can compile on Windows with Visual Studio, that works without problem. Make sure that you don't use any Windows specific libraries that are not available on the RED Brick.
Working Directory: Specify the working directory of your program. You can use a path that is relative to the root directory of your program. Usually you will leave this as
..Mono Options: Here you can add options that will be given to the mono JIT compiler.
Delphi/Lazarus
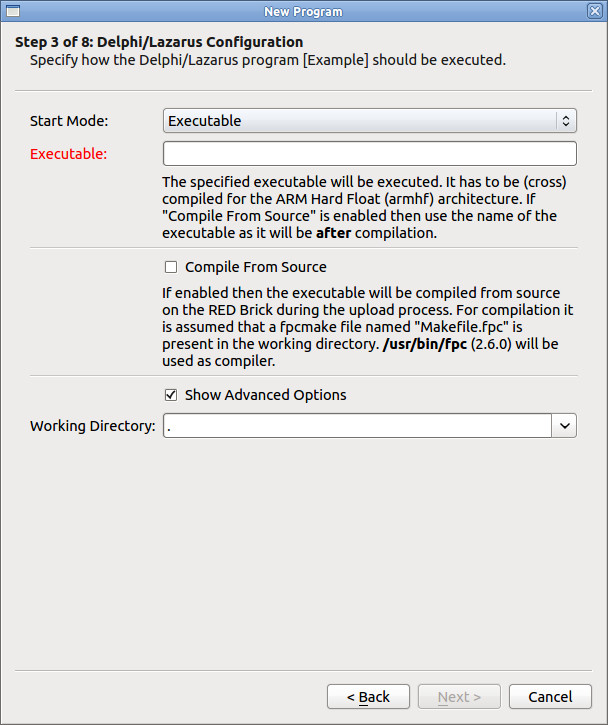
Start Mode: Currently only Executable is available as start mode.
Executable: Name of the executable that should be called. This is either the name of the cross compiled executable that you are uploading or it is the name of the executable that is created during compilation
Compile From Source: If you check this checkbox, your code will be compiled upon upload. As build system fpcmake or lazbuild (requires Image >= 1.7 and Brick Viewer >= 2.2.6) can be used:
For fpcmake your project must contain a
Makefile.fpc. An example Makefile for a small project that uses the Tinkerforge Bindings and has the fileExample.pasas main unit looks as follows:[target] programs=Example [require] packages=tinkerforge
For lazbuild your project must contain a Lazarus project file (
*.lpi).
Working Directory: Specify the working directory of your program. You can use a path that is relative to the root directory of your program. Usually you will leave this as
..Make/Lazbuild Options: If you compile from source you can also add make/lazbuild parameters.
Java

The Tinkerforge.jar Java Bindings are available in
/usr/tinkerforge/bindings/java/. The file is already added
to the class path by default, so you can just import the Tinkerforge
classes by the usual means, e.g. import com.tinkerforge.IPConnection;.
Java Version: Currently there is only one Java version installed.
Start Mode: The start modes Main Class and JAR File are available as start mode:
Main Class: If you choose main class, the Brick Viewer will parse all of the class files that you added in step two and show you all Classes that contain a main method and can thus be used to start your program.
JAR File: If you create a JAR file from your program, you can also start your program directly from the JAR file. The available JAR files will be listed in the drop down box.
Class Path: You can add files that are added to your class path. All JARs that you added in step 2 will automatically be added to the class path.
Working Directory: Specify the working directory of your program. You can use a path that is relative to the root directory of your program. Usually you will leave this as
..JVM Options: Here you can add options that will be given to the Java virtual machine.
JavaScript (Browser/Node.js)
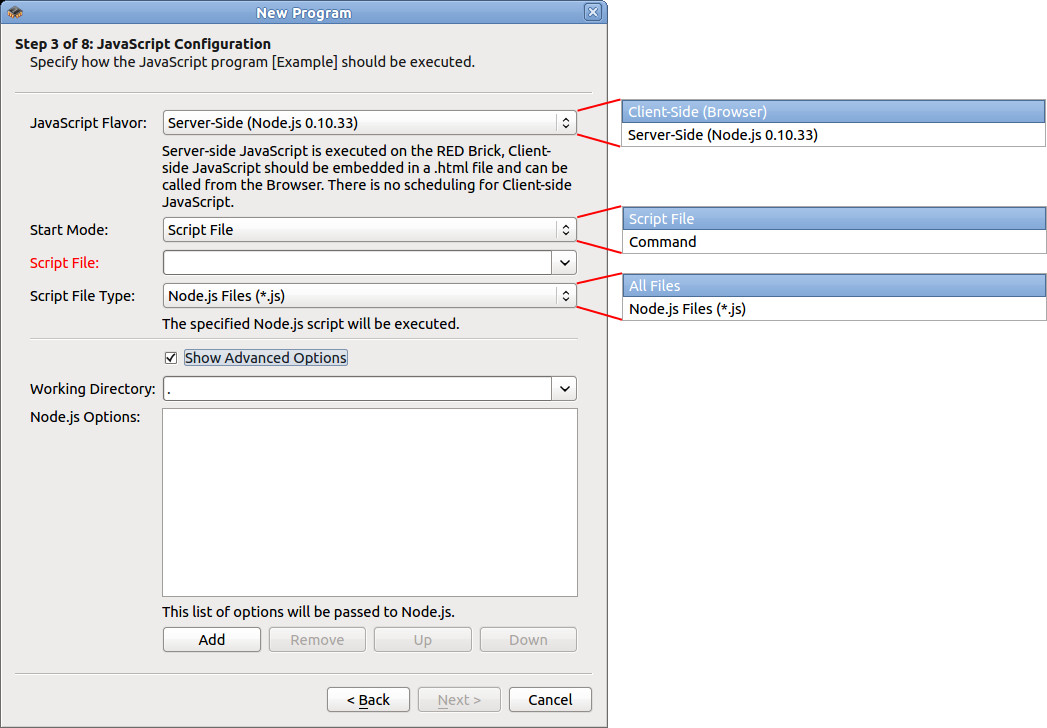
Client-Side (Browser): If you use client-side JavaScript, there is nothing to configure. You can add your
.htmlfiles in step 2, which are then available through the RED Brick web interface. TheTinkerforge.jscan be used via:<script src="/Tinkerforge.js" type='text/javascript'></script>
Server-Side (Node.js): If you use Node.js, you can configure the start mode and other options. The Tinkerforge Bindings are available, you can use
require('tinkerforge')to import them.Start Mode: The start modes Script File and Command are available as start mode:
Start Mode Script File: Specify the script file that should be executed by node.
Start Mode Command: Specify a command that should be executed by node with the -e option.
Working Directory: Specify the working directory of your program. You can use a path that is relative to the root directory of your program. Usually you will leave this as
..Node.js Options: Here you can add options that will be given to node when your script file or command is executed.
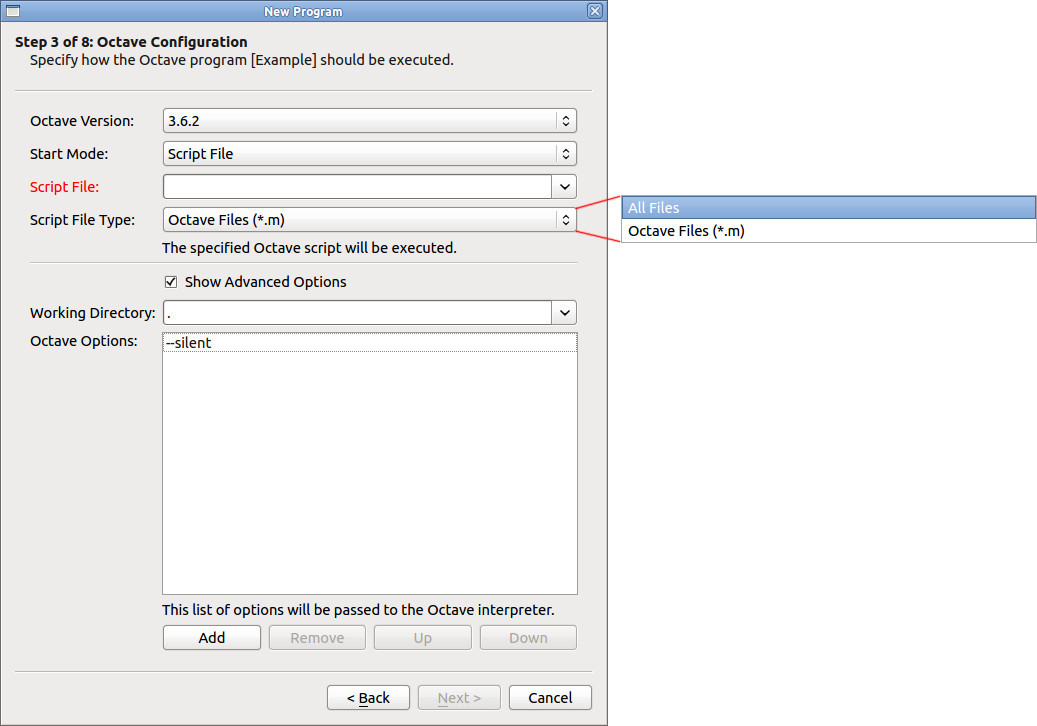
Octave
For Octave the Java path to the Tinkerforge.jar is already added
in the .octaverc file. This means that in your program you can assume
that javaaddpath("Tinkerforge.jar") was already called with
the correct directory.
Octave Version: Currently there is only one Octave version installed on the RED Brick.
Start Mode: Currently only Script File is available as start mode.
Script File: Choose one of the script files that you added in step 2, it will be executed by Octave. If you want to use one of our Octave example, make sure to extend it to a script file first.
Working Directory: Specify the working directory of your program. You can use a path that is relative to the root directory of your program. Usually you will leave this as
..Octave Options: Here you can add options that will be given to the Octave interpreter. By default the --silent options is already set, it suppresses the output version and copyright information that is usually done by octave. If you remove this option your log file will have this output added to each log entry.
Perl
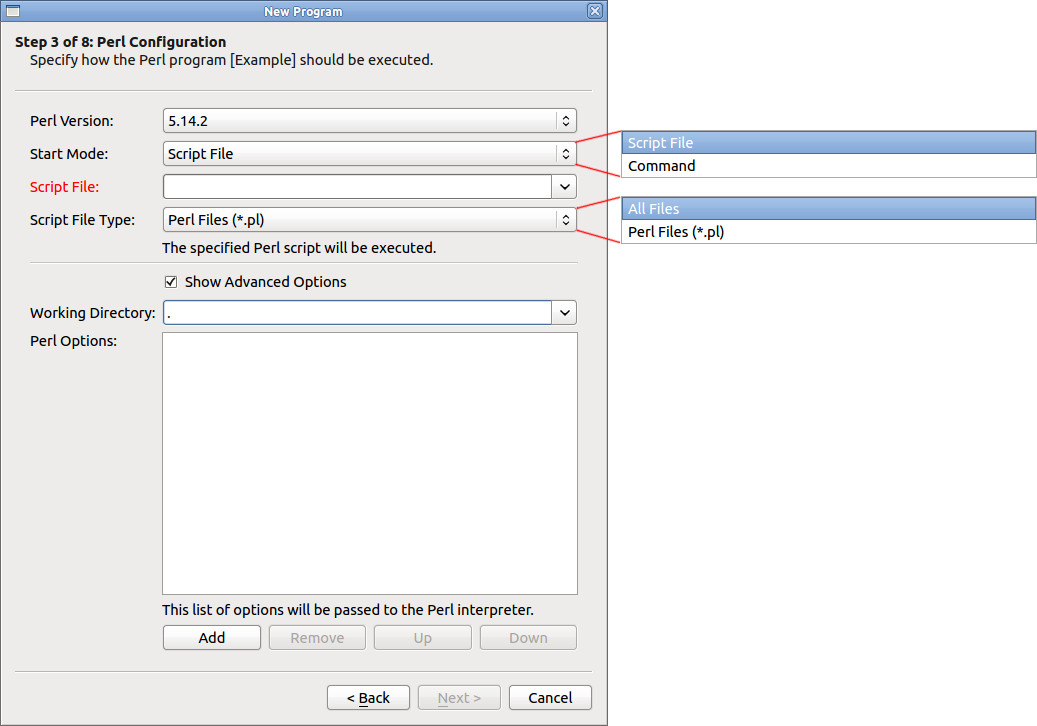
The Tinkerforge Bindings are available. You can use the use
directive to import them, e.g.: use Tinkerforge::IPConnection;.
Perl Version: Currently there is only one Perl interpreter version installed on the RED Brick.
Start Mode: The start modes Script File and Command are available as start mode:
Start Mode Script File: Specify the script file that should be executed by the Perl interpreter.
Start Mode Command: Specify a command that should be executed by the Perl interpreter with the -e option.
Working Directory: Specify the working directory of your program. You can use a path that is relative to the root directory of your program. Usually you will leave this as
..Perl Options: Here you can add options that will be given to Perl when your script file or command is executed.
PHP
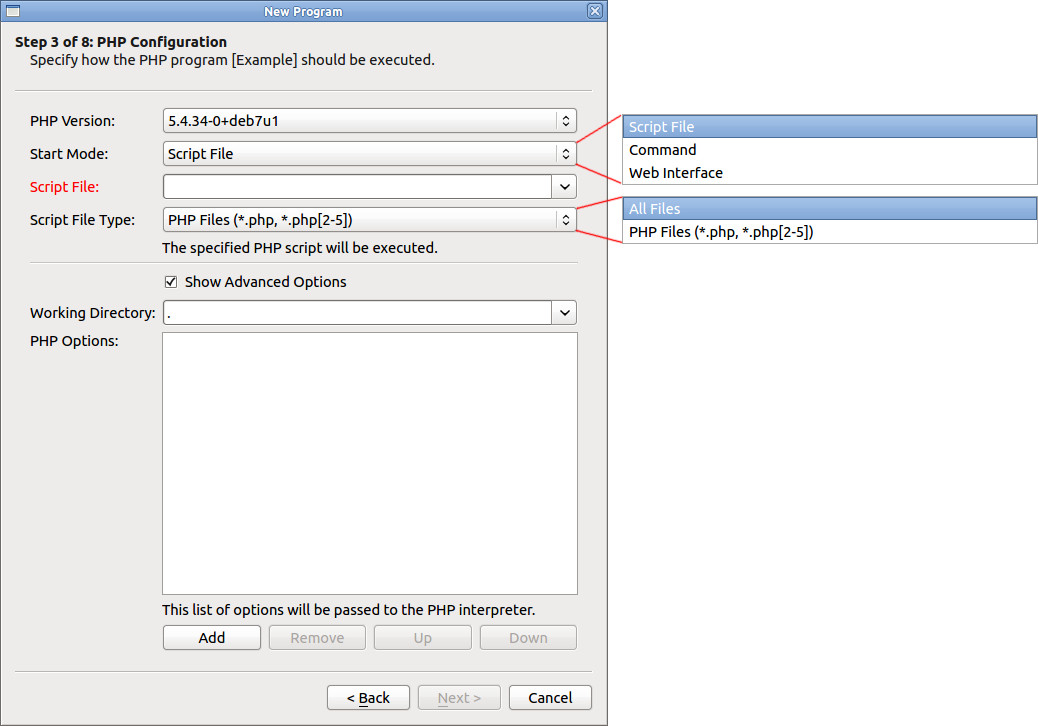
The Tinkerforge Bindings are installed through PEAR
and thus available. You can import them with the require_once
function, e.g.: require_once('Tinkerforge/IPConnection.php');.
PHP Version: Currently there is only one PHP interpreter version installed on the RED Brick.
Start Mode: The start modes Script File, Command and Web Interface are available as start mode:
Start Mode Script File: Specify the script file that should be executed by the PHP interpreter.
Start Mode Command: Specify a command that should be executed by the PHP interpreter with the -r option.
Start Mode Web Interface: If you want to implement a web interface with PHP you have to chose this option. In this case PHP will be called from Apache, thus there are no other configurations to be made. See RED Brick web interface for more informations about the web interface.
Working Directory: Specify the working directory of your program. You can use a path that is relative to the root directory of your program. Usually you will leave this as
..PHP Options: Here you can add options that will be given to the PHP interpreter when your script file or command is executed.
Python
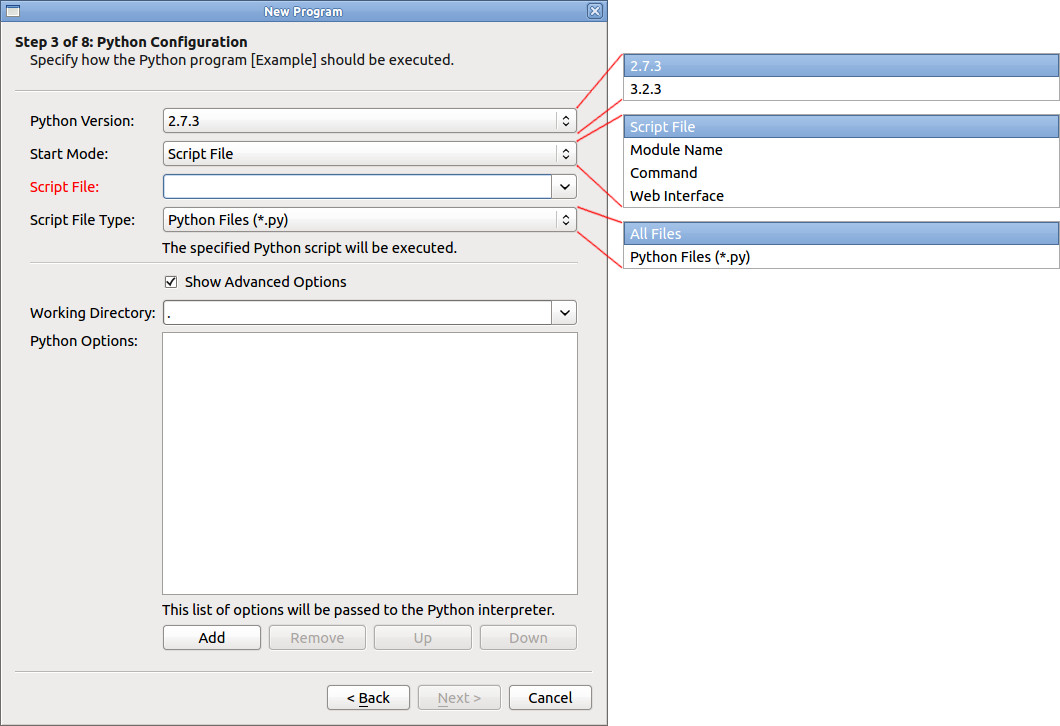
The Tinkerforge Bindings are installed through
pip and thus
available. You can import them with the normal import
statement, e.g.: from tinkerforge.ip_connection import IPConnection.
Python Version: You can choose between Python 2 and Python 3.
Start Mode: The start modes Script File, Module Name, Command and Web Interface are available as start mode:
Start Mode Script File: Specify the script file that should be executed by the Python interpreter.
Start Mode Module Name: Specify a module name that should be executed by the Python interpreter with the -m option.
Start Mode Command: Specify a command that should be executed by the Python interpreter with the -c option.
Start Mode Web Interface: If you want to implement a web interface with Python you have to chose this option. In this case Python will be called from Apache/WSGI, thus there are no other configurations to be made. See RED Brick web interface for more informations about the web interface.
Working Directory: Specify the working directory of your program. You can use a path that is relative to the root directory of your program. Usually you will leave this as
..Python Options: Here you can add options that will be given to Python interpreter when your script file or command is executed.
Ruby

The Tinkerforge Bindings are installed through gem
and thus available. You can use the require statement to import them,
e.g.: require 'tinkerforge/ip_connection'.
Ruby Version: Currently there is only one Ruby interpreter version installed on the RED Brick.
Start Mode: The start modes Script File and Command are available as start mode:
Start Mode Script File: Specify the script file that should be executed by the Ruby interpreter.
Start Mode Command: Specify a command that should be executed by the Ruby interpreter with the -e option.
Working Directory: Specify the working directory of your program. You can use a path that is relative to the root directory of your program. Usually you will leave this as
..Ruby Options: Here you can add options that will be given to Ruby when your script file or command is executed.
Shell
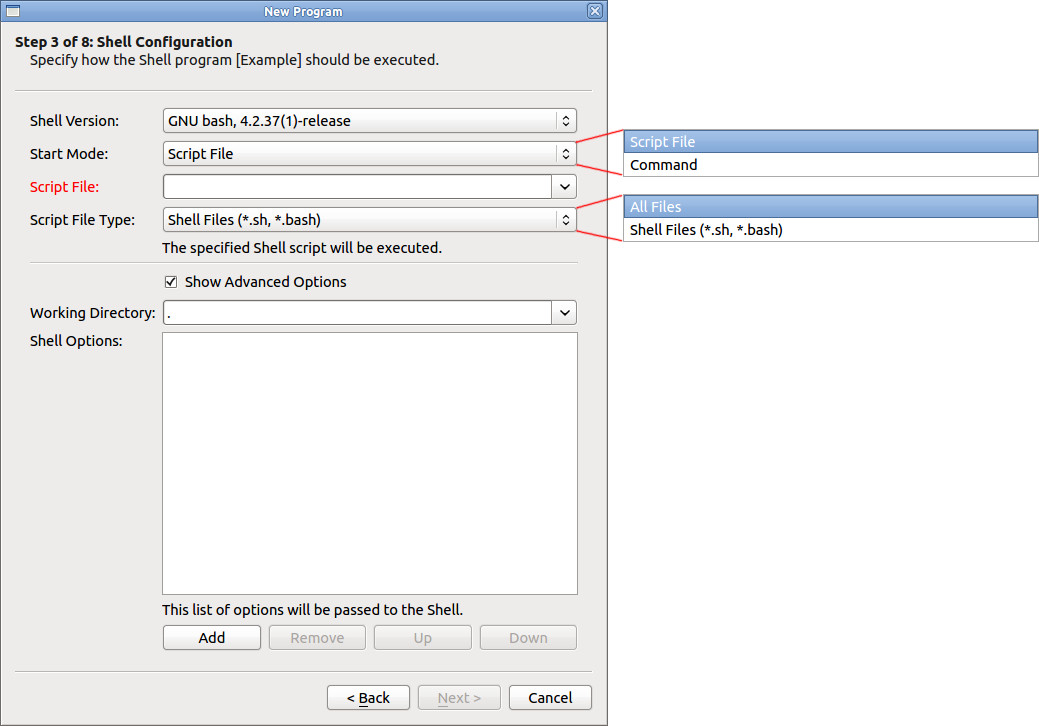
The Shell Bindings are available in /usr/local/bin, which is
in the PATH. In your shell script you can just call tinkerforge
without any prefix.
Shell Version: Currently there is only one bash version available on the RED Brick.
Start Mode: The start modes Script File and Command are available as start mode:
Start Mode Script File: Specify the script file that should be executed by bash.
Start Mode Command: Specify a command that should be executed by bash with the -c option.
Working Directory: Specify the working directory of your program. You can use a path that is relative to the root directory of your program. Usually you will leave this as
..Shell Options: Here you can add options that will be given to bash when your script file or command is executed.
Visual Basic .NET
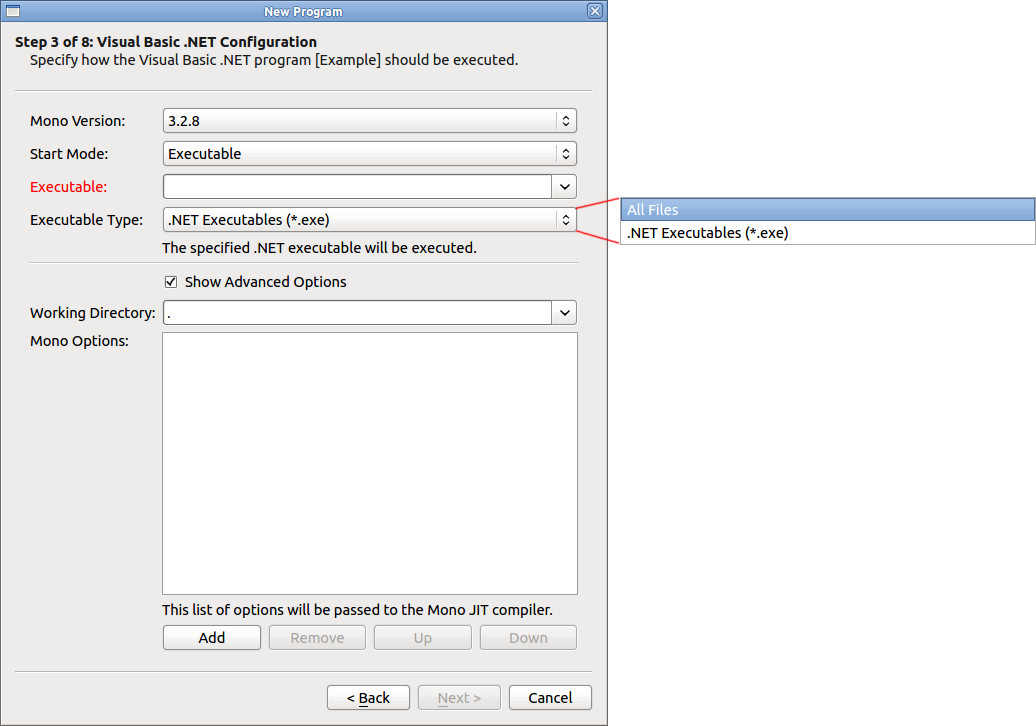
For Visual Basic .NET the Tinkerforge.dll is available in /usr/lib/
and can thus be found by mono. That means, if you compile your VB.NET
program and you use the Tinkerforge.dll as reference, it will be
automatically found on the RED Brick. You don't have to add
the Tinkerforge.dll in step 2.
Mono Version: Currently there is only one mono version installed.
Start Mode: Currently only Executable is available as start mode.
Executable: Choose the .NET executable from the files that you added in step 2. A .NET executable usually has the file ending
.exe.Your executable will be executed with mono, but you can compile on Windows with Visual Studio, that works without problem. Make sure that you don't use any Windows specific libraries that are not available on the RED Brick.
Working Directory: Specify the working directory of your program. You can use a path that is relative to the root directory of your program. Usually you will leave this as
..Mono Options: Here you can add options that will be given to the mono JIT compiler.
Wizard Step 4: Arguments and Environment

Arguments: Your program will be called with the given arguments.
Please note that you don't have to escape your arguments. If you would call your program on the terminal with:
./my_program --setting value1 value2
You have to add the three arguments --settings, value1 and value2 individually to the argument list.
If you only add the one argument --settings value1 value2 it will be equivalent to the following call in the terminal:
./my_program --settings\ value1\ value2
Environment: Your program will have the environment variables that you set here available. Environment variables that are necessary to start a program in the chosen programming language will already be there by default.
If your program has a GUI then you need to add the environment variable DISPLAY with a value of :0, otherwise your program cannot show a window on the desktop.
If you don't know what this means you very likely don't have to touch this setting.
Wizard Step 5: Stdio Redirection
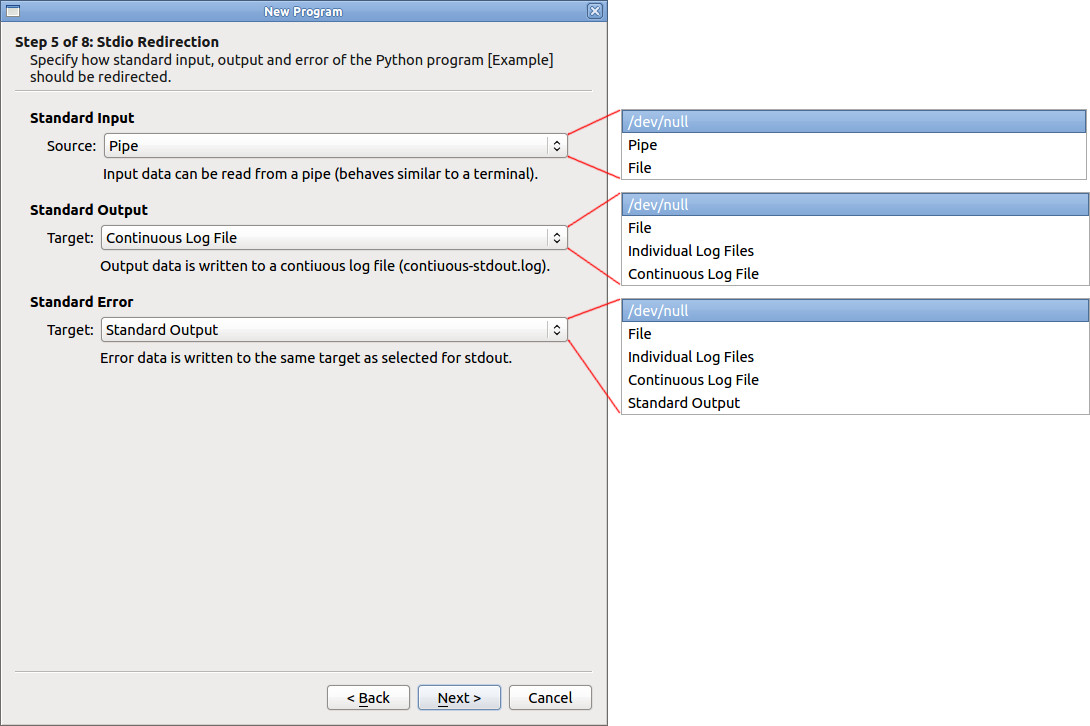
In many cases the default values can just leaved as they are. If you don't know what the standard input and output is you can likely just click Next.
Standard Input:
/dev/null: Your program does not have any input.
Pipe: If you choose Pipe you can send input to your program with the Brick Viewer (in the Stdio Redirection section of the program tab). Many of our example programs wait for user input and only react on callbacks. If your program is of this nature you have to select Pipe as standard input.
File: You can specify a file that will be given to your program as input.
Standard Output:
/dev/null: Through output of your program away.
File: You can specify a file where the standard output is written to.
Individual Log Files: Create a new log file for each execution of your program.
Continuous Log File: Create one log file that has an entry for each execution of your program.
Standard Error: For error output you can use the same configurations as for standard output. Additionally you can redirect the error output to the standard output (i.e. they will both be written to the same file).
Wizard Step 6: Schedule

Mode Never: The scheduler of the RED Brick will not be used. You can start your program manually in the program tab of the Brick Viewer.
Mode Always: The scheduler will try to always keep your program running. If your program ends it will be restarted immediately. If you have a controlling program that uses some input to control some output that should just always do its thing, this mode is the right one for you.
Mode Interval: Define an interval (in seconds) in which your program should be executed.
Mode Cron: Use cron to schedule your program. Cron is a time-based job scheduler. You can specify things like
Every day at 20:00:
00 20 * * *Every weekday during working hours (6:00-18:00) once per hour:
00 09-18 * * 1-5Every minute during the 12th hour of Monday, but only if the day is the 16th of the month:
* 12 16 * Mon
As you can see, you can specify quite complex tasks with cron. There is a big number of cron tutorials available on the Internet.
Please note that your RED Brick needs to have the current time available for cron to work. The RED Brick is not equipped with a clock, which is also active when the RED Brick is powered down. Such that the time is lost after power down. The time will be automatically set if your RED Brick is connected to the Internet (through NTP). You can set it in the Date/Time section of the settings tab and you can use the GPS Bricklet to sync the Linux system time with the GPS time.
Mode Once After Upload: The scheduler will execute the program only once directly after it is uploaded.
Continue After Error: If this checkbox is unchecked, the scheduler will stop after your program exits with an error. If it is checked errors are ignored.
Wizard Step 7: Summary
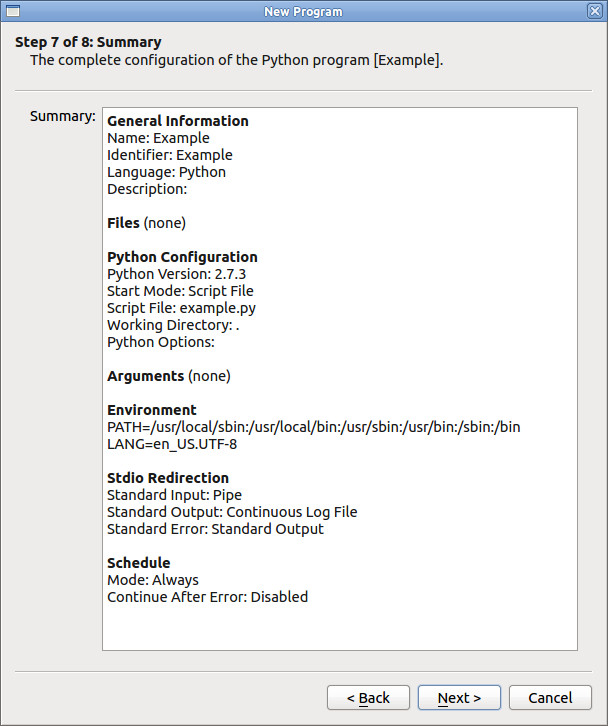
The summary page shows a summary of the previous made configuration. If you want to ask for help regarding the configuration of a program it probably makes sense to append the content of this summary to your inquiry.
Wizard Step 8: Upload
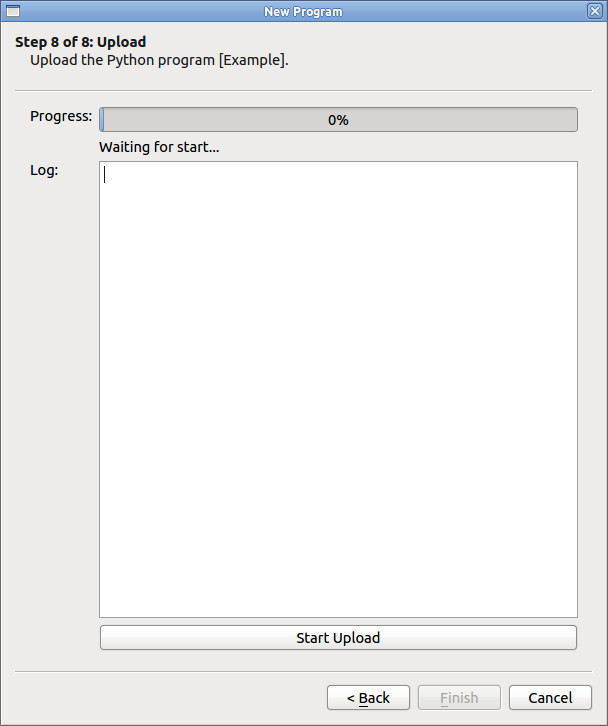
In the last step you can press Start Upload to start the upload of your program files and configuration. Your program will either start directly after upload or later, depending on the scheduling configurations in step 6.