- Getting Started
- Hardware
- Software
- Kits
- Starter Kit: Weather Station
- Starter Kit: Hardware Hacking
- Features
- Description
- Technical Specifications
- Resources
- Required Tools
- Firmware updating and first tests
- How it works
- Hardware Hacking for Beginners
- Examples
- Control Mains Switches Remotely
- Read out Smoke Detectors
- Control Garage Doors Remotely
- Is someone at the Door? - Doorbell Notifier
- Starter Kit: Server Room Monitoring
- Starter Kit: Server Room Monitoring 2.0
- Starter Kit: Blinkenlights
- Starter Kit: Internet of Things
- Starter Kit: Camera Slider
- Tabletop Weather Station
- Embedded Boards
- Specifications
Control Remote Mains Switches using C# with GUI
For this project we are assuming, that you have a C# development environment set up and that you have a rudimentary understanding of the C# language.
If you are totally new to C# itself you should start here. If you are new to the Tinkerforge API, you should start here.
We are also assuming that you have a remote control connected to an Industrial Quad Relay Bricklet as described here.
A demo application based on this project is available (Download: Windows, Linux, macOS):
On Windows it requires the .NET Framework, but you probably have this installed already.
On Linux it requires the Mono Runtime for Linux, but you probably have this installed already, too.
On macOS it requires the Mono Runtime for macOS. Since macOS 10.8 you also have to install XQuartz to make the Mono Runtime work properly. Now you can start it with
mono RemoteSwitchGUI.exefrom a terminal window.
Goals
In this project we will create a robust GUI program that resembles the functionality of the actual remote control.
Step 1: Create the GUI
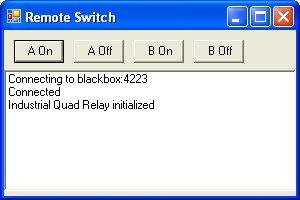
The program will have a simple Windows Forms GUI that contains four buttons and a list box for status messages:
We start with a simple Form that has title and size:
class RemoteSwitchGUI : Form
{
    public RemoteSwitchGUI()
    {
        Text = "Remote Switch";
        Size = new Size(300, 500);
    }

    static public void Main()
    {
        Application.Run(new RemoteSwitchGUI());
    }
}
Then a 40 pixel height panel for the buttons is added on the top border and a list box for status messages fills the rest of the form:
public RemoteSwitchGUI()
{
    Text = "Remote Switch";
    Size = new Size(300, 500);

    panel = new Panel();
    panel.Parent = this;
    panel.Height = 40;
    panel.Dock = DockStyle.Top;

    listBox = new ListBox();
    listBox.Parent = this;
    listBox.Dock = DockStyle.Fill;
    listBox.BringToFront();
The CreateButton() method creates a new button with a given name and
position:
private Button CreateButton(string name, int x)
{
    Button button = new Button();

    button.Text = name;
    button.Parent = panel;
    button.Width = 50;
    button.Location = new Point(x, 10);

    return button;
}
Finally four buttons are created, one for each button on the remote control that we want to be able to trigger:
public RemoteSwitchGUI()
{
    // [...]

    buttonAOn  = CreateButton("A On",   10);
    buttonAOff = CreateButton("A Off",  70);
    buttonBOn  = CreateButton("B On",  130);
    buttonBOff = CreateButton("B Off", 190);
Now the GUI is finished.
Step 2: Discover Bricks and Bricklets
This step is basically the same as step 1 in the Read out Smoke Detectors using C# project, but with some changes to make it work in a GUI program.
We don't want to call the Connect()
method directly, because it might take a moment and block the GUI during that
period of time. Instead Connect() will be called from a thread, so it will
run in the background and the GUI stays responsive:
public RemoteSwitchGUI()
{
    // [...]

    Thread thread = new Thread(delegate() { Connect(); });
    thread.IsBackground = true;
    thread.Start();
}

private void Connect()
{
    ipcon = new IPConnection();
    ipcon.Connect(HOST, PORT);

    ipcon.EnumerateCallback += EnumerateCB;
    ipcon.Connected += ConnectedCB;

    ipcon.Enumerate();
}
The ConnectedCB callback function is the same as in the smoke detector
project. But the EnumerateCB callback function is simpler because the
Industrial Quad Relay Bricklet does not need any configuration for this project:
private void EnumerateCB(IPConnection sender, string UID, string connectedUID, char position,
                         short[] hardwareVersion, short[] firmwareVersion,
                         int deviceIdentifier, short enumerationType)
{
    if(enumerationType == IPConnection.ENUMERATION_TYPE_CONNECTED ||
       enumerationType == IPConnection.ENUMERATION_TYPE_AVAILABLE)
    {
        if(deviceIdentifier == BrickletIndustrialQuadRelay.DEVICE_IDENTIFIER)
        {
            brickletIndustrialQuadRelay = new BrickletIndustrialQuadRelay(UID, ipcon);
        }
    }
}
Step 3: Triggering Switches
The connection is established and an Industrial Quad Relay Bricklet is found but there is no logic yet to trigger a switch if a button is clicked.
A delegate is added to the Click event of the button that calls a
TriggerSwitch() method with the given selection mask. This mask defines
which switches of the Industrial Quad Relay Bricklet should be closed if the
specific button is clicked:
private Button CreateButton(string name, int x, int selectionMask)
{
    // [...]

    button.Click += delegate(object sender, System.EventArgs e)
    {
        TriggerSwitch(selectionMask);
    };

    return button;
}
According to the hardware setup section the inputs of the remote control should be connected as follows:
Signal |
Relay |
|---|---|
A |
0 |
B |
1 |
ON |
2 |
OFF |
3 |
To trigger the switch "A ON" of the remote control the relays 0 and 2 have to be
closed. This is represented by the selection mask (1 << 0) | (1 << 2).
The constructor is changed to call CreateButton() with the correct
selection mask for each button:
public RemoteSwitchGUI()
{
    // [...]

    buttonAOn  = CreateButton("A On",   10, (1 << 0) | (1 << 2));
    buttonAOff = CreateButton("A Off",  70, (1 << 0) | (1 << 3));
    buttonBOn  = CreateButton("B On",  130, (1 << 1) | (1 << 2));
    buttonBOff = CreateButton("B Off", 190, (1 << 1) | (1 << 3));
The TriggerSwitch() method uses SetMonoflop() to trigger a button
press on the remote control. A monoflop will set a new state (relay open or close)
and hold it for a given time (0.5s in this case). After this time
the previous state is restored. This approach simulates a button click that
takes 0.5s (500ms).
private void TriggerSwitch(int selectionMask)
{
    brickletIndustrialQuadRelay.SetMonoflop(selectionMask, 15, 500);
}
That's it. If we would copy these three steps together in one file and execute it, we would have a working program that can control remote switches using their hacked remote control!
But the program is not yet robust enough. What happens if it can't connect on startup? What happens if the enumerate after an auto reconnect doesn't work?
What we need is error handling!
Step 4: Error handling and Logging
We will use the same principals as in step 4 of the Read out Smoke Detectors using C# project, but with some changes to make it work in a GUI program.
We can't just use System.Console.WriteLine() for logging because this is a
GUI program and there is no console window. Instead the list box is going to
display the log messages.
But there is still a problem with that approach. The connection is established
on an extra thread, but only the main thread can safely interact with the
GUI. Luckily C# provides the Invoke() method that allows all threads to run
code on the main thread and safely interact with the GUI. With this method we
can create a Log() method that allows all threads to write to the list box
in a safe way:
private void Log(string message)
{
    Invoke((MethodInvoker) delegate() { listBox.Items.Add(message); });
}
All the changes described in step 4 of the smoke detector project apply here as
well. In addition we have to deal with errors in TriggerSwitch() too:
private void TriggerSwitch(string name, int selectionMask)
{
    if(brickletIndustrialQuadRelay == null) {
        Log("No Industrial Quad Relay Bricklet found");
        return;
    }

    try
    {
        brickletIndustrialQuadRelay.SetMonoflop(selectionMask, 15, 500);
        Log("Triggered '" + name + "'");
    }
    catch(TinkerforgeException e)
    {
        Log("Trigger '" + name + "' Error: " + e.Message);
    }
}
To get nicer log messages the button name is passed to TriggerSwitch() so
it can be included in the log messages.
Finally, because the connect thread interacts with the GUI now it cannot be
started directly from the constructor anymore. Instead it is started when the
GUI is shown for the first time. The Load event can be used for this:
public RemoteSwitchGUI()
{
    // [...]

    Load += delegate(object sender, System.EventArgs e)
    {
        Thread thread = new Thread(delegate() { Connect(); });
        thread.IsBackground = true;
        thread.Start();
    };
}
Step 5: Everything put together
That's it! We are done with our hacked remote switch and all of the goals should be met.
Now all of the above put together (download):
using System.Windows.Forms;
using System.Drawing;
using System.Threading;
using Tinkerforge;

class RemoteSwitchGUI : Form
{
    private static string HOST = "localhost";
    private static int PORT = 4223;

    private Panel panel = null;
    private Button buttonAOn = null;
    private Button buttonAOff = null;
    private Button buttonBOn = null;
    private Button buttonBOff = null;
    private ListBox listBox = null;

    private IPConnection ipcon = null;
    private BrickletIndustrialQuadRelay brickletIndustrialQuadRelay = null;

    public RemoteSwitchGUI()
    {
        Text = "Remote Switch GUI 1.0.1";
        Size = new Size(300, 500);
        MinimumSize = new Size(260, 200);

        panel = new Panel();
        panel.Parent = this;
        panel.Height = 40;
        panel.Dock = DockStyle.Top;

        listBox = new ListBox();
        listBox.Parent = this;
        listBox.Dock = DockStyle.Fill;
        listBox.BringToFront();

        buttonAOn  = CreateButton("A On",   10, (1 << 0) | (1 << 2));
        buttonAOff = CreateButton("A Off",  70, (1 << 0) | (1 << 3));
        buttonBOn  = CreateButton("B On",  130, (1 << 1) | (1 << 2));
        buttonBOff = CreateButton("B Off", 190, (1 << 1) | (1 << 3));

        Load += delegate(object sender, System.EventArgs e)
        {
            Thread thread = new Thread(delegate() { Connect(); });
            thread.IsBackground = true;
            thread.Start();
        };
    }

    private Button CreateButton(string name, int x, int selectionMask)
    {
        Button button = new Button();

        button.Text = name;
        button.Parent = panel;
        button.Width = 50;
        button.Location = new Point(x, 10);

        button.Click += delegate(object sender, System.EventArgs e)
        {
            TriggerSwitch(name, selectionMask);
        };

        return button;
    }

    private void Log(string message)
    {
        Invoke((MethodInvoker) delegate() { listBox.Items.Add(message); });
    }

    private void Connect()
    {
        Log("Connecting to " + HOST + ":" + PORT);

        ipcon = new IPConnection();
        while(true)
        {
            try
            {
                ipcon.Connect(HOST, PORT);
                break;
            }
            catch(System.Net.Sockets.SocketException e)
            {
                Log("Connection Error: " + e.Message);
                Thread.Sleep(1000);
            }
        }

        ipcon.EnumerateCallback += EnumerateCB;
        ipcon.Connected += ConnectedCB;

        while(true)
        {
            try
            {
                ipcon.Enumerate();
                break;
            }
            catch(NotConnectedException e)
            {
                Log("Enumeration Error: " + e.Message);
                Thread.Sleep(1000);
            }
        }

        Log("Connected");
    }

    private void TriggerSwitch(string name, int selectionMask)
    {
        if(brickletIndustrialQuadRelay == null) {
            Log("No Industrial Quad Relay Bricklet found");
            return;
        }

        try
        {
            brickletIndustrialQuadRelay.SetMonoflop(selectionMask, 15, 500);
            Log("Triggered '" + name + "'");
        }
        catch(TinkerforgeException e)
        {
            Log("Trigger '" + name + "' Error: " + e.Message);
        }
    }

    private void EnumerateCB(IPConnection sender, string UID, string connectedUID, char position,
                             short[] hardwareVersion, short[] firmwareVersion,
                             int deviceIdentifier, short enumerationType)
    {
        if(enumerationType == IPConnection.ENUMERATION_TYPE_CONNECTED ||
           enumerationType == IPConnection.ENUMERATION_TYPE_AVAILABLE)
        {
            if(deviceIdentifier == BrickletIndustrialQuadRelay.DEVICE_IDENTIFIER)
            {
                try
                {
                    brickletIndustrialQuadRelay = new BrickletIndustrialQuadRelay(UID, ipcon);
                    Log("Industrial Quad Relay initialized");
                }
                catch(TinkerforgeException e)
                {
                    Log("Industrial Quad Relay init failed: " + e.Message);
                    brickletIndustrialQuadRelay = null;
                }
            }
        }
    }

    private void ConnectedCB(IPConnection sender, short connectedReason)
    {
        if(connectedReason == IPConnection.CONNECT_REASON_AUTO_RECONNECT)
        {
            Log("Auto Reconnect");

            while(true)
            {
                try
                {
                    ipcon.Enumerate();
                    break;
                }
                catch(NotConnectedException e)
                {
                    Log("Enumeration Error: " + e.Message);
                    Thread.Sleep(1000);
                }
            }
        }
    }

    static public void Main()
    {
        Application.Run(new RemoteSwitchGUI());
    }
}