Warning
Unfortunately the RED Brick is discontinued. Because of severe chip shortages of serveral of the ICs that are used on the RED Brick it is not possible for us to produce it anymore.
As a replacement we recommend a Raspberry Pi (Zero) together with a HAT (Zero) Brick.
Tutorial - RED Brick
The following tutorial will demonstrate how to develop software with the RED Brick together with Bricks and Bricklets. A full step-by-step tutorial that shows how Bricks, Bricklets and Extensions are used is also available: first steps tutorial.
The RED Brick is the brain of the Tinkerforge building block system. A program that controls Bricks and Bricklets can be uploaded to and executed on the RED Brick.
In this tutorial we will demonstrate the different capabilities of the RED Brick. To keep it simple we will use a small setup consisting of a RED Brick, a Master Brick and a Temperature Bricklet 2.0. Later in the Tutorial will additionally add an Ethernet Extension to get Internet access.
At first we will test a simple program that prints the temperature on your PC and upload and execute it on the RED Brick after that. Then we will extend the program by a GUI to also show the current time on an HDMI monitor. After that we will add a web interface for our temperature measurements. The features of this example are not very useful, but it shows some of the important possibilities of the RED Brick.
If you build your application, you might use other Bricks, Bricklets or programming languages, than those used in this example. But the presented concepts and the workflow will be the same.
Install necessary software
At first you need to install the Brick Daemon and the Brick Viewer on your PC or Mac. Follow the documented steps:
Test the RED Brick
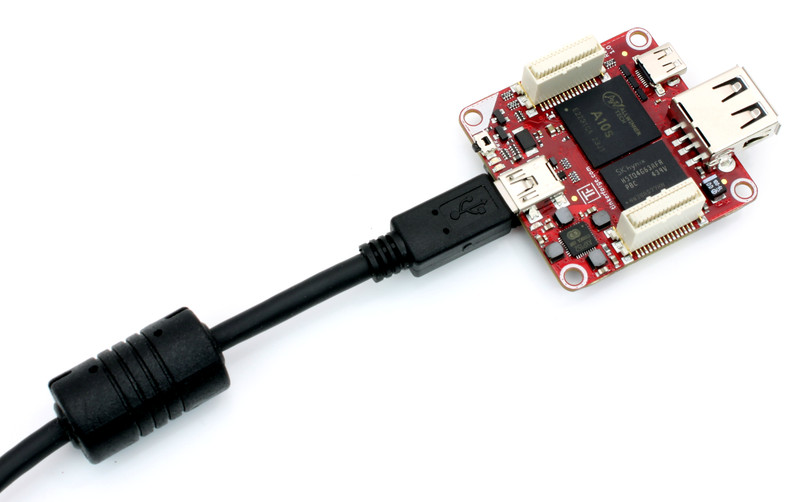
After you have installed the necessary software, you can test the RED Brick. At first you need to put a Micro-SD card with an RED Brick software image in the Micro-SD card slot of the Brick. It is located on the bottom side (a Micro-SD card with a pre-installed image can be found in our shop). After that, you can connect the RED Brick with a mini USB cable to your PC.
Start the Brick Viewer software and click on Connect. A tab marked with RED Brick will show up. Click on it. You should see some status information about the state of the RED Brick. A full description of the RED Brick tab of the Brick Viewer is documented here.
The RED Brick is now ready to go!
Add Bricks and Bricklets
Now we can be sure that your RED Brick works. Before adding Bricks/Bricklets, you should power the RED Brick down. To shut it down click on System located in the right upper corner of the RED Brick tab and choose Shutdown. Wait until all LEDs turn off. After that plug a Master Brick on top of the RED Brick and connect a Temperature Bricklet 2.0 to it.
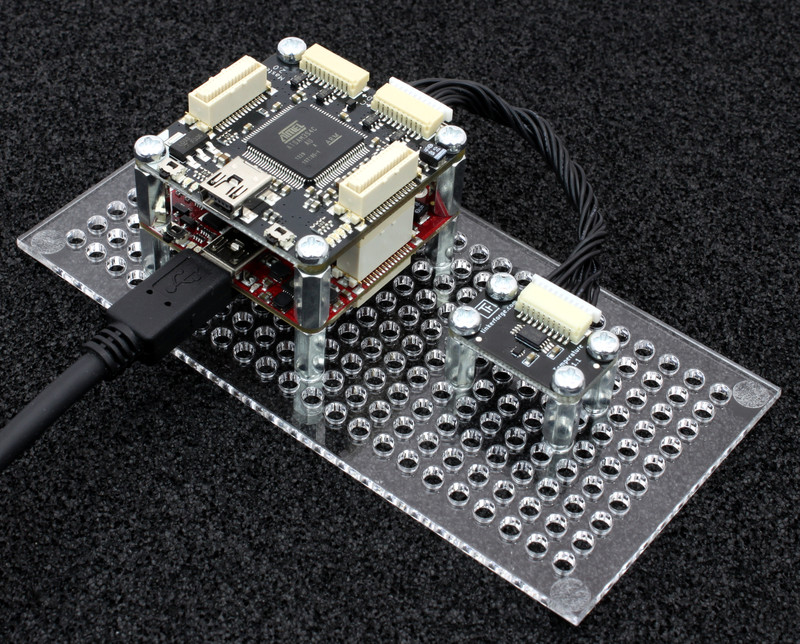
After that reconnect the RED Brick to the PC, open the Brick Viewer software and click on Connect. Now the RED Brick tab, a Master Brick and the Temperature Bricklet 2.0 will come up. You can click through the tabs to try out the connected hardware.
Run example program
Before writing your first program you should to take a look at the API documentation of the used Bricks/Bricklet to see their supported functions. Each documentation page starts with some examples. It is a good idea to run an example program first. We take the "Simple" example of the Temperature Bricklet 2.0 API documentation and execute it.
 1#!/usr/bin/env python
 2# -*- coding: utf-8 -*-
 3
 4HOST = "localhost"
 5PORT = 4223
 6UID = "XYZ" # Change XYZ to the UID of your Temperature Bricklet 2.0
 7
 8from tinkerforge.ip_connection import IPConnection
 9from tinkerforge.bricklet_temperature_v2 import BrickletTemperatureV2
10
11if __name__ == "__main__":
12    ipcon = IPConnection() # Create IP connection
13    t = BrickletTemperatureV2(UID, ipcon) # Create device object
14
15    ipcon.connect(HOST, PORT) # Connect to brickd
16    # Don't use device before ipcon is connected
17
18    # Get current temperature
19    temperature = t.get_temperature()
20    print("Temperature: " + str(temperature/100.0) + " °C")
21
22    input("Press key to exit\n") # Use raw_input() in Python 2
23    ipcon.disconnect()
To do this you download the example_simple.py Python program and
replace the UID in the line UID = "XYZ" with the UID of your Temperature
Bricklet 2.0. You can find it in the Setup tab of the Brick Viewer or in the
Temperature Bricklet 2.0 tab.
Execute this program on your PC. If everything went as expected, you should see the current temperature in the command line.
Execute the program on the RED Brick
Now you have tried out the example and you know that it is working correctly. In the example program we wait for user input:
raw_input('Press key to exit\n')
We do this to prevent the command line on windows from closing immediately. On the RED Brick there won't be any user interaction. We want the program to print the measured temperature one time and end the program afterwards. So we need to remove this line.
Download (example_simple_red.py)
 1#!/usr/bin/env python
 2# -*- coding: utf-8 -*-
 3
 4HOST = "localhost"
 5PORT = 4223
 6UID = "XYZ" # Change XYZ to the UID of your Temperature Bricklet 2.0
 7
 8from tinkerforge.ip_connection import IPConnection
 9from tinkerforge.bricklet_temperature_v2 import BrickletTemperatureV2
10
11if __name__ == "__main__":
12    ipcon = IPConnection() # Create IP connection
13    t = BrickletTemperatureV2(UID, ipcon) # Create device object
14
15    ipcon.connect(HOST, PORT) # Connect to brickd
16    # Don't use device before ipcon is connected
17
18    # Get current temperature (unit is °C/100)
19    temperature = t.get_temperature() / 100.0
20
21    print('Temperature: ' + str(temperature) + ' °C')
22
23    ipcon.disconnect()
Now you can execute it on the RED Brick. The general program uploading procedure can be found in the RED Brick Brick Viewer description. We will only describe the necessary steps here:
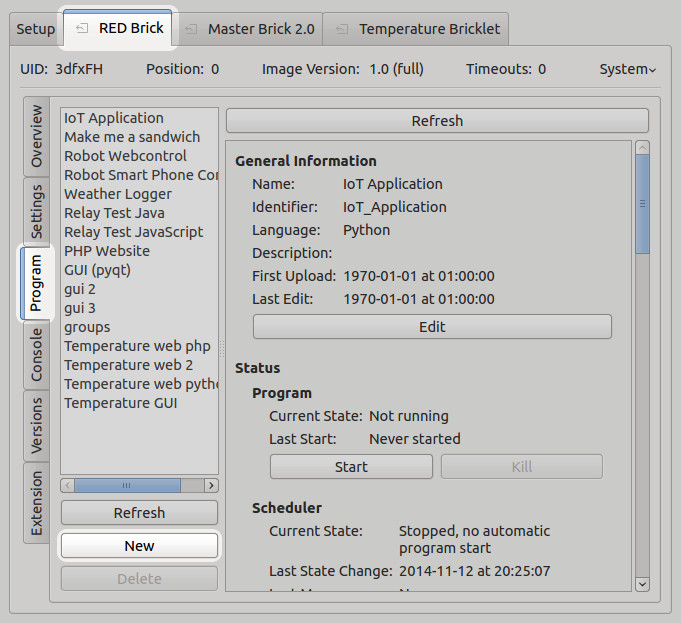
First, open the RED Brick tab in the Brick Viewer and select the Program tab.
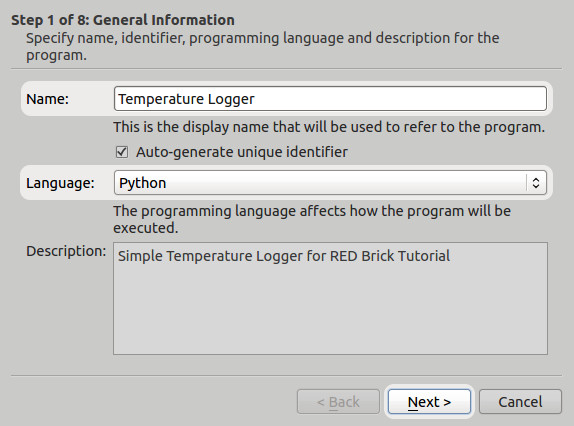
The New button will open the New Program wizard. Enter "Temperature Logger" as name of the program, and select Python as language. Click on Next.
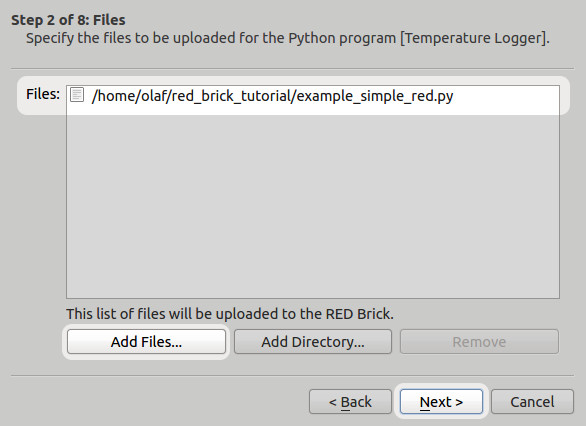
Click on Add Files and select the example_simple_red.py program.
Click on Next.
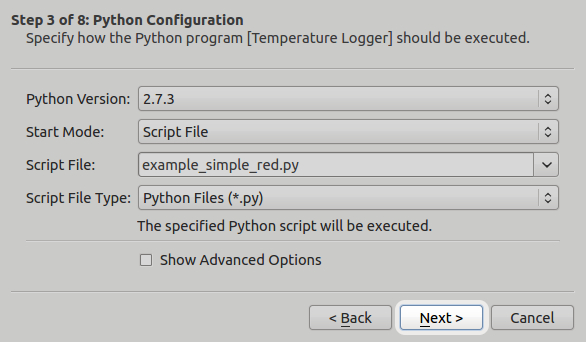
We will use Python version 3.5.3, Script File as start mode and our single file as script file. All of these settings are already the default, so we can again click on Next.
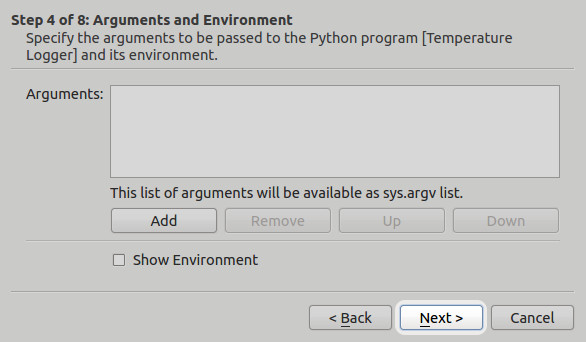
Our simple Python program does not need any arguments or environment variable, so we can again click on the Next button.
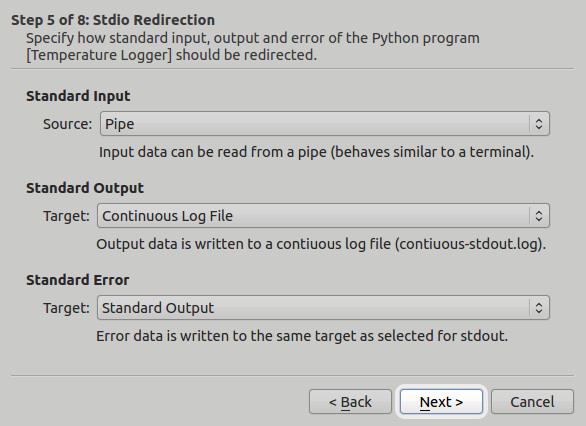
We use Pipe as standard input and log all output (standard output and standard error) to a continuous log file. So no changes are required. Click on Next again.
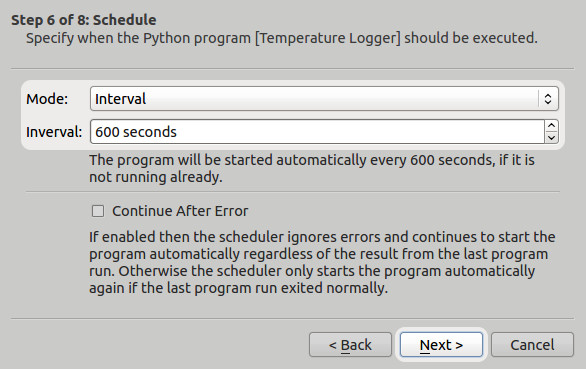
There are many options for scheduling, one of the easiest option is to schedule a program with a given time interval. Will will choose Interval as mode with an interval time of 10 minutes (600 seconds). This means that our program will be scheduled every 10 minutes, i.e. the temperature will be logged every 10 minutes.
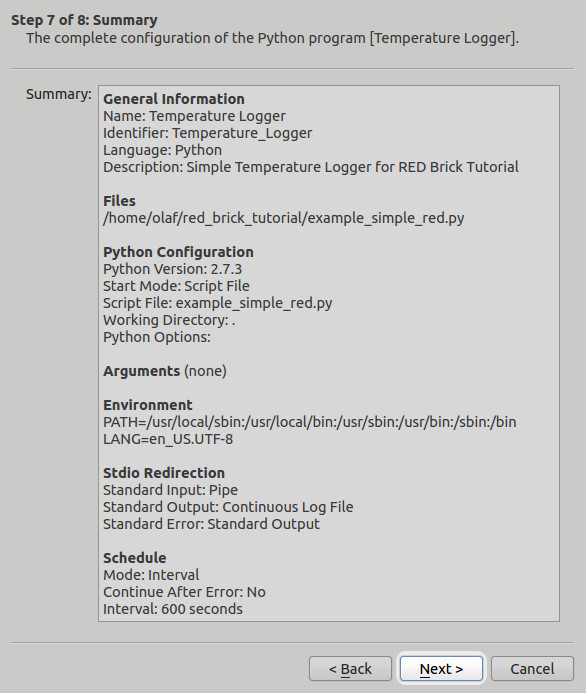
The summary page will show your configuration. Click on Next.
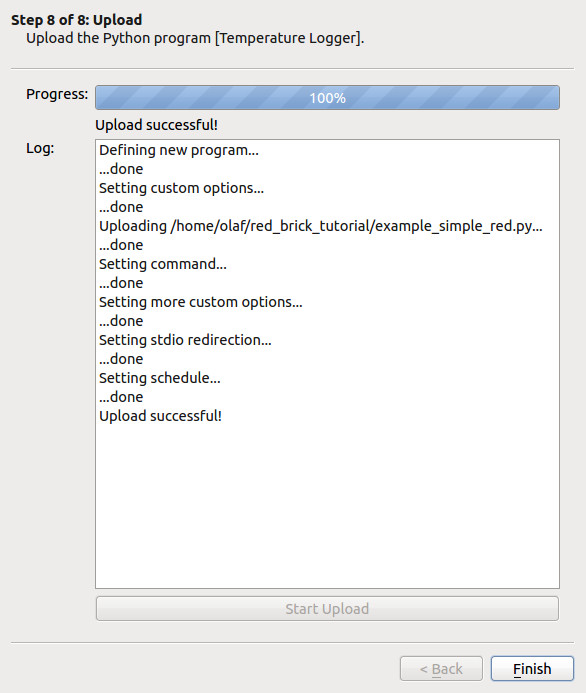
Click on the Start Upload Button to upload the file. After that click on Finish. You should now be able to take a look at the log file and see the logged temperatures.
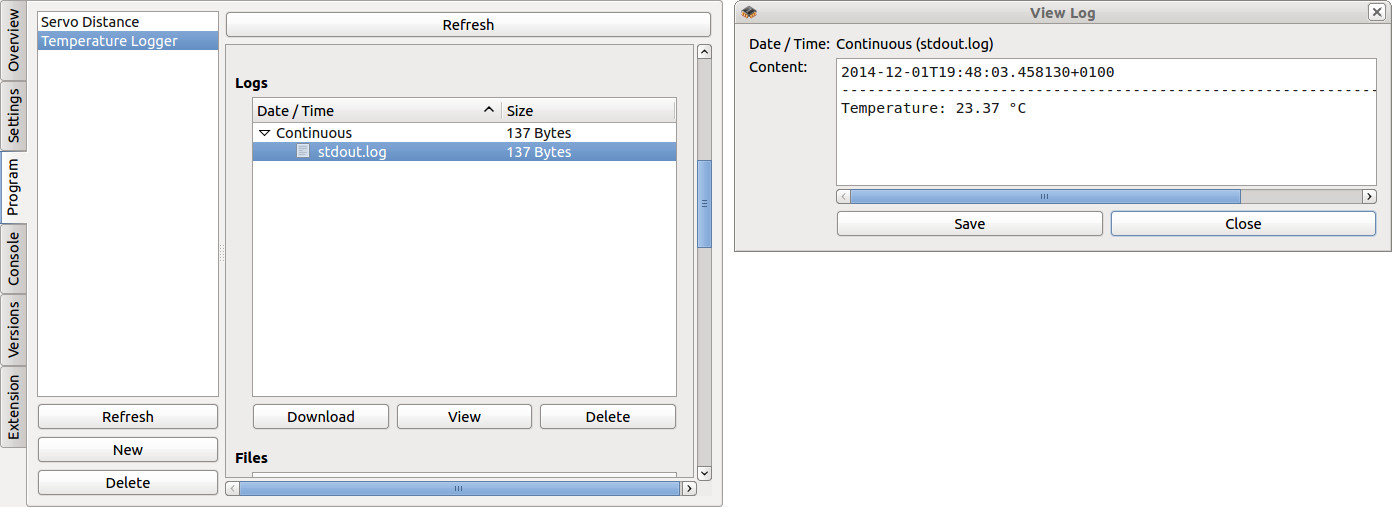
You can select log files in the browser view and downloading them to your PC by clicking on Download. By the View button you can directly take a look inside the log. With the Delete button you can delete the log file from the RED Brick.
Gain Internet Access
To gain Internet access on the RED Brick we can either connect a USB Wi-Fi/Ethernet dongle or the Ethernet Extension. In this example we will add the Ethernet Extension:
Shut the RED Brick down and remove the power before you stack the Extension on top of the stack.
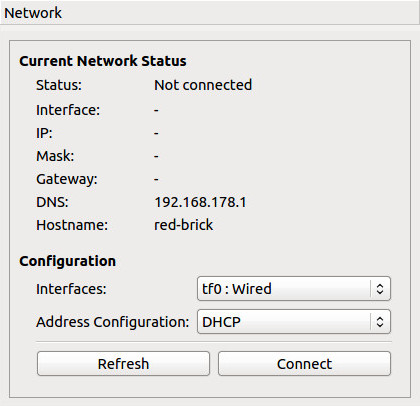
After that reconnect power and wait until the enhanced stack has booted. Click on "Settings". The Network section should be opened and tfX: Wired should be selected (X is a number). Select between DHCP or a static IP and press Connect. After a few seconds the Current Network Status should change to Connected.
Now that you have Internet access, you can easily do Internet-of-Things and similar applications. Another advantage of Internet access is, that the RED Brick will automatically use NTP and thus have a correct system time.
This means that you can now add a time to each measured temperature.
Download (example_time_red.py)
 1#!/usr/bin/env python
 2# -*- coding: utf-8 -*-
 3
 4HOST = "localhost"
 5PORT = 4223
 6UID = "XYZ" # Change XYZ to the UID of your Temperature Bricklet 2.0
 7
 8import time
 9from tinkerforge.ip_connection import IPConnection
10from tinkerforge.bricklet_temperature_v2 import BrickletTemperatureV2
11
12if __name__ == "__main__":
13    ipcon = IPConnection() # Create IP connection
14    t = BrickletTemperatureV2(UID, ipcon) # Create device object
15
16    ipcon.connect(HOST, PORT) # Connect to brickd
17    # Don't use device before ipcon is connected
18
19    # Get current temperature (unit is °C/100)
20    temperature = t.get_temperature() / 100.0
21    print('Temperature of ' + str(temperature) + ' °C on ' + time.ctime())
22
23    ipcon.disconnect()
You can upload this program the same way as before.
Develop a custom RED Brick GUI
Note
GUI on the RED Brick only works with the full image.
Another type of program that the RED Brick can execute is a GUI program that is shown on the HDMI output. In this example we will add a PyQt GUI to the simple Temperature Bricklet 2.0 program.
 1#!/usr/bin/env python
 2# -*- coding: utf-8 -*-
 3
 4HOST = "localhost"
 5PORT = 4223
 6UID = "XYZ" # Change XYZ to the UID of your Temperature Bricklet 2.0
 7
 8from PyQt4 import QtGui, QtCore
 9import sys
10
11from tinkerforge.ip_connection import IPConnection
12from tinkerforge.bricklet_temperature_v2 import BrickletTemperatureV2
13
14class Window(QtGui.QWidget):
15    qtcb_temperature = QtCore.pyqtSignal(int)
16
17    def __init__(self):
18        QtGui.QWidget.__init__(self)
19        self.button = QtGui.QPushButton('Refresh', self)
20        self.button.clicked.connect(self.handle_button)
21        self.label = QtGui.QLabel('TBD')
22        layout = QtGui.QVBoxLayout(self)
23        layout.addWidget(self.button)
24        layout.addWidget(self.label)
25
26        self.ipcon = IPConnection()
27        self.temperature = BrickletTemperatureV2(UID, self.ipcon)
28        self.ipcon.connect(HOST, PORT)
29
30        # We send the callback through the Qt signal/slot
31        # system to make sure that we can change the label
32        self.qtcb_temperature.connect(self.cb_temperature)
33        self.temperature.register_callback(BrickletTemperatureV2.CALLBACK_TEMPERATURE, self.qtcb_temperature.emit)
34
35        # Refresh every second
36        self.temperature.set_temperature_callback_period(1000)
37
38        # Refresh once on startup
39        self.handle_button()
40
41    # Refresh by hand
42    def handle_button(self):
43        self.cb_temperature(self.temperature.get_temperature())
44
45    def cb_temperature(self, temperature):
46        # Show temperature
47        self.label.setText(u"Temperature: {0} °C".format(temperature / 100.0))
48
49if __name__ == '__main__':
50    app = QtGui.QApplication(sys.argv)
51    window = Window()
52    window.show()              # In window
53    # window.showFullScreen()  # Fullscreen
54    sys.exit(app.exec_())
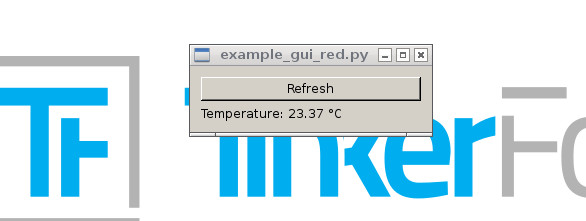
The GUI has a label that is refreshed with the current temperature every second. Additionally there is a Refresh button that forces a refresh of the label.
You can upload this program the same way as the other Python programs before, with two small differences:
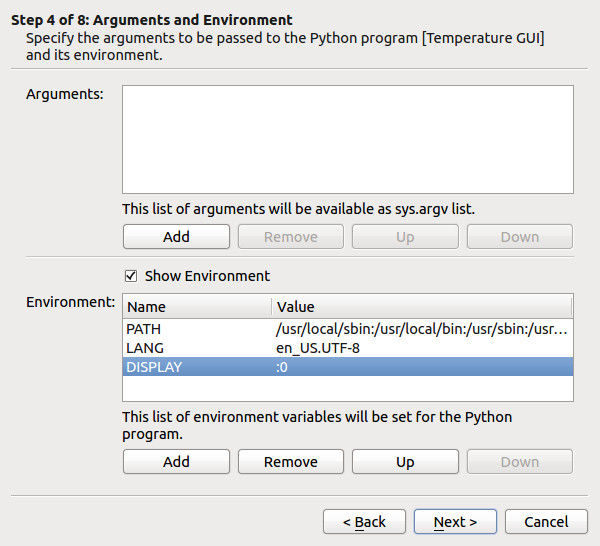
In step 4 you need to add the environment variable DISPLAY with a value of :0. With this configuration the GUI will be shown on the RED Brick desktop that is running on the full image. Adding this variable is necessary, the program will not be able to start otherwise.
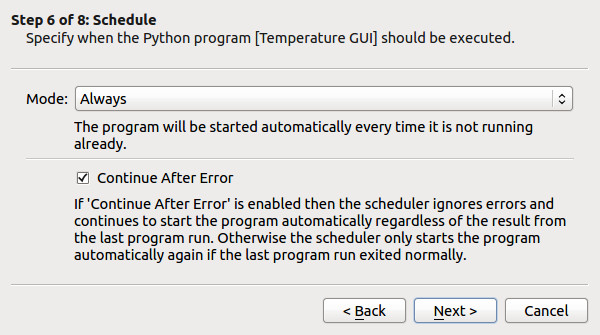
For the scheduler you may want to choose Always and tick off Continue After Error. With this configuration your GUI will be automatically restarted if is closed and also if it fails with an error.
On the RED Brick desktop the simple GUI looks as follows:
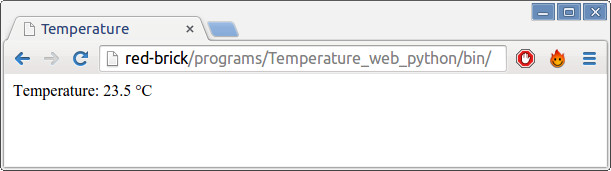
Develop a custom RED Brick web interface
If your RED Brick has a network interface (Wi-Fi dongle or Ethernet Extension), you can also use it to display a dynamic web page. Currently we support HTML/JavaScript, PHP and Python for this purpose.
Please look at the RED Brick web interface documentation
for more information about the web interface. Basically you can call
your start point index.html, index.php or index.py and it will
automatically be used as a directory index.
Our simple Temperature Bricklet 2.0 program as a web interface looks as follows (Python and PHP):
 1#!/usr/bin/env python
 2# -*- coding: utf-8 -*-
 3
 4HOST = "localhost"
 5PORT = 4223
 6UID = "XYZ" # Change XYZ to the UID of your Temperature Bricklet 2.0
 7
 8from flask import Flask       # Use Flask framework
 9application = Flask(__name__) # Function "application" is used by Apache/wsgi
10app = application             # Use shortcut for routing
11
12from tinkerforge.ip_connection import IPConnection
13from tinkerforge.bricklet_temperature_v2 import BrickletTemperatureV2
14
15PAGE = u"""
16<meta http-equiv="Content-Type" content="text/html; charset=utf-8" />
17<html>
18 <head>
19  <title>Temperature</title>
20 </head>
21 <body>
22  <p>Temperature: {0} °C<p>
23 </body>
24</html>
25"""
26
27@app.route('/')
28def index():
29    ipcon = IPConnection() # Create IP connection
30    t = BrickletTemperatureV2(UID, ipcon) # Create device object
31
32    ipcon.connect(HOST, PORT) # Connect to brickd
33    # Don't use device before ipcon is connected
34
35    # Get current temperature (unit is °C/100)
36    temperature = t.get_temperature() / 100.0
37
38    ipcon.disconnect()
39
40    return PAGE.format(temperature)
 1<?php
 2
 3require_once('Tinkerforge/IPConnection.php');
 4require_once('Tinkerforge/BrickletTemperatureV2.php');
 5
 6use Tinkerforge\IPConnection;
 7use Tinkerforge\BrickletTemperatureV2;
 8
 9const HOST = 'localhost';
10const PORT = 4223;
11const UID = 'XYZ'; // Change XYZ to the UID of your Temperature Bricklet 2.0
12
13$ipcon = new IPConnection(); // Create IP connection
14$t = new BrickletTemperatureV2(UID, $ipcon); // Create device object
15
16$ipcon->connect(HOST, PORT); // Connect to brickd
17// Don't use device before ipcon is connected
18
19// Get current temperature (unit is °C/100)
20$temperature = $t->getTemperature() / 100.0;
21
22$ipcon->disconnect();
23
24header('content-type: text/html; charset=utf-8');
25
26?>
27
28<meta http-equiv="Content-Type" content="text/html; charset=utf-8" />
29<html>
30 <head>
31  <title>Temperature</title>
32 </head>
33 <body>
34  <p>Temperature: <?php echo $temperature; ?> °C<p>
35 </body>
36</html>
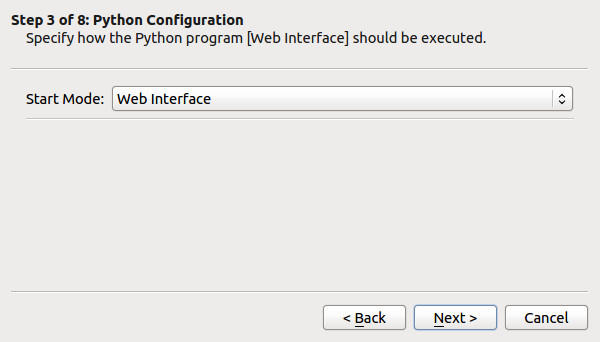
If your program is used as a web interface, you don't need to configure your executable, arguments, environment and working directory. The steps 4-6 will actually be skipped if you choose Web Interface in Step 3:
To take a look at your web interface go to the IP address or hostname of your RED Brick with a browser and click on the Bin button of your program. It will redirect you to your program path for which your index file will be executed automatically: