- Getting Started
- Hardware
- Software
- Brick Daemon (brickd)
- Brick Viewer (brickv)
- Brick Logger
- API Bindings
- C/C++
- C/C++ (iOS)
- C/C++ for Microcontrollers
- C#
- C# (Windows Phone)
- Delphi/Lazarus
- Go
- Java
- Java (Android)
- JavaScript
- LabVIEW
- Mathematica
- MATLAB/Octave
- MQTT
- openHAB
- Perl
- PHP
- Python
- Ruby
- Rust
- Shell
- Requirements
- Installation
- Testing an Example
- API Reference and Examples
- IP Connection
- Bricks
- Bricks (Discontinued)
- Bricklets
- Accelerometer Bricklet 2.0
- Air Quality Bricklet
- Ambient Light Bricklet 3.0
- Analog In Bricklet 3.0
- Analog Out Bricklet 3.0
- Barometer Bricklet
- Barometer Bricklet 2.0
- CAN Bricklet
- CAN Bricklet 2.0
- CO2 Bricklet 2.0
- Color Bricklet
- Color Bricklet 2.0
- Compass Bricklet
- DC Bricklet 2.0
- Distance IR Bricklet
- Distance IR Bricklet 2.0
- Distance US Bricklet 2.0
- DMX Bricklet
- Dual Button Bricklet 2.0
- Dust Detector Bricklet
- E-Paper 296x128 Bricklet
- Energy Monitor Bricklet
- GPS Bricklet 2.0
- GPS Bricklet 3.0
- Hall Effect Bricklet
- Hall Effect Bricklet 2.0
- Humidity Bricklet 2.0
- IMU Bricklet 3.0
- Industrial Analog Out Bricklet 2.0
- Industrial Counter Bricklet
- Industrial Digital In 4 Bricklet 2.0
- Industrial Digital Out 4 Bricklet
- Industrial Digital Out 4 Bricklet 2.0
- Industrial Dual 0-20mA Bricklet
- Industrial Dual 0-20mA Bricklet 2.0
- Industrial Dual AC In Bricklet
- Industrial Dual AC Relay Bricklet
- Industrial Dual Analog In Bricklet 2.0
- Industrial Dual Relay Bricklet
- Industrial PTC Bricklet
- Industrial Quad Relay Bricklet 2.0
- IO-16 Bricklet
- IO-16 Bricklet 2.0
- IO-4 Bricklet 2.0
- Isolator Bricklet
- Joystick Bricklet
- Joystick Bricklet 2.0
- Laser Range Finder Bricklet 2.0
- LCD 128x64 Bricklet
- LCD 20x4 Bricklet
- LED Strip Bricklet 2.0
- Line Bricklet
- Linear Poti Bricklet
- Linear Poti Bricklet 2.0
- Load Cell Bricklet 2.0
- Motion Detector Bricklet 2.0
- Motorized Linear Poti Bricklet
- Multi Touch Bricklet
- Multi Touch Bricklet 2.0
- NFC Bricklet
- OLED 128x64 Bricklet 2.0
- OLED 64x48 Bricklet
- One Wire Bricklet
- Outdoor Weather Bricklet
- Particulate Matter Bricklet
- Performance DC Bricklet
- Piezo Speaker Bricklet
- Piezo Speaker Bricklet 2.0
- Real-Time Clock Bricklet
- Real-Time Clock Bricklet 2.0
- Remote Switch Bricklet 2.0
- RGB LED Bricklet 2.0
- RGB LED Button Bricklet
- Rotary Encoder Bricklet 2.0
- Rotary Poti Bricklet
- Rotary Poti Bricklet 2.0
- RS232 Bricklet
- RS232 Bricklet 2.0
- RS485 Bricklet
- Segment Display 4x7 Bricklet
- Segment Display 4x7 Bricklet 2.0
- Servo Bricklet 2.0
- Silent Stepper Bricklet 2.0
- Solid State Relay Bricklet 2.0
- Sound Intensity Bricklet
- Sound Pressure Level Bricklet
- Temperature Bricklet
- Temperature Bricklet 2.0
- Temperature IR Bricklet 2.0
- Thermal Imaging Bricklet
- Thermocouple Bricklet 2.0
- Tilt Bricklet
- UV Light Bricklet 2.0
- Voltage/Current Bricklet 2.0
- XMC1400 Breakout Bricklet
- Bricklets (Discontinued)
- Visual Basic .NET
- ESP32 Firmware
- APT Repository
- Device Identifier
- Source Code and Bug Tracking
- Programming Interface
- Kits
- Embedded Boards
- Specifications
Shell - Segment Display 4x7 Bricklet
This is the description of the Shell API bindings for the Segment Display 4x7 Bricklet. General information and technical specifications for the Segment Display 4x7 Bricklet are summarized in its hardware description.
An installation guide for the Shell API bindings is part of their general description.
Examples
The example code below is Public Domain (CC0 1.0).
Simple
1#!/bin/sh
2# Connects to localhost:4223 by default, use --host and --port to change this
3
4uid=XYZ # Change XYZ to the UID of your Segment Display 4x7 Bricklet
5digits=(63 6 91 79 102 109 125 7 127 111 119 124 57 94 121 113)
6
7# Write "4223" to the display with full brightness without colon
8segments=${digits[4]},${digits[2]},${digits[2]},${digits[3]}
9tinkerforge call segment-display-4x7-bricklet $uid set-segments $segments 7 false
API
Possible exit codes for all tinkerforge commands are:
1: interrupted (ctrl+c)
2: syntax error
21: Python 2.5 or newer is required
22: Python
argparsemodule is missing23: socket error
24: other exception
25: invalid placeholder in format string
26: authentication error
201: timeout occurred
209: invalid argument value
210: function is not supported
211: unknown error
Command Structure
The common options of the call and dispatch commands are documented
here. The specific command structure is shown below.
- tinkerforge call segment-display-4x7-bricklet [<option>..] <uid> <function> [<argument>..]
Parameters: - <uid> – Type: String
- <function> – Type: String
The
callcommand is used to call a function of the Segment Display 4x7 Bricklet. It can take several options:--helpshows help for the specificcallcommand and exits--list-functionsshows a list of known functions of the Segment Display 4x7 Bricklet and exits
- tinkerforge dispatch segment-display-4x7-bricklet [<option>..] <uid> <callback>
Parameters: - <uid> – Type: String
- <callback> – Type: String
The
dispatchcommand is used to dispatch a callback of the Segment Display 4x7 Bricklet. It can take several options:--helpshows help for the specificdispatchcommand and exits--list-callbacksshows a list of known callbacks of the Segment Display 4x7 Bricklet and exits
- tinkerforge call segment-display-4x7-bricklet <uid> <function> [<option>..] [<argument>..]
Parameters: - <uid> – Type: String
- <function> – Type: String
The
<function>to be called can take different options depending of its kind. All functions can take the following options:--helpshows help for the specific function and exits
Getter functions can take the following options:
--execute <command>shell command line to execute for each incoming response (see section about output formatting for details)
Setter functions can take the following options:
--expect-responserequests response and waits for it
The
--expect-responseoption for setter functions allows to detect timeouts and other error conditions calls of setters as well. The device will then send a response for this purpose. If this option is not given for a setter function then no response is sent and errors are silently ignored, because they cannot be detected.
- tinkerforge dispatch segment-display-4x7-bricklet <uid> <callback> [<option>..]
Parameters: - <uid> – Type: String
- <callback> – Type: String
The
<callback>to be dispatched can take several options:--helpshows help for the specific callback and exits--execute <command>shell command line to execute for each incoming response (see section about output formatting for details)
Basic Functions
- tinkerforge call segment-display-4x7-bricklet <uid> set-segments <segments> <brightness> <colon>
Parameters: - <segments> – Type: Int Array, Length: 4, Range: [0 to 127]
- <brightness> – Type: Int, Range: [0 to 7]
- <colon> – Type: Bool
Output: - no output
The 7-segment display can be set with bitmaps. Every bit controls one segment:
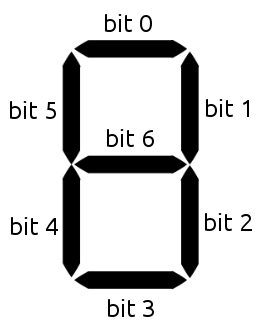
For example to set a "5" you would want to activate segments 0, 2, 3, 5 and 6. This is represented by the number 0b01101101 = 0x6d = 109.
The brightness can be set between 0 (dark) and 7 (bright). The colon parameter turns the colon of the display on or off.
- tinkerforge call segment-display-4x7-bricklet <uid> get-segments
Output: - segments – Type: Int Array, Length: 4, Range: [0 to 127]
- brightness – Type: Int, Range: [0 to 7]
- colon – Type: Bool
Returns the segment, brightness and color data as set by
set-segments.
Advanced Functions
- tinkerforge call segment-display-4x7-bricklet <uid> start-counter <value-from> <value-to> <increment> <length>
Parameters: - <value-from> – Type: Int, Range: [-999 to 9999]
- <value-to> – Type: Int, Range: [-999 to 9999]
- <increment> – Type: Int, Range: [-999 to 9999]
- <length> – Type: Int, Unit: 1 ms, Range: [0 to 232 - 1]
Output: - no output
Starts a counter with the from value that counts to the to value with the each step incremented by increment. length is the pause between each increment.
Example: If you set from to 0, to to 100, increment to 1 and length to 1000, a counter that goes from 0 to 100 with one second pause between each increment will be started.
Using a negative increment allows to count backwards.
You can stop the counter at every time by calling
set-segments.
- tinkerforge call segment-display-4x7-bricklet <uid> get-counter-value
Output: - value – Type: Int, Range: [-999 to 9999]
Returns the counter value that is currently shown on the display.
If there is no counter running a 0 will be returned.
- tinkerforge call segment-display-4x7-bricklet <uid> get-identity
Output: - uid – Type: String, Length: up to 8
- connected-uid – Type: String, Length: up to 8
- position – Type: Char, Range: [a to h, z]
- hardware-version – Type: Int Array, Length: 3
- 0: major – Type: Int, Range: [0 to 255]
- 1: minor – Type: Int, Range: [0 to 255]
- 2: revision – Type: Int, Range: [0 to 255]
- firmware-version – Type: Int Array, Length: 3
- 0: major – Type: Int, Range: [0 to 255]
- 1: minor – Type: Int, Range: [0 to 255]
- 2: revision – Type: Int, Range: [0 to 255]
- device-identifier – Type: Int, Range: [0 to 216 - 1]
Returns the UID, the UID where the Bricklet is connected to, the position, the hardware and firmware version as well as the device identifier.
The position can be 'a', 'b', 'c', 'd', 'e', 'f', 'g' or 'h' (Bricklet Port). A Bricklet connected to an Isolator Bricklet is always at position 'z'.
The device identifier numbers can be found here.
Callbacks
Callbacks can be used to receive time critical or recurring data from the device:
tinkerforge dispatch segment-display-4x7-bricklet <uid> example
The available callbacks are described below.
Note
Using callbacks for recurring events is always preferred compared to using getters. It will use less USB bandwidth and the latency will be a lot better, since there is no round trip time.
- tinkerforge dispatch segment-display-4x7-bricklet <uid> counter-finished
Output: - no output
This callback is triggered when the counter (see
start-counter) is finished.