- Getting Started
- Hardware
- Software
- Brick Daemon (brickd)
- Brick Viewer (brickv)
- Brick Logger
- API Bindings
- C/C++
- C/C++ (iOS)
- C/C++ for Microcontrollers
- C#
- C# (Windows Phone)
- Delphi/Lazarus
- Go
- Java
- Java (Android)
- JavaScript
- LabVIEW
- Mathematica
- MATLAB/Octave
- MQTT
- openHAB
- Requirements
- Installation
- Usage
- API Reference and Examples
- Bricks
- Bricks (Discontinued)
- Bricklets
- Accelerometer Bricklet 2.0
- Air Quality Bricklet
- Ambient Light Bricklet 3.0
- Analog In Bricklet 3.0
- Analog Out Bricklet 3.0
- Barometer Bricklet
- Barometer Bricklet 2.0
- CAN Bricklet
- CAN Bricklet 2.0
- CO2 Bricklet 2.0
- Color Bricklet
- Color Bricklet 2.0
- Compass Bricklet
- Distance IR Bricklet
- Distance IR Bricklet 2.0
- Distance US Bricklet 2.0
- DMX Bricklet
- Dual Button Bricklet 2.0
- Dust Detector Bricklet
- E-Paper 296x128 Bricklet
- Energy Monitor Bricklet
- GPS Bricklet 2.0
- GPS Bricklet 3.0
- Hall Effect Bricklet
- Hall Effect Bricklet 2.0
- Humidity Bricklet 2.0
- IMU Bricklet 3.0
- Industrial Analog Out Bricklet 2.0
- Industrial Counter Bricklet
- Industrial Digital In 4 Bricklet 2.0
- Industrial Digital Out 4 Bricklet
- Industrial Digital Out 4 Bricklet 2.0
- Industrial Dual 0-20mA Bricklet
- Industrial Dual 0-20mA Bricklet 2.0
- Industrial Dual AC Relay Bricklet
- Industrial Dual Analog In Bricklet 2.0
- Industrial Dual Relay Bricklet
- Industrial PTC Bricklet
- Industrial Quad Relay Bricklet 2.0
- IO-16 Bricklet
- IO-16 Bricklet 2.0
- IO-4 Bricklet 2.0
- Isolator Bricklet
- Joystick Bricklet
- Joystick Bricklet 2.0
- Laser Range Finder Bricklet 2.0
- LCD 128x64 Bricklet
- LCD 20x4 Bricklet
- LED Strip Bricklet 2.0
- Line Bricklet
- Linear Poti Bricklet
- Linear Poti Bricklet 2.0
- Load Cell Bricklet 2.0
- Motion Detector Bricklet 2.0
- Motorized Linear Poti Bricklet
- Multi Touch Bricklet
- Multi Touch Bricklet 2.0
- NFC Bricklet
- OLED 128x64 Bricklet 2.0
- OLED 64x48 Bricklet
- One Wire Bricklet
- Outdoor Weather Bricklet
- Particulate Matter Bricklet
- Piezo Speaker Bricklet
- Piezo Speaker Bricklet 2.0
- Real-Time Clock Bricklet
- Real-Time Clock Bricklet 2.0
- Remote Switch Bricklet 2.0
- RGB LED Bricklet 2.0
- RGB LED Button Bricklet
- Rotary Encoder Bricklet 2.0
- Rotary Poti Bricklet
- Rotary Poti Bricklet 2.0
- RS232 Bricklet
- RS232 Bricklet 2.0
- RS485 Bricklet
- Segment Display 4x7 Bricklet
- Segment Display 4x7 Bricklet 2.0
- Solid State Relay Bricklet 2.0
- Sound Intensity Bricklet
- Sound Pressure Level Bricklet
- Temperature Bricklet
- Temperature Bricklet 2.0
- Temperature IR Bricklet 2.0
- Thermal Imaging Bricklet
- Thermocouple Bricklet 2.0
- Tilt Bricklet
- UV Light Bricklet 2.0
- Voltage/Current Bricklet 2.0
- XMC1400 Breakout Bricklet
- Bricklets (Discontinued)
- Perl
- PHP
- Python
- Ruby
- Rust
- Shell
- Visual Basic .NET
- ESP32 Firmware
- APT Repository
- Device Identifier
- Source Code and Bug Tracking
- Programming Interface
- Kits
- Embedded Boards
- Specifications
openHAB - Segment Display 4x7 Bricklet 2.0
Warning
The openHAB bindings are still in beta, but the development was stopped.
This is the description of the openHAB API bindings for the Segment Display 4x7 Bricklet 2.0. General information and technical specifications for the Segment Display 4x7 Bricklet 2.0 are summarized in its hardware description.
An installation guide for the openHAB API bindings is part of their general description.
Thing
UID:
- tinkerforge:brickletsegmentdisplay4x7v2:[UID]
Required firmware version:
- 2.0.0
Firmware update supported:
- yes
Channels: Actions: Parameters:
- Status LED Configuration – Type: Choice, Default: Show Status
- The status LED configuration. By default the LED shows communication traffic between Brick and Bricklet, it flickers once for every 10 received data packets. You can also turn the LED permanently on/off or show a heartbeat. If the Bricklet is in bootloader mode, the LED is will show heartbeat by default.
- Options: Off, On, Show Heartbeat, Show Status
Channels
- Brightness
The brightness can be set between 0 (dark) and 7 (bright).
Type:
- Choice
UID:
- tinkerforge:brickletsegmentdisplay4x7v2:[UID]:BrickletSegmentDisplay4x7V2Brightness
Read only:
- No
Options:
- 0, 1, 2, 3, 4, 5, 6, 7
Range:
- 0 to 7 (Step 1)
- Show Upper Colon Dot
Turns the colon of the display on or off.
Type:
- Switch
UID:
- tinkerforge:brickletsegmentdisplay4x7v2:[UID]:BrickletSegmentDisplay4x7V2ColonUpper
Read only:
- No
- Show Lower Colon Dot
Turns the colon of the display on or off.
Type:
- Switch
UID:
- tinkerforge:brickletsegmentdisplay4x7v2:[UID]:BrickletSegmentDisplay4x7V2ColonLower
Read only:
- No
- Show Tick
Turns the colon of the display on or off.
Type:
- Switch
UID:
- tinkerforge:brickletsegmentdisplay4x7v2:[UID]:BrickletSegmentDisplay4x7V2Tick
Read only:
- No
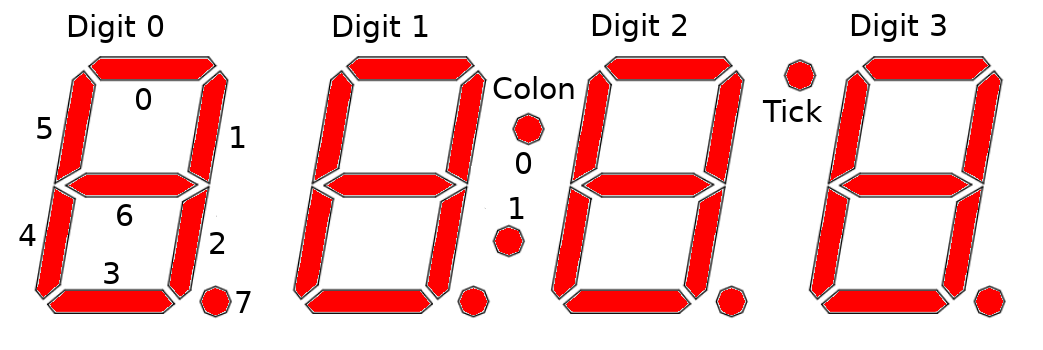
- Segments
The seven segment display can be set with bitmaps. Every bit controls one segment as shown here.. The channel accepts an integer, that is split into 4 bytes, controlling one segment each. For example 1717263183, which is 0x665b5b4f in hex will be split into 0x66 for the first segment, 0x5b for the second, 0x5b for the third and 0x4f for the fourth.
Type:
- Number
UID:
- tinkerforge:brickletsegmentdisplay4x7v2:[UID]:BrickletSegmentDisplay4x7V2Segments
Read only:
- No
- Text
Text to display on the seven segment display. Supported are A-Z, a-z, 0-9, ", (, ), +, -, =, [, ], ^, _ and |. An unsupported character will show as empty. A colon (:) anywhere in the text will light on the display's colon. Alternatively, you can enable only the upper colon dot with a backtick (`) or the lower one with a comma (,). An apostrophe (') anywhere will light up the tick after the third digit. A dot (.) after another character will light the corresponding digit's dot. For example H.i,T.'F will show HiTF on the display and activate the first and third dot, lower colon dot and the tick.
Type:
- String
UID:
- tinkerforge:brickletsegmentdisplay4x7v2:[UID]:BrickletSegmentDisplay4x7V2Text
Read only:
- No
Actions
Actions can be used in rules by creating an action object. All actions return a Map<String, Object>. Returned values can be accessed by name, sometimes the type deduction needs some hints, as shown below:
val actions = getActions("tinkerforge", "tinkerforge:brickletsegmentdisplay4x7v2:[UID]")
val hwVersion = actions.brickletSegmentDisplay4x7V2GetIdentity().get("hardwareVersion") as short[]
logInfo("Example", "Hardware version: " + hwVersion.get(0) + "." + hwVersion.get(1) + "." + hwVersion.get(2))
Basic Actions
- brickletSegmentDisplay4x7V2SetSegments(boolean[] digit0, boolean[] digit1, boolean[] digit2, boolean[] digit3, boolean[] colon, boolean tick)
Parameters: - digit0 – Type: boolean[], Length: 8
- digit1 – Type: boolean[], Length: 8
- digit2 – Type: boolean[], Length: 8
- digit3 – Type: boolean[], Length: 8
- colon – Type: boolean[], Length: 2
- tick – Type: boolean
Sets the segments of the Segment Display 4x7 Bricklet 2.0 segment-by-segment.
The data is split into the four digits, two colon dots and the tick mark.
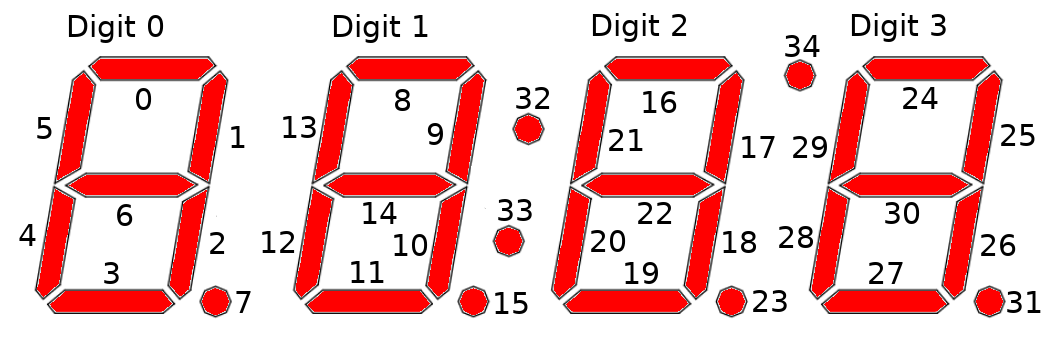
The indices of the segments in the digit and colon parameters are as follows:

- brickletSegmentDisplay4x7V2GetSegments()
Return Map: - digit0 – Type: boolean[], Length: 8
- digit1 – Type: boolean[], Length: 8
- digit2 – Type: boolean[], Length: 8
- digit3 – Type: boolean[], Length: 8
- colon – Type: boolean[], Length: 2
- tick – Type: boolean
Returns the segment data as set by
Segments.
- brickletSegmentDisplay4x7V2SetSelectedSegment(int segment, boolean value)
Parameters: - segment – Type: int, Range: [0 to 34]
- value – Type: boolean
Turns one specified segment on or off.
The indices of the segments are as follows:
- brickletSegmentDisplay4x7V2GetSelectedSegment(int segment)
Parameters: - segment – Type: int, Range: [0 to 34]
Return Map: - value – Type: boolean
Returns the value of a single segment.
- brickletSegmentDisplay4x7V2SetBrightness(int brightness)
Parameters: - brightness – Type: int, Range: [0 to 7], Default: 7
The brightness can be set between 0 (dark) and 7 (bright).
- brickletSegmentDisplay4x7V2GetBrightness()
Return Map: - brightness – Type: int, Range: [0 to 7], Default: 7
Returns the brightness as set by
Brightness.
- brickletSegmentDisplay4x7V2SetNumericValue(int[] value)
Parameters: - value – Type: int[], Length: 4, Range: [-2 to 15]
Sets a numeric value for each of the digits. They represent:
-2: minus sign
-1: blank
0-9: 0-9
10: A
11: b
12: C
13: d
14: E
15: F
Example: A call with [-2, -1, 4, 2] will result in a display of "- 42".
Advanced Actions
- brickletSegmentDisplay4x7V2StartCounter(int valueFrom, int valueTo, int increment, long length)
Parameters: - valueFrom – Type: int, Range: [-999 to 9999]
- valueTo – Type: int, Range: [-999 to 9999]
- increment – Type: int, Range: [-999 to 9999]
- length – Type: long, Unit: 1 ms, Range: [0 to 232 - 1]
Starts a counter with the from value that counts to the to value with the each step incremented by increment. length is the pause between each increment.
Example: If you set from to 0, to to 100, increment to 1 and length to 1000, a counter that goes from 0 to 100 with one second pause between each increment will be started.
Using a negative increment allows to count backwards.
You can stop the counter at every time by calling
SegmentsorSetNumericValue().
- brickletSegmentDisplay4x7V2GetCounterValue()
Return Map: - value – Type: int, Range: [-999 to 9999]
Returns the counter value that is currently shown on the display.
If there is no counter running a 0 will be returned.
- brickletSegmentDisplay4x7V2GetChipTemperature()
Return Map: - temperature – Type: int, Unit: 1 °C, Range: [-215 to 215 - 1]
Returns the temperature as measured inside the microcontroller. The value returned is not the ambient temperature!
The temperature is only proportional to the real temperature and it has bad accuracy. Practically it is only useful as an indicator for temperature changes.
- brickletSegmentDisplay4x7V2GetStatusLEDConfig()
Return Map: - config – Type: int, Range: See constants, Default: 3
Returns the configuration as set by the thing configuration
The following constants are available for this function:
For config:
val STATUS_LED_CONFIG_OFF = 0
val STATUS_LED_CONFIG_ON = 1
val STATUS_LED_CONFIG_SHOW_HEARTBEAT = 2
val STATUS_LED_CONFIG_SHOW_STATUS = 3
- brickletSegmentDisplay4x7V2GetSPITFPErrorCount()
Return Map: - errorCountAckChecksum – Type: long, Range: [0 to 232 - 1]
- errorCountMessageChecksum – Type: long, Range: [0 to 232 - 1]
- errorCountFrame – Type: long, Range: [0 to 232 - 1]
- errorCountOverflow – Type: long, Range: [0 to 232 - 1]
Returns the error count for the communication between Brick and Bricklet.
The errors are divided into
ACK checksum errors,
message checksum errors,
framing errors and
overflow errors.
The errors counts are for errors that occur on the Bricklet side. All Bricks have a similar function that returns the errors on the Brick side.
- brickletSegmentDisplay4x7V2Reset()
Calling this function will reset the Bricklet. All configurations will be lost.
After a reset you have to create new device objects, calling functions on the existing ones will result in undefined behavior!
- brickletSegmentDisplay4x7V2GetIdentity()
Return Map: - uid – Type: String, Length: up to 8
- connectedUid – Type: String, Length: up to 8
- position – Type: char, Range: ['a' to 'h', 'z']
- hardwareVersion – Type: short[], Length: 3
- 0: major – Type: short, Range: [0 to 255]
- 1: minor – Type: short, Range: [0 to 255]
- 2: revision – Type: short, Range: [0 to 255]
- firmwareVersion – Type: short[], Length: 3
- 0: major – Type: short, Range: [0 to 255]
- 1: minor – Type: short, Range: [0 to 255]
- 2: revision – Type: short, Range: [0 to 255]
- deviceIdentifier – Type: int, Range: [0 to 216 - 1]
Returns the UID, the UID where the Bricklet is connected to, the position, the hardware and firmware version as well as the device identifier.
The position can be 'a', 'b', 'c', 'd', 'e', 'f', 'g' or 'h' (Bricklet Port). A Bricklet connected to an Isolator Bricklet is always at position 'z'.
The device identifier numbers can be found here.
Internal Actions
- brickletSegmentDisplay4x7V2ReadUID()
Return Map: - uid – Type: long, Range: [0 to 232 - 1]
Returns the current UID as an integer. Encode as Base58 to get the usual string version.