Plans to make the system of Tinkerforge building blocks stand-alone existed since the beginning. Originally we wanted to provide a C-API, that could have been used to write firmwares for Bricks. We called the idea “On Device API”. The advantage of our “High-Level” API with the strong abstraction of the hardware would have been lost. Users of our building blocks would have been forced to learn low-level C, which is against our grand scheme.
Since we can’t do everything at the same time, we decided some time ago to hold on to our “High-Level” approach. We want to give everyone the possibility to write stand-alone applications fast, easy and flexible. A good solution for that are embedded-PCs, such as the Raspberry Pi. Those are already often used to control Bricks and Bricklets.
With the RED Brick (RED = Rapid Embedded Development) we take that concept of an embedded-PC and bring it into the system of Tinkerforge building blocks. In our Forum we asked you for ideas about the RED Brick. The general consensus was that the RED Brick should be of size 40x40mm like the other Bricks.
After some development work and lots of swearing (4x4cm is really small) we are excited to be able to present the first screenshots of the layout:
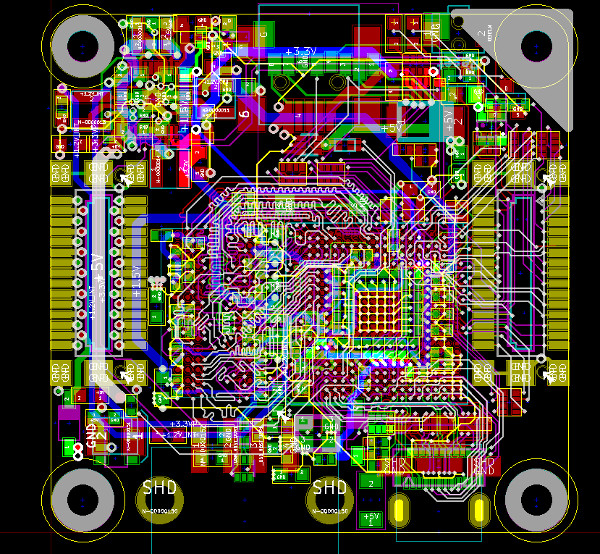
The 6-layer circuit board design is not yet completely done. Some signals still have to be routed and optimizations as well as planes are still missing. We are however confident that we will be able to order first prototypes next week.
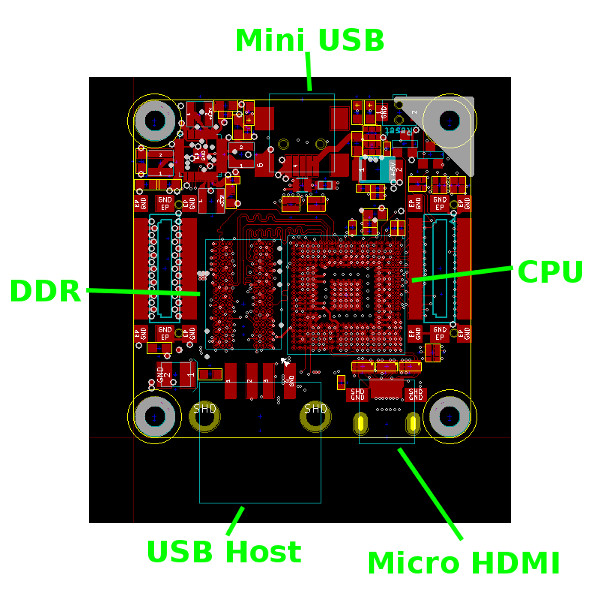
An A10s processor from Allwinner is accommodated on the top-side. This processor is an Cortex A8 with a frequency of 1GHz. Directly next to it we located a 512MB DDR3 RAM module. The decision for the type of processor was not easy. If the PCB is supposed to still be moderately priced we can’t use blind vias. Without blind vias we have to put both the RAM and the processor on one side of the PCB. As a consequence the space for the CPU is very limited.
Additionally we placed the following interfaces on the top-side:
USB Host for USB devices such as USB thumb drives, USB <-> Wi-Fi adapters, HDDs, keyboards, mice, etc.
Micro HDMI to connect monitors or TVs
Mini USB for a serial console and for configuration
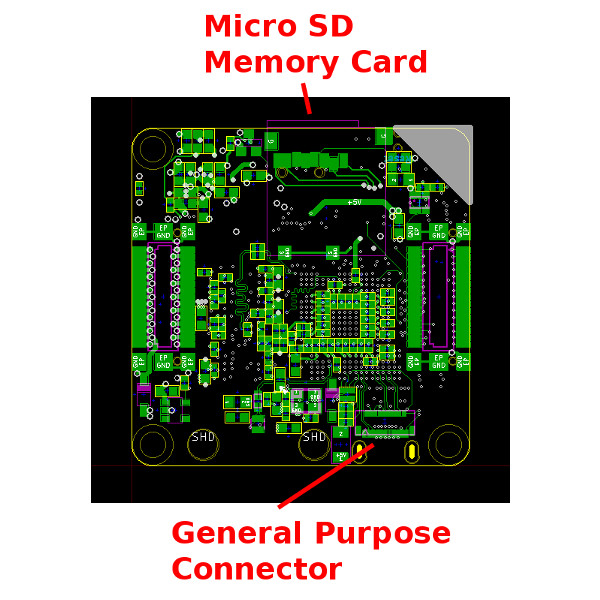
On the bottom-side you can find:
Micro SD card slot as a storage media for the operating system, your own applications etc.
General purpose connector for flat cable. Many different interfaces are routed to this connector. The utilization of these is not yet planned.
Short Hardware Specification:
CPU: Allwinner A10s
Frequency: 1 GHz
# Cores: Single Core
RAM: DDR3, 512MB
Interfaces: Stack, Micro HDMI, USB Host, Mini USB, General Purpose
Storage: Micro SD card
We will keep you informed with more blog posts in the future. Keep your fingers crossed that the prototype works as we are hoping :-).
Stay tuned!