Blog

LCD and Humidity status

Circuit boards and parts for the LCD 20x4 and Humidity Bricklet are now complete. The whole thing will go in production on friday. So far everything worked as planned. The number of preorders is so high currently that it will probably take up to wednesday until everything is shipped (May 1st is a holiday in Germany).

https://www.tinkerforge.com/static/img/_stuff/panel2.jpg

New payment provider

In the last weeks the complaints regarding our payment provider (Moneybookers) seemed to increase. Many credit card and ELV payments were not accepted without any reason and often the shopping cart was empty after the abortion. Even after a long back and forth with Moneybookers these problems couldn’t be fixed. Thus we decided to change the payment provider about a month ago.

All of the necessary verification processes are now completed and it is from now on possible to pay with credit card or with ELV (Germany only) over Heidelpay. In contrast to Moneybookers the whole payment process is now integrated in our shop. There are no popups any more, you don’t have to leave the shop for payment and the shopping cart will still be there if the payment failed!

Additionally to credit card and ELV it is still possible to pay via prepayment (europe only) and PayPal. Regular customers, universities and schools can still order on account. With Heidelpay it would also be possible to integrate the PayPal payment process into our shop (so you aren’t redirected to the PayPal site for payment). This would cost us a little bit more but if it is asked for we could activate that pretty fast now.

We did test the new system with some real orders and everything seemed to work fine. If you have any problems please contact info@tinkerforge.com so we can fix the issues!

Joystick Bricklet Hiccup

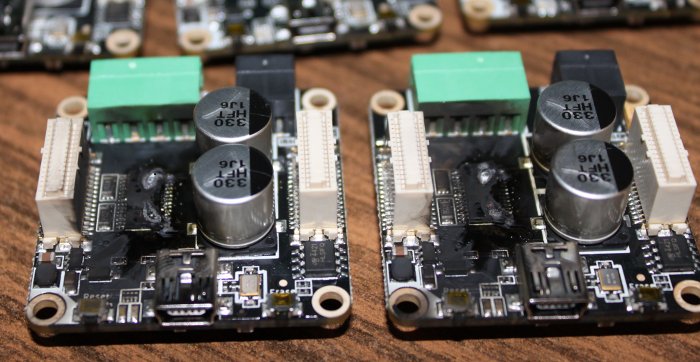
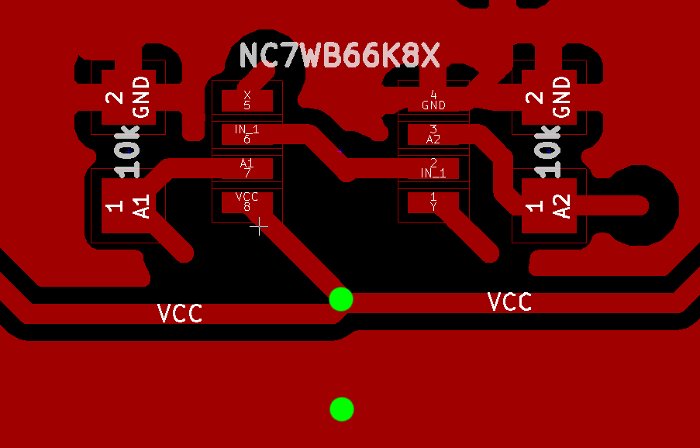
Edit: Unfortunately the new NC7WB66K8X with the same date code have the same problem. The only other solution that we found to circumvent the problem is to put a small capacitor directly in front of the supply voltage of the analog switch. There are of course no pads there, but we found a hack to fix it nevertheless: Fortunately there is a big VCC trace directly at the pad of the NC7WB66K8X and directly below the trace is a big GND plane. This means we can scrape a part of the copper plane and solder on a capacitor this way (see green points).

https://www.tinkerforge.com/static/img/_stuff/nc7wb66k8x.jpg

This is obviously not exactly nice and we will fix this with the production of new Joystick Bricklets. We did discuss all possible alternatives we could think of, but the only other possibility would be to throw away all Joystick Bricklets we have here and add a delay of 1.5 month (until the new Joystick Bricklets arrive).

We will try to ship all open orderes with Joystick Bricklets today, but there are probably too many and some will only go out tomorrow.

Appologies for the problems and the delays!

Orginal blog post:

Unfortunately all orders that include a Joystick Bricklet will have to be delayed for 2-3 days.

The Joystick on the Joystick Bricklet consists of two potentiometers (for the X- and Y-axis). To read out two potis you need two analog-to-digital converters. Since there is only one analog-to-digital pin on a Bricklet port we needed some trick to get it working. For that we added an analog switch (NC7WB66K8X), it allows to demultiplex the two potentiometers.

Now the problem

Recently our circuit board assembler finished the first reel of the NC7WB66K8X. The second reel was newly purchased and it contained the NC7WB66K8X with a newer date code. Unfortunately we found out that Fairchild changed the chip design on the new version of the NC7WB66K8X and it now produces a short circuit if a voltage is applied to the chip before ground.

If you look in a USB connector, you will see that there are some pins that stick out further than others. These pins are the ground pins. Good thinking by the guy that designed the USB connector!

Why is this a problem

It becomes a problem if you connect a Bricklet to an already running Brick. Depending on which site of the Bricklet connector reaches the pins of the Brick first, the NC7WB66K8X makes a short circuit or not. Officially we don’t support hotplug for the Bricklets, but we need it to flash them for the first time and it is just not acceptable that such a small mistake can make a short circuit and possibly destroy a whole stack!

There are two good and one bad news

The good news: We did recognize the problem early and none of the broken Joystick Bricklets were shipped. Also we have found a supplier in China that can supply us with big amounts of the NC7WB66K8X with the old date code!

The bad news: We ran out of Joystick Bricklets with the old analog switch on Friday and the new ones from China did not arrive yet.

Therefore the following holds true

If your order contains a Joystick Bricklet and it is not shipped yet, your order will be delayed for 2-3 more days until we exchanged the faulty chips.

Special easter discount

We currently offer a special 10% easter discount on all of the products in our shop. The discount is valid until april 15th. Make sure to stock up on Bricks and Bricklets before it is too late ;-)!

Chibi Extension capabilities

Since yesterday version 1.1.7 of the Master Brick firmware is online. In the last update we fixed some bugs and we were able to increase the throughput of the Chibi Extension (mostly in the PC-to-Brick direction). To test the capabilities of the Extension we equipped a small track vehicle with Bricks:

To give some concreate numbers, with the current Master Brick firmware we were able to reach the following values:

Messages per second one way (only PC-to-Brick or only Brick-to-PC): Max 125
Messages per second both ways (PC-to-Brick and Brick-to-PC at the same time): Max 65

This is enough to read out the values of the IMU Brick and control the two DC Bricks with a Joystick Bricklet. If you wanted to add lots of sensors to the robot, a small Linux board on the robot would probably be best (such as Beagle Board or Raspberry PI). In this case you could control the robot either directly with the embedded board or you could plug a USB WIFI stick in the board and still control over a PC (use the IP of the board instead of localhost for the connection to the Bricks).

We equipped the track vehicle with a Step-Down Power Supply, a Master Brick, two DC Bricks, an IMU Brick and a Chibi Extension. The Step-Down Power Supply is supplied by two LiPO batteries and the gear motors of the track vehicle use about 1.5A each. This works with the DC Bricks without additional cooling. The IMU Brick is mounted at the top of the stack to reduce the magnetic field of the motors. We recalibrated the magnetometer of the IMU with the IMU Brick mounted on the robot. For an optimal result the IMU Brick could have been mounted a few centimeters higher.