Blog

New Software: Brick Logger

In many applications of the Tinkerforge building blocks it is necessary to log measurements that are later analyzed in a program such as Excel. It is not a huge amount of work to use our API to program a small data logger, insofar you can program. If you need a more convenient solution or if you can’t program there is now a ready to use program: The Brick Logger.

https://www.tinkerforge.com/de/doc/_images/Screenshots/brick_logger_devices.jpg

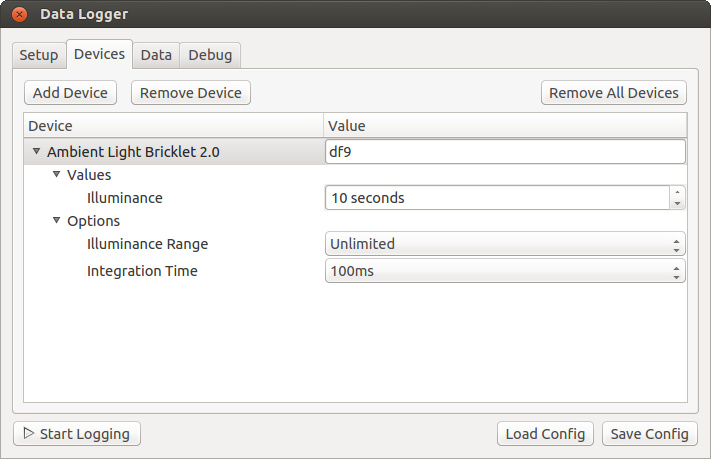
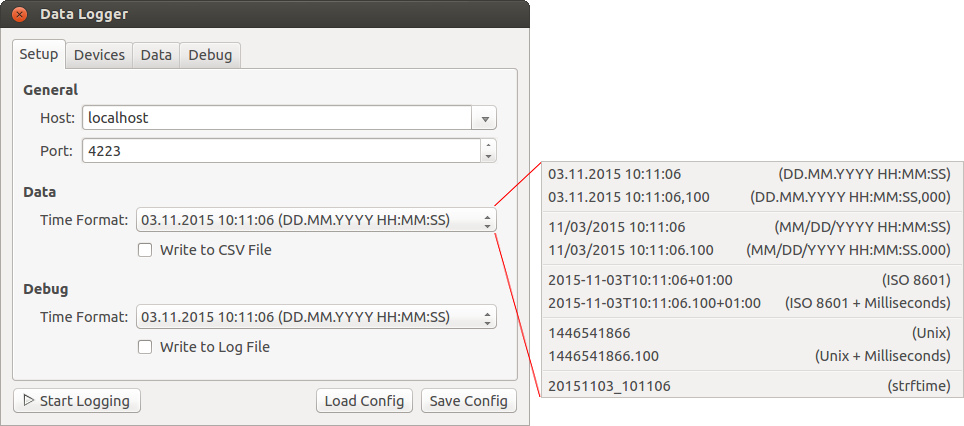
The Brick Logger is integrated into the newest release of the Brick Viewer (version 2.3.0). You can use the GUI to configure devices (Bricks or Bricklets) and corresponding sensor values that are to be logged. The output format as well as the host can be configured. Thus it is possible to log measured data directly from a Brick/Bricklet, from a different PC or from a stack with Ethernet/WIFI Extension.

You can configure and start the logger directly from within the Brick Viewer. Additionally you can save the configuration and use a Brick-Logger-Python-Script without Brick Viewer. As an additional alternative we offer a RED Brick program that can be uploaded to the RED Brick.

A more detailed description can be found in the Brick Logger documentation.

Tinkerforge Workbench

Today we have released the Tinkerforge Workbench. It is perfect for everybody that wants to experiment with Tinkerforge components and wants to present the project in a tidy way.

https://www.tinkerforge.com/static/img/_stuff/workbench_3x_600.jpg

It is a plastic case with a size of 240x140mm and a slightly tilted front panel. The front panel has a grid of 3mm drill holes, that have a distance of 5mm to each other. You can mount all of the Tinkerforge modules on this grid, as well as other circuit boards or other hardware projects. Cables can be put through slots and guided unobtrusively at the bottom site of the case. The resulting projects are thus always clean and tidy, even if they have complex wiring.

https://www.tinkerforge.com/static/img/_stuff/workbench_rpi_bottom_600.jpg

In the middle of the front panel is enough space to either mount a stack of Bricks or a Raspberry Pi (which unfortunately does not have a 5mm compatible grid). If you use a Raspberry Pi, you can still put up to four Bricks at the bottom side of the front panel (inside of the case). If that is not enough, you can of course also mount Bricks at any other position of the case.

https://www.tinkerforge.com/static/img/_stuff/workbench_rpi_wo_display_600.jpg

The struts at the front and at the back also have 3mm drill holes. These can be used to mount other construction. As an example we attached a simple HDMI display mount made with MakerBeams:

https://www.tinkerforge.com/static/img/_stuff/workbench_rpi_display_keyboard_600.jpg

If you miss a mounting option somewhere, you can easily drill new holes into the acrylic plastic. We wish you lots of fun with this case and hope to be able to see some photos of your projects!

https://www.tinkerforge.com/static/img/_stuff/workbench_red_600.jpghttps://www.tinkerforge.com/static/img/_stuff/workbench_rpi_display_tilted_600.jpg

New RS485 Extension

We now have the new RS485 Extension (Version 1.1) in our shop.

https://www.tinkerforge.com/en/doc/_images/Extensions/extension_rs485_v11_tilted_600.jpg

With hardware version 1.1 we added additional filters for supression of interferences. This means that the RS485 Extension is now even more resistent to interferences.

The RS485 Extension in version 1.1 behaves the same as the old Extension in version 1.0. There are no software changes necessary and the two different versions are of course compatible to each other.

Build environment for Brick firmware development

We often get asked how to set-up a build environment that can be used to modify and compile Brick firmwares or Bricklet plugins and how to change or add API to the Bindings.

A script that sets up a build environment for the complete Tinkerforge ecosystem is now available. Additionally we wrote a tutorial that explains how to use different parts of the build environment.

With the build environment you can:

* Modify and compile Brick firmwares
* Modify and compile Bricklet plugins
* Modify and generate APIs/Bindings for all of our supported programming languages
* Modify and compile Brick Viewer/Daemon
* View and modify schematics and layout files for Bricks and Bricklets (with KiCad)
* View and modify case CAD files (with FreeCAD).
* Modify and build the documentation

MQTT with Tinkerforge

https://www.tinkerforge.com/static/img/_stuff/mqttorg-glow.png

Nowadays IoT (Internet of Things) and M2M (machine to machine) communication is a much talked about topic. One of the big hurdles seems to be to establish one standard/protocol to communicate between devices and machines. Our solution to this problem has always been to directly provide Bindings for a big number of programming languages. This guarantees easy usage and there is no need for the protocol-question. To show that it is nevertheless easy to talk to Bricks and Bricklets with a M2M protocol, we wrote a Brick MQTT Proxy.

The Brick MQTT Proxy is a Python script that supports most of our Bricklets. The script is designed to be easy to extend. If you are missing a function or similar, you can easily add it yourself. More information can be found in the Brick MQTT Proxy documentation.

MQTT was already developed in the year 2000 and is meant as a protocol to exchange data between devices/machines. Is is a Internet of Things protocol that was ahead of its time. MQTT uses a so called Broker. It exchanges data between Publishers (devices that want to send data) and Subscribers (devices that want to receive data). Data sets are called Topics (for example a temperature). Topics are offered by Publishers and subscribed to by Subscribers. A device can be Subscriber and Publisher at the same time and for different Topics. If you want to now more about this, you can for example read the article What is MQTT and how does it work with WebSphere MQ?.

We look forward to your feedback regarding the Proxy!